Linux 基础
支持的版本:已审查的示例:Ubuntu 24.04 LTS、Debian 13、Amazon Linux 2023;软件包/服务名称因发行版而异 最后更新:September 15, 2026
了解 Linux 基础对于理解 Kubernetes 和容器技术至关重要。本文档涵盖了 Kubernetes 环境中特别重要的核心 Linux 概念。
如果您刚接触终端和网络,请从从零开始学习 Linux 网络的第 1 课开始。之后,本文档也可作为容器和内核概念的深入参考。
实验环境设置
要跟随本文档中的示例操作,您需要以下环境:
必需环境
- Linux 操作系统(建议使用 Ubuntu 24.04 LTS、Debian 13 或 Amazon Linux 2023)
- 终端访问权限
- sudo 权限
云环境设置(可选)
请使用隔离的训练 VM。对于 AWS,请选择具有正确架构和 Region 的 AL2023;旧的硬编码 AMI 不可移植。AWS 列出的 AL2 标准支持已于 2026 年 6 月 30 日结束。以下内容仅查询 AMI;请另行安排实例创建和权限范围控制,然后连接到现有实例。
# Read-only AMI discovery; select a kernel-specific parameter when reproducibility is required.
aws ssm get-parameter --region us-east-1 \
  --name /aws/service/ami-amazon-linux-latest/al2023-ami-kernel-default-x86_64 \
  --query Parameter.Value --output text

# SSH connection
ssh -i your-key.pem ec2-user@your-instance-public-ip
本地环境设置(可选)
对于本地练习,您可以使用以下任一环境:
- VirtualBox + Vagrant:设置虚拟机环境
- WSL2:在 Windows 上使用 Linux 环境
- Docker:适合基本 Shell 练习;普通容器不提供完整的 systemd 主机,也不具备进行主机网络/内核练习所需的权限。
目录
- Linux 内核和用户空间
- 进程管理
- 命名空间
- cgroups(控制组)
- 文件系统
- 网络基础
- 安全上下文
- systemd 和服务管理
- 内核参数和模块
- 系统资源限制
- 日志管理
- DNS 和网络配置
- 时间同步
- 软件包管理
- 基本 Linux 命令
- 容器相关的 Linux 功能
Linux 内核和用户空间
内核的作用
关键概念:Linux 内核是操作系统的核心,充当硬件与软件之间的中介。
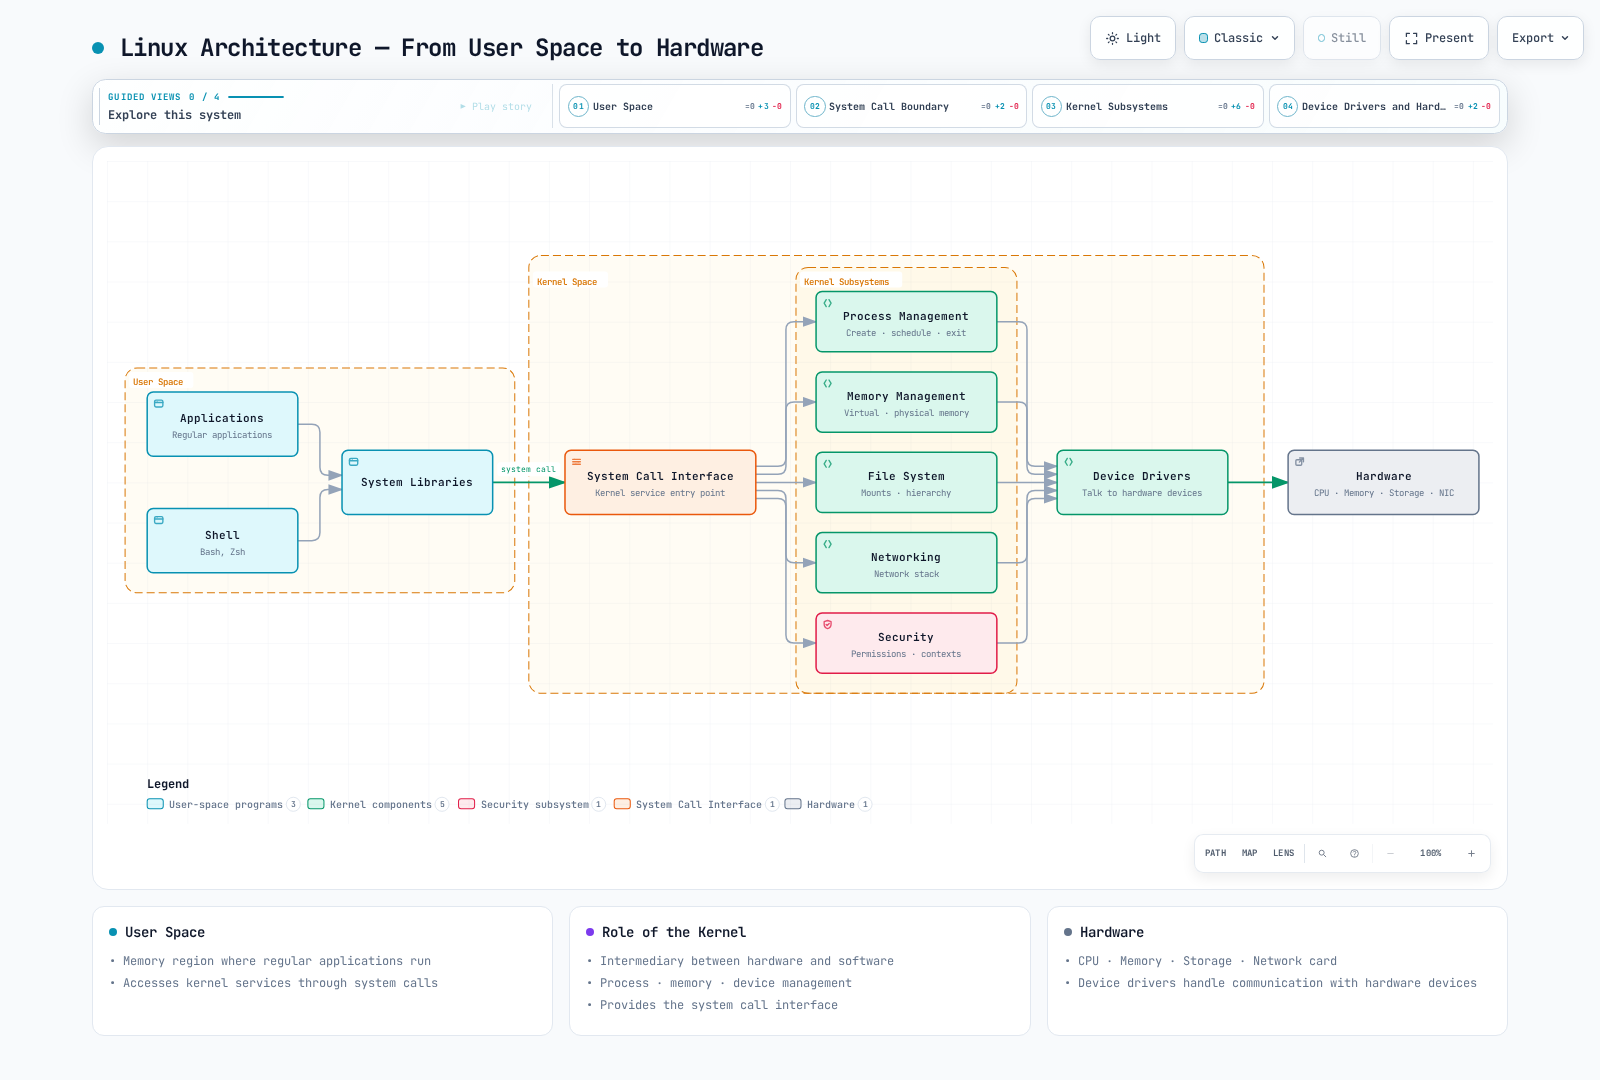
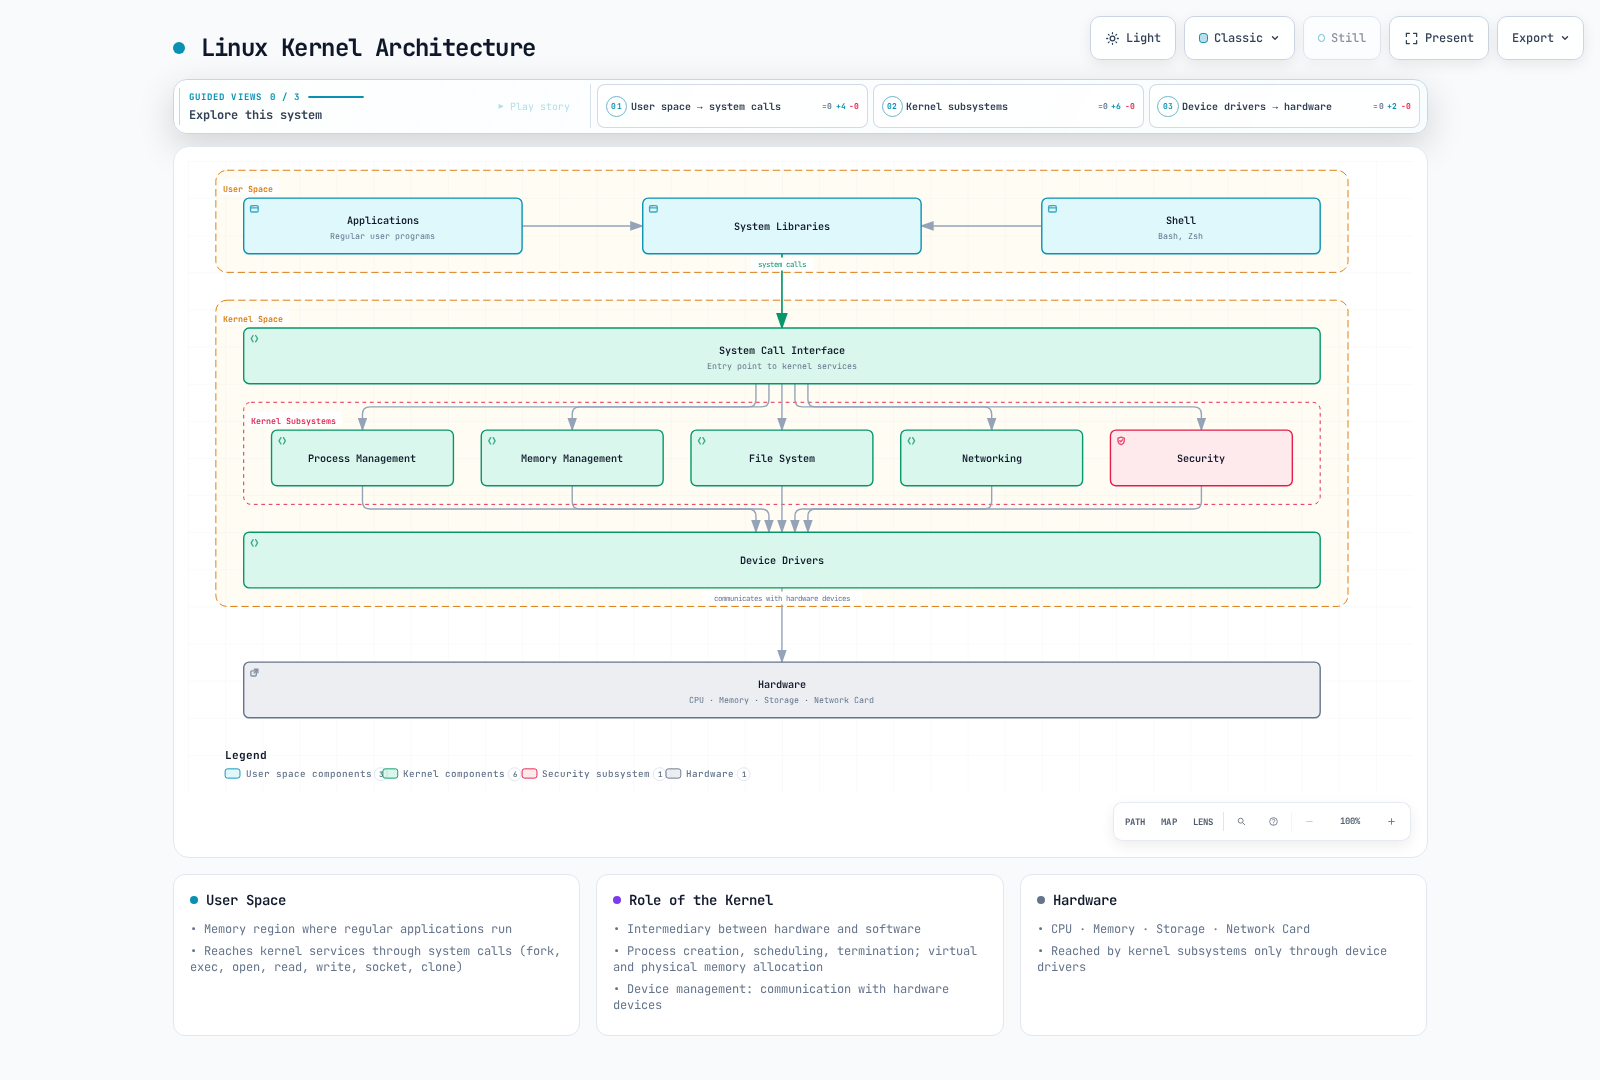
Linux 内核是操作系统的核心,充当硬件与软件之间的中介。其主要功能包括:
- 进程管理:进程创建、调度和终止
- 内存管理:虚拟内存和物理内存分配
- 设备管理:与硬件设备通信
- 系统调用接口:为用户空间程序提供访问内核服务的方法
用户空间
用户空间是常规应用程序运行的内存区域。用户空间程序通过系统调用访问内核服务。
系统调用示例
| 系统调用 | 描述 | 相关命令 |
|---|---|---|
fork() | 创建新进程 | ps, top |
exec() | 执行程序 | bash, sh |
open() | 打开文件 | cat, less |
read() | 从文件读取数据 | cat, grep |
write() | 将数据写入文件 | echo, tee |
socket() | 创建网络 socket | netstat, ss |
clone() | 创建命名空间 | unshare, docker |
Linux 内核架构
进程管理
进程和线程
- 进程:运行中程序的实例,拥有独立的内存空间
- 线程:在进程内执行的工作单元;同一进程的线程共享内存空间
进程状态
- 运行中:当前正在 CPU 上执行
- 等待中:等待 I/O 完成或事件发生
- 就绪:已准备运行但正在等待 CPU 分配
- 僵尸:已终止但父进程尚未检查其状态
- 已停止:暂停状态
关键进程管理命令
# View process list
ps aux

# Real-time process monitoring
top

# Enhanced real-time process monitoring
htop

# Terminate process
kill <PID>
killall <process-name>

# Background execution
command &

# Job management
jobs
fg %<job-number>
bg %<job-number>
命名空间
命名空间是 Linux 内核的一项功能,可隔离进程组,使每个组都能独立看到系统资源。这是容器技术的核心要素。
主要命名空间类型
- PID Namespace:进程 ID 隔离,使容器拥有自己的 PID 1(init)
- Network Namespace:网络栈隔离(接口、IP 地址、路由表、防火墙等),是容器网络的基础
- Mount Namespace:隔离挂载表;文件系统内容和容器根目录隔离需要适当的挂载/根目录配置
- UTS Namespace:主机名和 NIS 域名隔离(不是 DNS 域),为每个容器提供唯一的主机标识符
- IPC Namespace:进程间通信资源隔离(共享内存、信号量、消息队列等),对微服务架构中的服务隔离很重要
- User Namespace:用户和组 ID 隔离,支持以 rootless 方式执行容器以增强安全性
- cgroup Namespace:cgroup 根目录隔离,在容器内提供资源限制可见性
- Time Namespace:虚拟化 CLOCK_MONOTONIC/CLOCK_BOOTTIME 偏移量(Linux 5.6+),而非实时墙钟
命名空间相关命令
# Check process namespaces
ls -la /proc/<PID>/ns/

# Execute command in new namespace
sudo unshare --mount --net --pid --fork --mount-proc bash

# Enter existing process's namespace
sudo nsenter --target <PID> --net --pid bash

# Create and manage network namespaces
ip netns add <name>
ip netns exec <name> <command>

# Using user namespace for rootless container execution
unshare --user --map-root-user --mount --net bash

# Using time namespace (Linux 5.6+)
sudo unshare --time --fork bash
cgroups(控制组)
cgroups 是 Linux 内核的一项功能,用于限制和隔离进程组的资源使用。它用于实现容器资源限制。它是云原生环境和 Kubernetes 中资源管理的核心技术。
cgroups 的主要功能
- CPU 时间限制:限制进程组可用的 CPU 时间并分配 CPU 核心
- 内存限制:限制进程组可用的内存并控制 OOM(Out of Memory)行为
- 块 I/O 限制:磁盘 I/O 带宽限制和优先级设置
- 网络流量控制:将 tc/eBPF 与 cgroup 分类结合;cgroup v2 没有独立的网络带宽控制项
- 设备访问控制:对特定设备的访问控制和权限管理
- PIDs 控制:限制进程创建数量以防止 fork bomb
- Freezer:暂停和恢复进程组(用于暂停容器)
- cpuset:将进程绑定到特定 CPU 核心和 NUMA 节点
cgroups v1 和 v2
- cgroups v1:每种资源类型各有独立的层级结构,仍用于旧版系统
- cgroups v2:统一的单一层级结构,提供更一致的管理,是现代发行版的默认值
- 混合模式:同时使用 v1 和 v2,在利用新功能的同时保持兼容性
cgroups 相关命令
# Check cgroups
ls -la /sys/fs/cgroup/                     # cgroups v2
ls -la /sys/fs/cgroup/cpu /sys/fs/cgroup/memory  # cgroups v1

# cgroups management through systemd (modern approach)
sudo systemctl set-property --runtime <service-name> CPUQuota=20%
sudo systemctl set-property --runtime <service-name> MemoryMax=1G
sudo systemctl set-property --runtime <service-name> IOWeight=500

# Check process cgroup
cat /proc/<PID>/cgroup

# Run only the example command inside a transient cgroup managed by systemd.
sudo systemd-run --scope -p CPUQuota=20% -p MemoryHigh=768M -p MemoryMax=1G sleep 60
# memory.max/high take one byte count or "max"; cpu.max takes quota and period.
# Do not move your shell into systemd-owned user.slice or edit its control files.

# Container runtime and cgroups
podman stats  # Monitor container resource usage
docker run --cpus=0.5 --memory=512m nginx  # Set resource limits
文件系统
文件系统层级结构
Linux 采用从单一根目录(/)开始的层级式文件系统结构。
关键目录:
/bin:基本命令/sbin:系统管理命令/etc:系统配置文件/home:用户主目录/var:可变数据(日志、缓存等)/tmp:临时文件/usr:用户程序和数据/proc:进程和内核信息(虚拟文件系统)/sys:系统和硬件信息(虚拟文件系统)
文件系统类型
- ext4:常见的 Linux 文件系统;默认值因发行版而异
- XFS:适合大型文件系统
- Btrfs:提供快照和压缩等高级功能
- OverlayFS:将多个目录表示为单个目录(容器中常用)
- tmpfs:基于内存的临时文件系统;除非为其禁用了 swap,否则页面可能被交换出去
挂载和卷
# Mount file system
mount -t <filesystem-type> <source> <mount-point>

# Check mounted file systems
mount
df -h

# Unmount file system
umount <mount-point>
网络基础
网络接口
- lo:回环接口(127.0.0.1)
- eth0, ens3 等:物理网络接口
- docker0, cni0 等:虚拟桥接接口(容器网络)
网络配置命令
# Check network interfaces
ip addr show
ifconfig

# Check routing table
ip route
route -n

# Check network connections
netstat -tuln
ss -tuln

# Network packet analysis
tcpdump -i <interface>
网络命名空间和虚拟接口
# Create network namespace
ip netns add <namespace-name>

# Create virtual ethernet pair
ip link add <veth1> type veth peer name <veth2>

# Connect virtual interface to namespace
ip link set <veth2> netns <namespace-name>
安全上下文
用户和组
- UID(User ID):用户标识符
- GID(Group ID):组标识符
- root(UID 0):拥有管理权限的特殊用户
文件权限
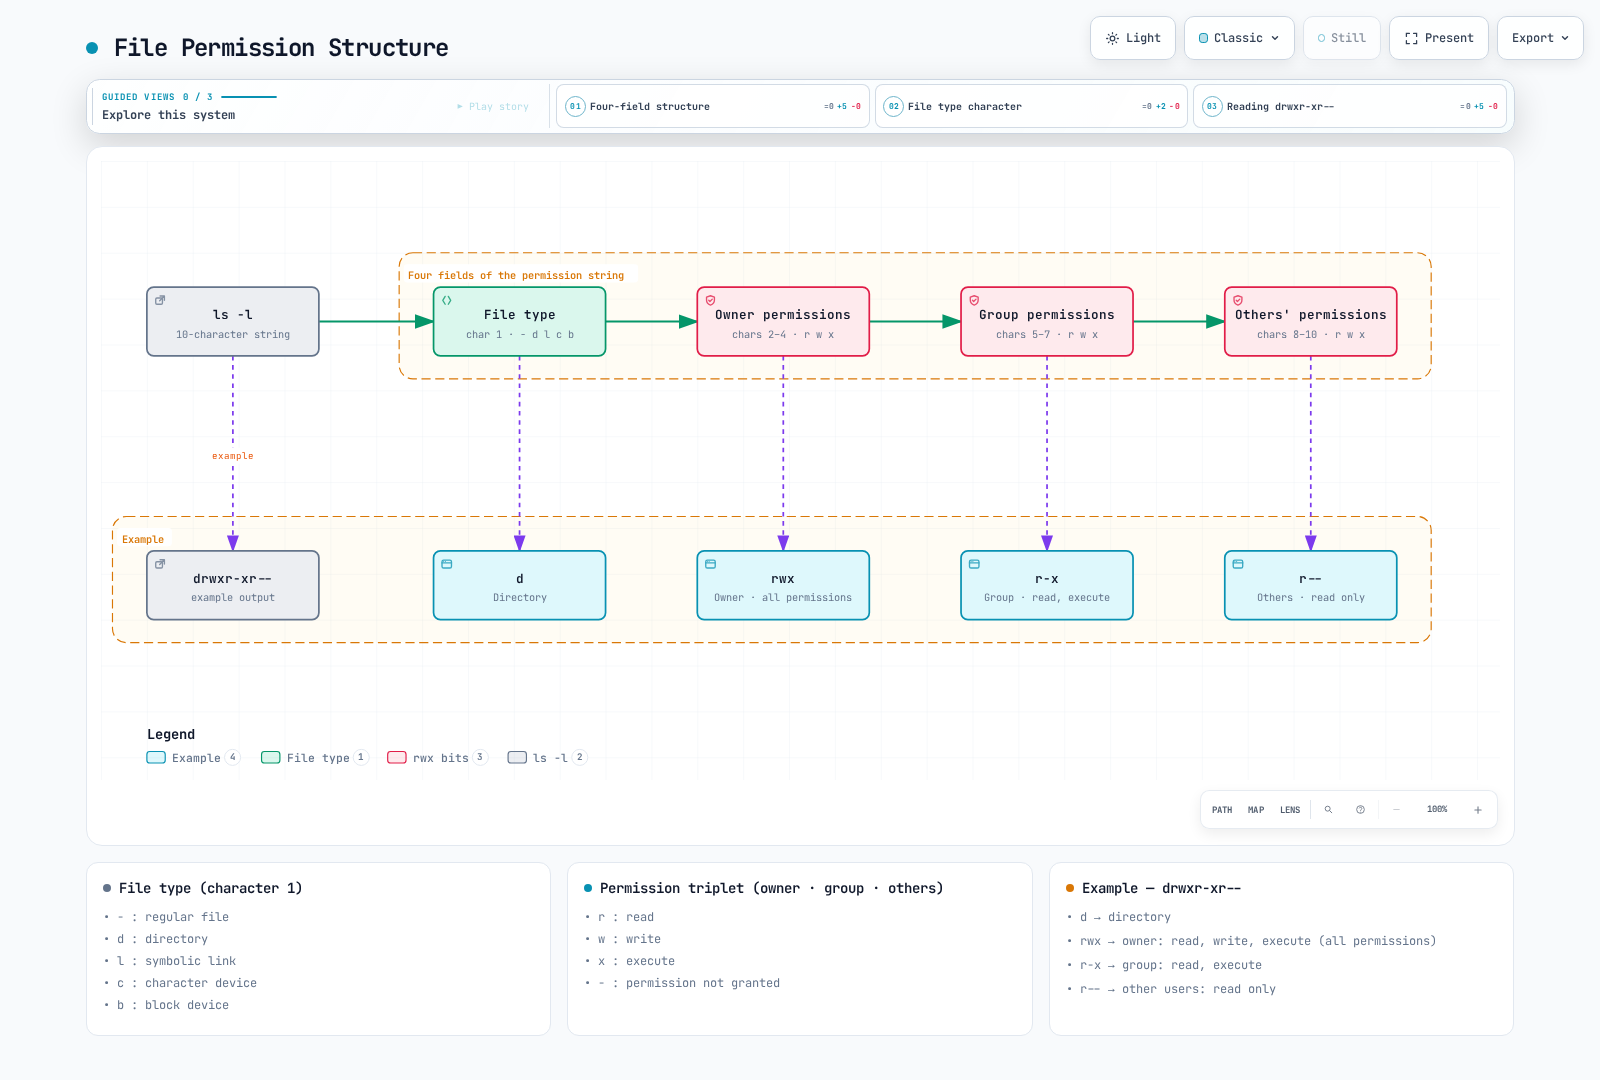
Linux 文件权限由所有者、组和其他用户的读取(r)、写入(w)和执行(x)权限组成。
权限相关命令
# Change file permissions
chmod 755 <filename>  # rwxr-xr-x
chmod u+x <filename>  # Add execute permission for owner

# Change file owner
chown <user>:<group> <filename>

# Special permissions
chmod 4755 <filename>  # Set setuid
chmod 2755 <filename>  # Set setgid
chmod 1755 <filename>  # Set sticky bit
SELinux 和 AppArmor
- SELinux(Security-Enhanced Linux):由 NSA 开发的强制访问控制系统
- AppArmor:使用按程序划分的安全配置文件的访问控制系统
# Check SELinux status
getenforce

# Only in a reviewed isolated lab: permissive disables enforcement system-wide.
# sudo setenforce 0
# Restore the original mode after investigation; do not use permissive as a generic fix.

# Check AppArmor status
aa-status

# AppArmor profile management
aa-enforce /etc/apparmor.d/<profile>
aa-complain /etc/apparmor.d/<profile>
systemd 和服务管理
systemd 是现代 Linux 系统的 init 系统和服务管理器。它用于管理 Kubernetes 节点上的 kubelet 和 containerd 等核心服务。
systemd 的主要功能
- 服务管理:启动、停止、重启、启用/禁用系统服务
- 依赖关系管理:自动进行服务依赖关系管理和并行启动
- 日志记录:通过 journald 集成日志管理
- 定时器:可替代 cron 的 timer 单元
- 资源管理:通过 cgroups 提供每服务资源限制
systemd 单元类型
- service:系统服务(例如 kubelet.service、containerd.service)
- socket:基于 socket 的激活
- target:单元组(类似于运行级别)
- timer:计划任务
- mount:文件系统挂载
- device:设备单元
systemd 命令
# Check service status
systemctl status kubelet
systemctl status containerd

# Service control
systemctl start <service>
systemctl stop <service>
systemctl restart <service>
systemctl reload <service>  # Reload configuration

# Set auto-start at boot
systemctl enable <service>
systemctl disable <service>

# Check service logs
journalctl -u kubelet -f  # Real-time logs
journalctl -u kubelet --since "1 hour ago"
journalctl -u kubelet --no-pager

# List all services
systemctl list-units --type=service
systemctl list-unit-files --type=service

# Check failed services
systemctl --failed

# Reload systemd configuration
systemctl daemon-reload
编写 systemd 单元文件
一个小型训练服务说明了单元结构。使用 systemctl cat kubelet 检查 kubelet;请保留由发行版/kubeadm 管理的单元和 drop-in,而非替换它们。
# /etc/systemd/system/linux-basics-demo.service
[Unit]
Description=Linux basics training service
Documentation=man:systemd.service(5)
Wants=network-online.target
After=network-online.target

[Service]
ExecStart=/usr/bin/sleep infinity
Restart=on-failure
RestartSec=10

[Install]
WantedBy=multi-user.target
systemd 资源限制
以下命令假定上面的训练单元已保存,且已在实验 VM 中完成 daemon-reload。请勿将这些教学限制应用于生产 kubelet/containerd。
# CPU limit (20%)
sudo systemctl set-property --runtime linux-basics-demo.service CPUQuota=20%

# Memory limit (1GB)
sudo systemctl set-property --runtime linux-basics-demo.service MemoryMax=1G

# I/O weight setting (1-10000, default 100)
sudo systemctl set-property --runtime linux-basics-demo.service IOWeight=500

# Check settings
systemctl show linux-basics-demo.service | grep -E 'CPUQuota|MemoryMax|IOWeight'
内核参数和模块
通过 sysctl 设置内核参数
sysctl 是用于查询和修改运行中内核参数的工具。在配置 Kubernetes 集群时,它对于网络和系统参数调优至关重要。
CNI 特定的 sysctl 设置和调优示例
这些并非每个 Kubernetes 节点的必需默认设置。请检查所选的 IP 协议族、CNI 和 Service 代理要求。桥接 netfilter 设置仅适用于使用 br_netfilter 的配置。不要在未经测量的情况下将性能/ARP/conntrack 值应用于生产环境;请记录现有值并使用隔离的训练 VM。
# Enable IP forwarding (required for container networking)
sudo sysctl -w net.ipv4.ip_forward=1
sudo sysctl -w net.ipv6.conf.all.forwarding=1

# Enable bridge traffic to pass through iptables (only for CNI configurations requiring bridge netfilter)
sudo sysctl -w net.bridge.bridge-nf-call-iptables=1
sudo sysctl -w net.bridge.bridge-nf-call-ip6tables=1

# Increase maximum file descriptor count
sudo sysctl -w fs.file-max=2097152

# Network performance tuning
sudo sysctl -w net.core.somaxconn=32768
sudo sysctl -w net.ipv4.tcp_max_syn_backlog=8192
sudo sysctl -w net.core.netdev_max_backlog=16384

# ARP cache settings (for large clusters)
sudo sysctl -w net.ipv4.neigh.default.gc_thresh1=80000
sudo sysctl -w net.ipv4.neigh.default.gc_thresh2=90000
sudo sysctl -w net.ipv4.neigh.default.gc_thresh3=100000

# Check current settings
sysctl net.ipv4.ip_forward
sysctl -a | grep bridge-nf-call

# Persistent settings (/etc/sysctl.conf or /etc/sysctl.d/*.conf)
cat <<EOF | sudo tee /etc/sysctl.d/99-kubernetes.conf
net.ipv4.ip_forward = 1
net.bridge.bridge-nf-call-iptables = 1
net.bridge.bridge-nf-call-ip6tables = 1
EOF

# Apply settings
sudo sysctl --system
内核模块管理
模块取决于运行时/CNI/存储选择。自 Kubernetes 1.35 起,IPVS 模式已弃用;以下 IPVS 命令仅适用于现有的 IPVS 集群。请勿在新集群中预加载列出的所有模块。
# Load modules
sudo modprobe overlay  # OverlayFS (container storage)
sudo modprobe br_netfilter  # Bridge networking
sudo modprobe ip_vs  # IPVS load balancing (kube-proxy IPVS mode)
sudo modprobe ip_vs_rr  # Round Robin algorithm
sudo modprobe ip_vs_wrr  # Weighted Round Robin
sudo modprobe ip_vs_sh  # Source Hashing

# Check loaded modules
lsmod | grep overlay
lsmod | grep br_netfilter

# Check module information
modinfo overlay

# Set auto-load at boot
cat <<EOF | sudo tee /etc/modules-load.d/kubernetes.conf
overlay
# Add br_netfilter only if required by the chosen CNI.
EOF

# Unload module
sudo modprobe -r <module-name>
内核版本和功能检查
# Check kernel version
uname -r

# Check kernel compile options
cat /boot/config-$(uname -r) | grep OVERLAY
cat /boot/config-$(uname -r) | grep NETFILTER

# Check available kernel features
cat /proc/filesystems  # Supported file systems
cat /proc/sys/net/ipv4/ip_forward  # IP forwarding status
系统资源限制
ulimit - 每用户资源限制
ulimit 限制进程可以使用的系统资源。Kubernetes 节点可能需要进行调整以确保拥有足够的资源。
# Check current limits
ulimit -a

# Key limit items
ulimit -n      # Number of open file descriptors
ulimit -u      # Maximum number of processes
ulimit -m      # RSS limit; not enforced on modern Linux
ulimit -v      # Virtual memory size

# Change limits (current session)
ulimit -n 65536  # Increase file descriptors to 65536

# Persistent settings (/etc/security/limits.conf)
sudo tee -a /etc/security/limits.conf <<EOF
*               soft    nofile          65536
*               hard    nofile          65536
*               soft    nproc           32768
*               hard    nproc           32768
EOF

# Settings for specific users/groups
sudo tee -a /etc/security/limits.conf <<EOF
root            soft    nofile          65536
root            hard    nofile          65536
@docker         soft    nofile          65536
@docker         hard    nofile          65536
EOF
PAM 限制设置
limits.conf 适用于使用 pam_limits 的新登录会话。普通 systemd 系统服务不会自动继承它;请使用诸如 LimitNOFILE/TasksMax 的服务 drop-in。现有会话/进程不会改变。请检查发行版的 PAM 链,而不要盲目追加重复的 common-session 条目。
# Inspect the active configuration; PAM file names differ by distribution.
grep -R pam_limits.so /etc/pam.d
systemctl show kubelet -p LimitNOFILE -p TasksMax
每进程资源检查
# Check current resource limits for a process
cat /proc/<PID>/limits

# Check file descriptors for a specific process
find /proc/<PID>/fd -mindepth 1 -maxdepth 1 -printf '%f\n' | wc -l
日志管理
journald - systemd 集成日志
journald 是 systemd 的日志系统,用于管理 Kubernetes 节点上的系统服务日志。
# Full system logs
journalctl

# Specific service logs
journalctl -u kubelet
journalctl -u containerd
journalctl -u docker

# Real-time logs (similar to tail -f)
journalctl -u kubelet -f

# Time range specification
journalctl --since "2025-11-24 10:00:00"
journalctl --since "1 hour ago"
journalctl --since yesterday
journalctl --until "2025-11-24 12:00:00"

# Filter by priority
journalctl -p err        # Error and higher severity (0-3)
journalctl -p warning    # Warnings and above
journalctl -p debug      # All including debug

# Change output format
journalctl -u kubelet -o json        # JSON format
journalctl -u kubelet -o json-pretty # Pretty JSON
journalctl -u kubelet -o cat         # Messages only

# Boot logs
journalctl -b           # Current boot logs
journalctl -b -1        # Previous boot logs
journalctl --list-boots # Boot list

# Check disk usage
journalctl --disk-usage

# Clean logs
journalctl --vacuum-time=7d   # Remove archived journal files older than 7 days
journalctl --vacuum-size=1G   # Remove oldest archived journals toward 1GiB total
journald 配置
# journald configuration file
sudo vi /etc/systemd/journald.conf

# Key configuration options
# Storage=persistent        # Persistent storage to disk
# SystemMaxUse=1G          # Maximum disk usage
# SystemKeepFree=500M      # Minimum free space
# MaxRetentionSec=1month   # Maximum retention period

# Apply configuration
sudo systemctl restart systemd-journald
传统 syslog
有些系统仍然使用 syslog。
# syslog file locations
# /var/log/syslog         # Debian/Ubuntu
# /var/log/messages       # RHEL/CentOS

# Real-time log viewing
tail -f /var/log/syslog

# Log search
grep "kubelet" /var/log/syslog
grep -i "error" /var/log/syslog
日志轮转
对于普通应用程序文件,请使用 logrotate。copytruncate 存在复制/截断竞争条件,可能丢失记录;当应用程序支持时,优先选择重新打开日志。Kubelet 自行管理 CRI 容器日志轮转。
# logrotate configuration
sudo vi /etc/logrotate.d/linux-basics-demo

# File content (only application text logs not managed by kubelet):/var/log/linux-basics-demo/*.log {
daily
rotate 7
missingok
notifempty
compress
delaycompress
copytruncate
}# Run rotation manually
sudo logrotate -f /etc/logrotate.d/linux-basics-demoDNS 和网络配置
DNS 配置
NetworkManager/systemd-resolved 可能管理主机的 resolv.conf,因此请先检查它。诸如 8.8.8.8 的公共解析器无法解析 cluster.local Service。ClusterFirst Pod 使用由 kubelet 配置的集群 DNS;向主机解析器添加集群搜索后缀不会提供集群 DNS 连接。
# On the Linux host
cat /etc/resolv.conf
cat /etc/hosts
# If a cluster is available, inspect its actual DNS Service address.
kubectl -n kube-system get service kube-dns
# Run inside an existing Pod with DNS utilities and ClusterFirst policy:
# nslookup kubernetes.default.svc.cluster.local
以下展示了 Pod 解析器文件格式。请使用实际值替换 IP、namespace 和集群域名;不要将其复制到主机配置中。
nameserver <cluster-dns-service-ip>
search <namespace>.svc.cluster.local svc.cluster.local cluster.local
options ndots:5
systemd-resolved
现代 Linux 发行版使用 systemd-resolved。
# Check systemd-resolved status
systemctl status systemd-resolved

# Check DNS servers
resolvectl status

# DNS cache statistics
resolvectl statistics

# Clear DNS cache
resolvectl flush-caches
网络配置文件
确定发行版使用 NetworkManager 还是 netplan。Netplan YAML 是 /etc/netplan 下的文件内容,而不是 Shell 命令。在更改远程寻址/路由前,请准备恢复路径,并使用 netplan try 验证。
nmcli connection show
nmcli device status
# On a netplan-based installation:
ls /etc/netplan# Example netplan file: replace eth0 with the actual interface name.
network:
version: 2
ethernets:
eth0:
dhcp4: truesudo netplan generate
sudo netplan try时间同步
时间同步在分布式系统中非常重要。Kubernetes 集群中的所有节点都必须保持准确的时间。
chronyd(推荐)
chronyd 是适合各种网络条件的 NTP 客户端/服务器。同步性能取决于时钟、时间源和配置。
# Install chronyd (RHEL/CentOS)
sudo yum install chrony

# Install chronyd (Ubuntu/Debian)
sudo apt install chrony

# Check the installed unit: chronyd on RHEL/Amazon Linux, chrony on Debian/Ubuntu.
systemctl status chronyd

# Check time synchronization status
chronyc tracking

# NTP server list
chronyc sources

# Detailed information
chronyc sourcestats

# Manual time synchronization
# Only during a reviewed maintenance window; stepping can disrupt time-sensitive workloads.
# sudo chronyc makestep
chronyd 配置
RHEL 系列系统通常使用 /etc/chrony.conf;Debian/Ubuntu 使用 /etc/chrony/chrony.conf。在将其替换为公共服务器之前,请检查发行版/提供商设置(包括 EC2 上的 Amazon Time Sync Service)。以下为配置文件内容。
# Choose an approved reachable time source.
server <approved-ntp-server> iburst
# Permit stepping only during the first three clock updates.
makestep 1.0 3# Choose the unit actually installed on your distribution:
systemctl status chronyd.service # RHEL/Amazon Linux
systemctl status chrony.service # Debian/Ubuntu
chronyc tracking
chronyc sourcestimesyncd(特定于发行版的选择)
Ubuntu 在 25.10 中将其默认时间服务切换为 chrony;较早的发行版/镜像可能使用 systemd-timesyncd。请只使用一个活动的时间服务。show-timesync 专用于 timesyncd;请使用 chronyc 检查 chrony。
timedatectl status
# Only for installations using systemd-timesyncd:
timedatectl show-timesync --all
systemctl status systemd-timesyncd# /etc/systemd/timesyncd.conf: use approved servers for this environment.
[Time]
NTP=<approved-ntp-server># After editing a timesyncd installation:
sudo systemctl restart systemd-timesyncd时区设置
# Check current time and timezone
timedatectl

# List timezones
timedatectl list-timezones

# Change timezone
sudo timedatectl set-timezone Asia/Seoul

# Manually set time (when NTP is disabled)
: "${LAB_TIME:?Set an intentional time for an isolated VM with NTP disabled}"
# sudo timedatectl set-time "$LAB_TIME"

# Enable/disable NTP
sudo timedatectl set-ntp true
软件包管理
用于安装和管理 Kubernetes 及相关工具的软件包管理器用法。
apt(Debian/Ubuntu)
# Update package list
sudo apt update

# Upgrade packages
sudo apt upgrade

# Install package
sudo apt install <package-name>

# Remove package
sudo apt remove <package-name>
sudo apt purge <package-name>  # Remove configuration files as well

# Search packages
apt search <keyword>

# Package information
apt show <package-name>

# List installed packages
apt list --installed

# Add repository (Kubernetes example)
set -o pipefail
: "${KUBERNETES_MINOR:?Choose a supported cluster-compatible minor, for example v1.37}"
sudo apt install -y ca-certificates curl gnupg
sudo mkdir -p -m 755 /etc/apt/keyrings
curl -fsSL "https://pkgs.k8s.io/core:/stable:/${KUBERNETES_MINOR}/deb/Release.key" | \
  sudo gpg --dearmor -o /etc/apt/keyrings/kubernetes-apt-keyring.gpg
echo "deb [signed-by=/etc/apt/keyrings/kubernetes-apt-keyring.gpg] https://pkgs.k8s.io/core:/stable:/${KUBERNETES_MINOR}/deb/ /" | \
  sudo tee /etc/apt/sources.list.d/kubernetes.list

# Clean unnecessary packages
sudo apt autoremove
sudo apt autoclean
yum/dnf(RHEL/CentOS/Fedora)
# Install package
sudo yum install <package-name>
sudo dnf install <package-name>  # Fedora/RHEL 8+

# Update packages
sudo yum update
sudo dnf update

# Remove package
sudo yum remove <package-name>
sudo dnf remove <package-name>

# Search packages
yum search <keyword>
dnf search <keyword>

# Package information
yum info <package-name>
dnf info <package-name>

# List installed packages
yum list installed
dnf list installed

# Add repository (Kubernetes example)
: "${KUBERNETES_MINOR:?Choose a supported cluster-compatible minor, for example v1.37}"
cat <<EOF | sudo tee /etc/yum.repos.d/kubernetes.repo
[kubernetes]
name=Kubernetes
baseurl=https://pkgs.k8s.io/core:/stable:/${KUBERNETES_MINOR}/rpm/
enabled=1
gpgcheck=1
gpgkey=https://pkgs.k8s.io/core:/stable:/${KUBERNETES_MINOR}/rpm/repodata/repomd.xml.key
exclude=kubelet kubeadm kubectl cri-tools kubernetes-cni
EOF

# Clean cache
sudo yum clean all
sudo dnf clean all
软件包版本锁定
Kubernetes 组件具有版本兼容性要求,因此应防止自动更新。
# apt (Ubuntu/Debian)
sudo apt-mark hold kubelet kubeadm kubectl

# Remove apt hold
sudo apt-mark unhold kubelet kubeadm kubectl

# DNF: install the distribution-supported versionlock plugin first.
# Alternatively, use the Kubernetes repository exclusions shown above.
sudo dnf versionlock add kubelet kubeadm kubectl

# Remove the versionlock entry
sudo dnf versionlock delete kubelet kubeadm kubectl
基本 Linux 命令
文件和目录管理
ls -la           # List files (including hidden)
cd <directory>   # Change directory
pwd              # Print current directory
mkdir -p <path>  # Create directory (create parent directories if needed)
rm -rf <path>    # Remove files/directories
cp -r <source> <destination> # Copy files/directories
mv <source> <destination>    # Move or rename files/directories
find <path> -name "<pattern>" # Search files
文本处理
cat <file>        # Output file contents
less <file>       # View file contents page by page
grep "<pattern>" <file> # Search pattern in file
sed 's/<pattern>/<replacement>/' <file> # Text substitution
awk '{print $1}' <file> # Text processing
系统信息
uname -a         # Kernel information
lsb_release -a   # Distribution information
free -h          # Memory usage
df -h            # Disk usage
du -sh <path>    # Directory size
进程和服务管理
systemctl status <service> # Check service status
systemctl restart <service> # Or use start/stop as separate subcommands
journalctl -u <service> # View service logs
容器相关的 Linux 功能
OverlayFS
OverlayFS 是一种联合挂载文件系统,将多个目录表示为单个目录。Docker 等容器运行时使用它来实现镜像层。
网络桥接和 NAT
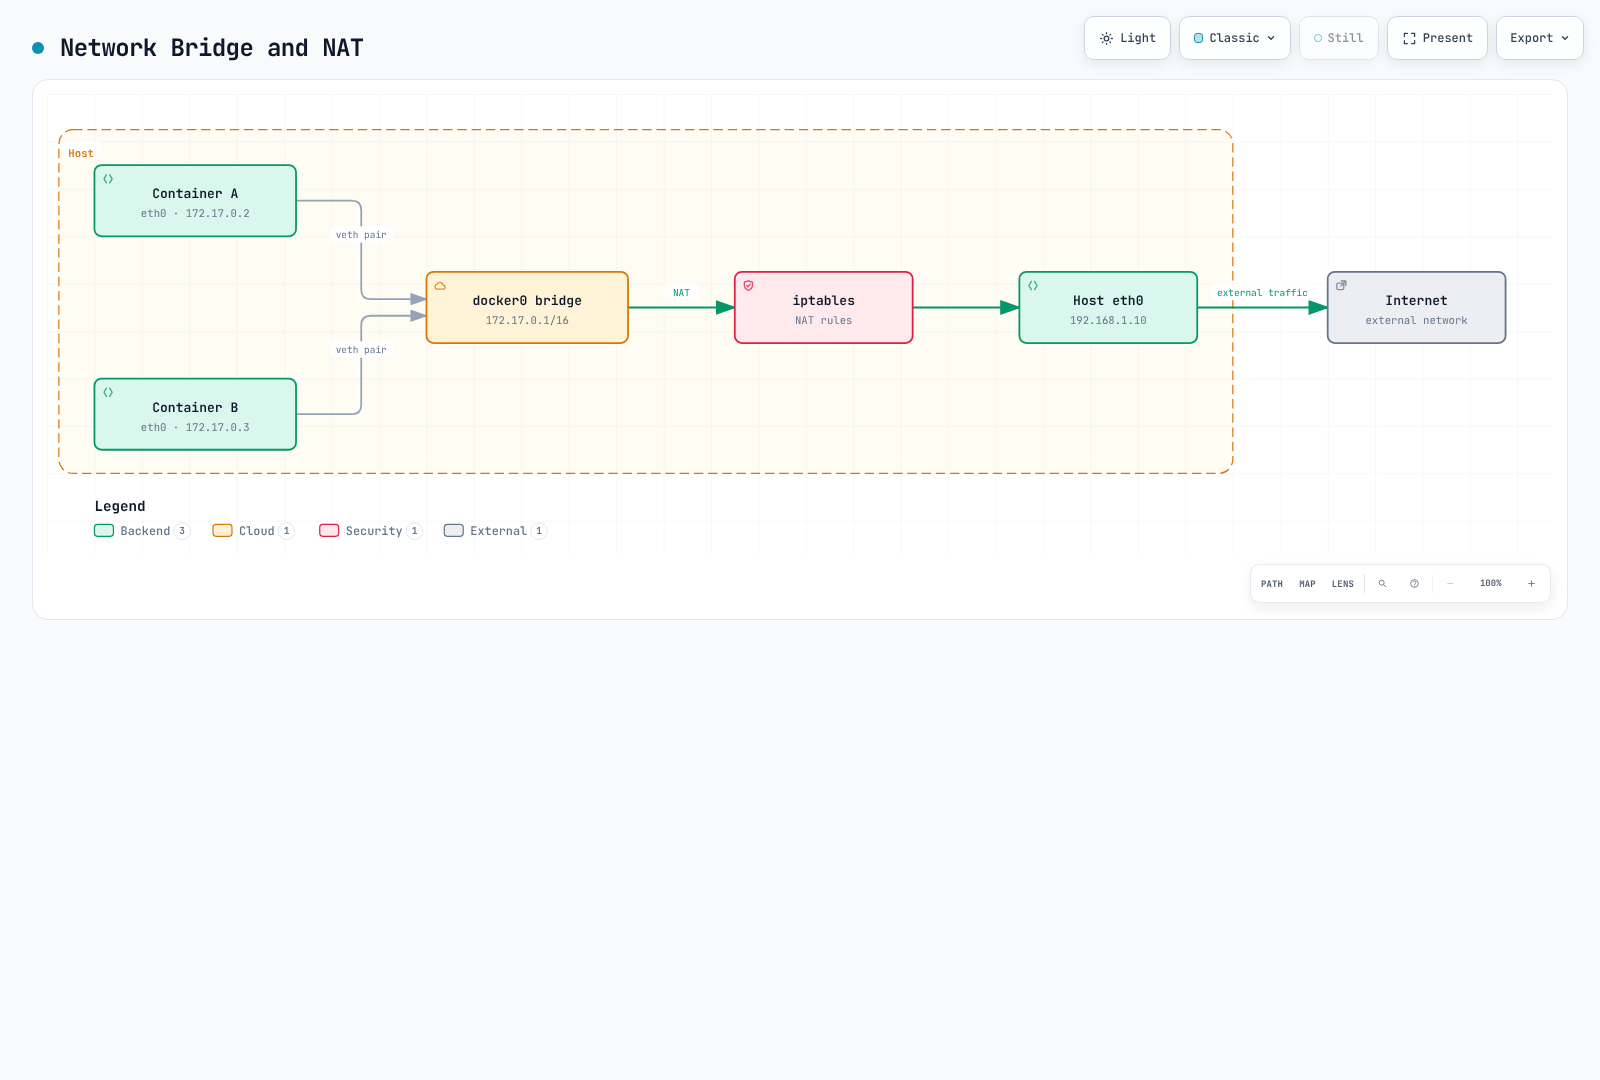
Docker 的默认桥接网络使用网桥和 NAT 处理外部流量。Kubernetes CNI 实现可能使用路由、覆盖网络或 VPC 原生网络;Pod 到 Pod 的流量并不总是经过 NAT。
系统调用过滤(seccomp)
seccomp(Secure Computing Mode)是 Linux 内核的一项功能,用于限制进程可用的系统调用。它用于增强容器安全性。
Capabilities 限制
Linux capabilities 将传统的 root 权限划分为更小的权限单元。容器仅获得必要的 capabilities,以增强安全性。
关键 capabilities:
CAP_NET_ADMIN:网络配置更改CAP_SYS_ADMIN:系统管理任务CAP_CHOWN:更改文件所有权CAP_DAC_OVERRIDE:绕过文件权限
结论
Linux 基础和功能对于理解 Kubernetes 和容器技术至关重要。以下是本文档涵盖的关键主题摘要:
核心技术
- 命名空间和 cgroups:容器隔离和资源管理的基础
- OverlayFS:容器镜像分层的核心
- systemd:Kubernetes 节点服务管理
必备操作知识
- 内核参数调优:通过 sysctl 进行网络和系统优化
- 模块管理:CNI 插件和存储驱动程序支持
- 日志管理:通过 journald 进行系统和服务日志分析
- 时间同步:维护分布式系统中的一致性
故障排除
- 资源限制:通过 ulimit 和 cgroups 进行资源管理
- 网络:DNS、网桥、iptables 配置
- 软件包管理:Kubernetes 组件的版本管理
掌握这些 Linux 基础后,您可以有效排查 Kubernetes 环境中的问题、优化集群并可靠地运行它们。
测验
要测试您在本章中学到的内容,请参加 Linux 基础测验。
参考资料
验证参考资料
- https://www.kernel.org/doc/html/latest/admin-guide/cgroup-v2.html
- https://kubernetes.io/docs/concepts/architecture/cgroups/
- https://man7.org/linux/man-pages/man7/time_namespaces.7.html
- https://man7.org/linux/man-pages/man2/getrlimit.2.html
- https://www.freedesktop.org/software/systemd/man/latest/systemd.resource-control.html
- https://www.freedesktop.org/software/systemd/man/latest/systemd.exec.html
- https://www.freedesktop.org/software/systemd/man/latest/systemd.unit.html
- https://www.freedesktop.org/software/systemd/man/latest/journalctl.html
- https://kubernetes.io/docs/concepts/cluster-administration/logging/
- https://kubernetes.io/docs/setup/production-environment/tools/kubeadm/install-kubeadm/
- https://ubuntu.com/about/release-cycle
- https://www.debian.org/releases/
- https://www.centos.org/centos-linux-eol/
- https://documentation.ubuntu.com/server/how-to/networking/timedatectl-and-timesyncd/
- https://aws.amazon.com/amazon-linux-2/faqs/
- https://docs.aws.amazon.com/linux/al2023/ug/ec2.html
- https://github.com/logrotate/logrotate/blob/main/logrotate.8.in
- https://github.com/linux-pam/linux-pam/blob/master/modules/pam_limits/limits.conf.5.xml