第 3 部分:使用 AWS Management Console 和 CLI 创建集群
使用 AWS Management Console 创建集群
使用 AWS Management Console 创建 EKS 集群的步骤如下:
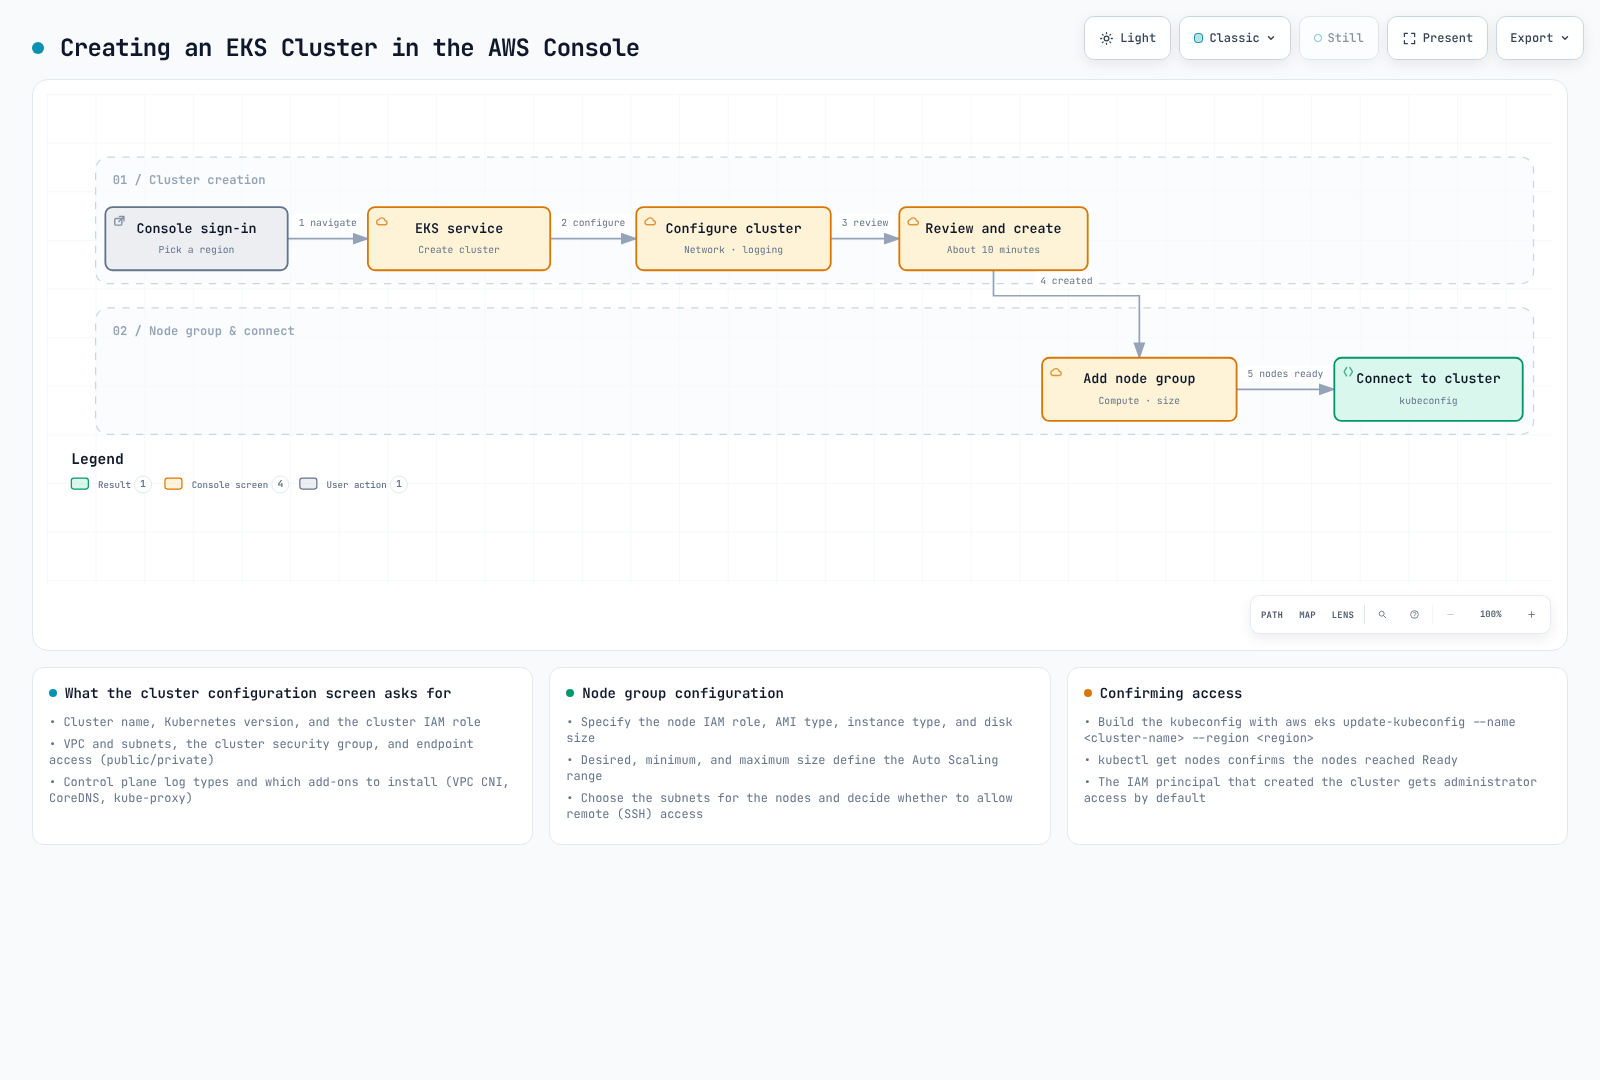
- 登录 AWS Management Console。
- 搜索“EKS”,或从服务列表中选择“Elastic Kubernetes Service”。
- 在“Clusters”页面上,单击“Create cluster”按钮。
集群配置
- 在“Configure cluster”页面上,输入以下信息:
- Cluster name:输入集群的唯一名称。
- Kubernetes version:选择要使用的 Kubernetes 版本。
- Cluster service role:创建新角色或选择现有角色。
- Tags:如有需要,添加标签。
- 单击“Next”按钮。
指定网络
- 在“Specify networking”页面上,输入以下信息:
- VPC:创建新的 VPC 或选择现有 VPC。
- Subnets:选择要用于集群的子网。至少 2 个子网必须位于不同的可用区。
- Security groups:选择要用于集群的安全组。
- Cluster endpoint access:配置对集群 API server 端点的访问。
- Public:可从互联网访问 API server。
- Private:只能从 VPC 内部访问 API server。
- Public and Private:可从互联网和 VPC 内部访问 API server。
- 单击“Next”按钮。
配置日志记录
- 在“Configure logging”页面上,输入以下信息:
- Control plane logging:选择要启用的日志类型。
- API server 日志
- 审计日志
- Authenticator 日志
- Controller manager 日志
- Scheduler 日志
- 单击“Next”按钮。
- Control plane logging:选择要启用的日志类型。
选择 Add-on
- 在“Select add-ons”页面上,输入以下信息:
- Amazon VPC CNI:用于 Pod 网络的 CNI 插件。
- CoreDNS:集群内的 DNS 服务。
- kube-proxy:提供网络代理和负载均衡。
- 单击“Next”按钮。
审核并创建
- 在“Review and create”页面上,审核配置并单击“Create”按钮。
集群创建完成后,您可以单击“Add node group”按钮来添加节点组。
添加节点组
- 在“Node group configuration”页面上,输入以下信息:
- Node group name:输入节点组的唯一名称。
- Node IAM role:创建新角色或选择现有角色。
- 单击“Next”按钮。
- 在“Set compute and scaling configuration”页面上,输入以下信息:
- AMI type:选择要用于节点的 AMI 类型。
- Instance type:选择要用于节点的 EC2 实例类型。
- Disk size:指定节点的磁盘大小。
- Node count:指定节点的最小、最大和期望数量。
- 单击“Next”按钮。
- 在“Specify networking”页面上,输入以下信息:
- Subnets:选择要用于节点组的子网。
- Remote access configuration:配置 SSH 访问。
- 单击“Next”按钮。
- 在“Review and create”页面上,审核配置并单击“Create”按钮。
使用 AWS CLI 创建集群
使用 AWS CLI 创建 EKS 集群的过程由多个步骤组成。当需要更多控制时,此方法非常有用。
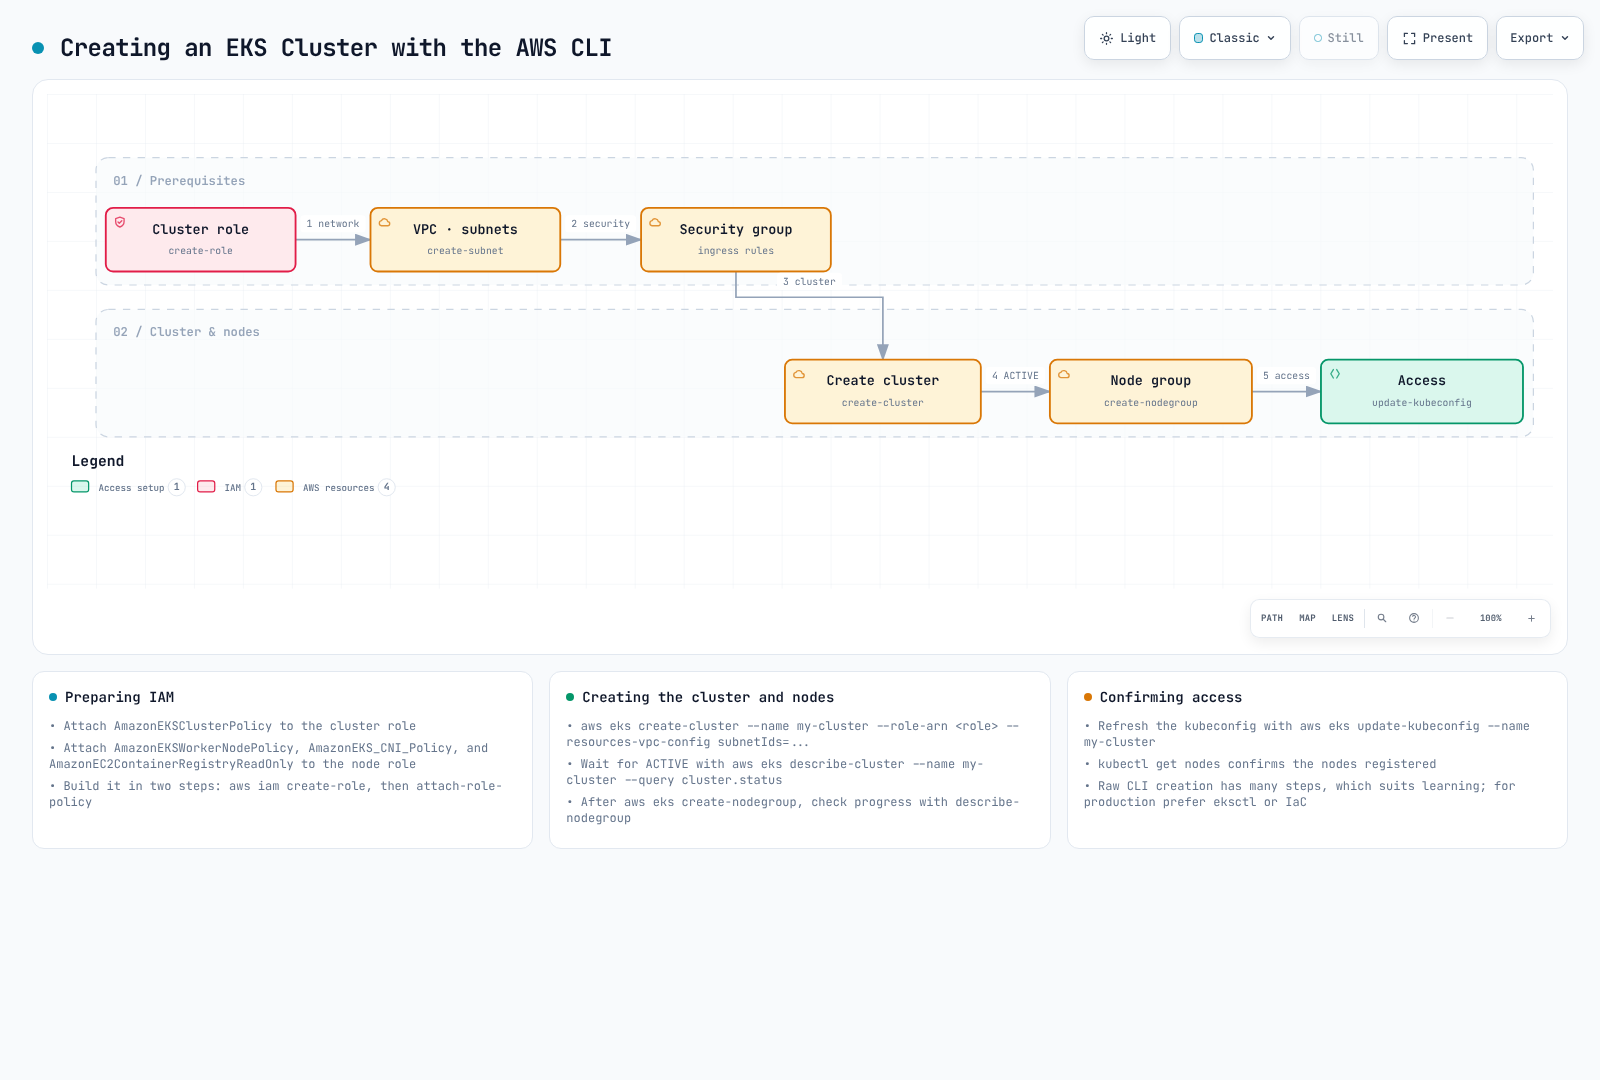
1. 创建集群 IAM 角色
EKS 集群需要一个 IAM 角色,以允许 Kubernetes control plane 管理 AWS 资源。
bash
# Create role
aws iam create-role \
  --role-name EKSClusterRole \
  --assume-role-policy-document '{
    "Version": "2012-10-17",
    "Statement": [
      {
        "Effect": "Allow",
        "Principal": {
          "Service": "eks.amazonaws.com"
        },
        "Action": "sts:AssumeRole"
      }
    ]
  }'

# Attach required policy
aws iam attach-role-policy \
  --role-name EKSClusterRole \
  --policy-arn arn:aws:iam::aws:policy/AmazonEKSClusterPolicy
2. 创建 VPC 和子网
EKS 集群需要 VPC 和子网。您可以使用现有 VPC 或创建新的 VPC。
bash
# Create VPC
aws ec2 create-vpc \
  --cidr-block 10.0.0.0/16 \
  --tag-specifications 'ResourceType=vpc,Tags=[{Key=Name,Value=EKS-VPC}]' \
  --query Vpc.VpcId \
  --output text

# Create subnets
aws ec2 create-subnet \
  --vpc-id vpc-xxxxxxxxxxxxxxxxx \
  --cidr-block 10.0.1.0/24 \
  --availability-zone us-west-2a \
  --tag-specifications 'ResourceType=subnet,Tags=[{Key=Name,Value=EKS-Subnet-1}]' \
  --query Subnet.SubnetId \
  --output text

aws ec2 create-subnet \
  --vpc-id vpc-xxxxxxxxxxxxxxxxx \
  --cidr-block 10.0.2.0/24 \
  --availability-zone us-west-2b \
  --tag-specifications 'ResourceType=subnet,Tags=[{Key=Name,Value=EKS-Subnet-2}]' \
  --query Subnet.SubnetId \
  --output text
3. 创建集群安全组
EKS 集群需要一个安全组。
bash
# Create security group
aws ec2 create-security-group \
  --group-name EKS-Cluster-SG \
  --description "Security group for EKS cluster" \
  --vpc-id vpc-xxxxxxxxxxxxxxxxx \
  --query GroupId \
  --output text

# Add inbound rule
aws ec2 authorize-security-group-ingress \
  --group-id sg-xxxxxxxxxxxxxxxxx \
  --protocol tcp \
  --port 443 \
  --cidr 0.0.0.0/0
4. 创建 EKS 集群
现在您可以创建 EKS 集群。
bash
aws eks create-cluster \
  --name my-cluster \
  --role-arn arn:aws:iam::123456789012:role/EKSClusterRole \
  --resources-vpc-config subnetIds=subnet-xxxxxxxxxxxxxxxxx,subnet-yyyyyyyyyyyyyyyyy,securityGroupIds=sg-zzzzzzzzzzzzzzzzz \
  --kubernetes-version 1.26
等待集群创建完成。要检查集群状态,请运行以下命令:
bash
aws eks describe-cluster \
  --name my-cluster \
  --query "cluster.status"
5. 创建节点 IAM 角色
EKS 节点需要 IAM 角色来访问 AWS 资源。
bash
# Create role
aws iam create-role \
  --role-name EKSNodeRole \
  --assume-role-policy-document '{
    "Version": "2012-10-17",
    "Statement": [
      {
        "Effect": "Allow",
        "Principal": {
          "Service": "ec2.amazonaws.com"
        },
        "Action": "sts:AssumeRole"
      }
    ]
  }'

# Attach required policies
aws iam attach-role-policy \
  --role-name EKSNodeRole \
  --policy-arn arn:aws:iam::aws:policy/AmazonEKSWorkerNodePolicy

aws iam attach-role-policy \
  --role-name EKSNodeRole \
  --policy-arn arn:aws:iam::aws:policy/AmazonEKS_CNI_Policy

aws iam attach-role-policy \
  --role-name EKSNodeRole \
  --policy-arn arn:aws:iam::aws:policy/AmazonEC2ContainerRegistryReadOnly
6. 创建节点组
现在您可以创建节点组。
bash
aws eks create-nodegroup \
  --cluster-name my-cluster \
  --nodegroup-name my-nodegroup \
  --node-role arn:aws:iam::123456789012:role/EKSNodeRole \
  --subnets subnet-xxxxxxxxxxxxxxxxx subnet-yyyyyyyyyyyyyyyyy \
  --disk-size 80 \
  --scaling-config minSize=1,maxSize=3,desiredSize=2 \
  --instance-types m5.large
等待节点组创建完成。要检查节点组状态,请运行以下命令:
bash
aws eks describe-nodegroup \
  --cluster-name my-cluster \
  --nodegroup-name my-nodegroup \
  --query "nodegroup.status"
7. 配置 kubeconfig
您需要配置 kubeconfig 文件以访问集群。
bash
aws eks update-kubeconfig \
  --name my-cluster \
  --region us-west-2
8. 验证集群
验证集群是否配置正确。
bash
kubectl get nodes测验
要测试您在本章中学到的内容,请尝试 EKS 集群创建 - 第 3 部分测验。