扩展 Kubernetes
审阅的上游 Kubernetes 版本:Kubernetes 1.35、1.36、1.37 最后更新:October 12, 2026
Kubernetes 是一个设计时便考虑了可扩展性的平台,允许您以多种方式扩展其功能。本章将探讨扩展 Kubernetes 的各种方法,以及如何在 Amazon EKS 中利用扩展功能。
目录
- Kubernetes 扩展概述
- 自定义资源
- Operator 模式
- 准入控制器
- API Server 扩展
- 调度器扩展
- Cloud Controller Manager
- CSI(容器存储接口)
- CNI(容器网络接口)
- 设备插件
- Amazon EKS 中的扩展功能
- 最佳实践
- 结论
Kubernetes 扩展概述
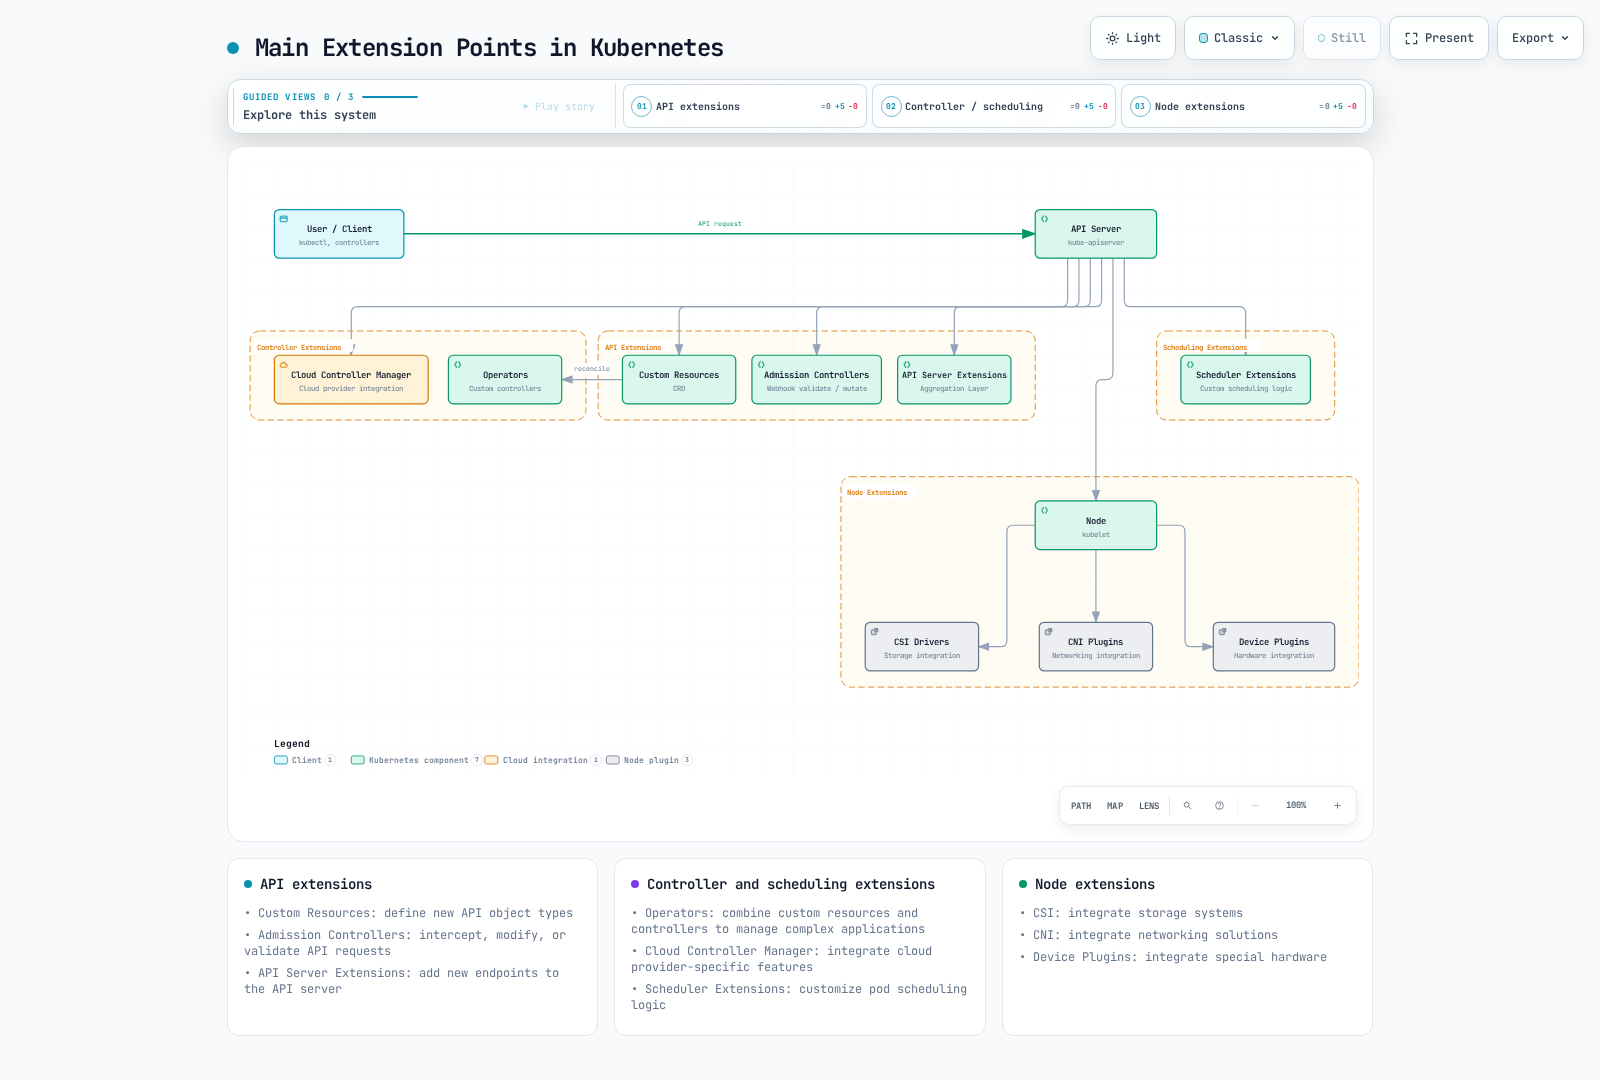
Kubernetes 提供了多种扩展点,可用于扩展和自定义其基础功能。主要扩展点包括:
- 自定义资源:定义新的 API 对象类型
- Operator:结合自定义资源和控制器来管理复杂应用程序
- 准入控制器:拦截、修改或验证 API 请求
- API Server 扩展:向 API Server 添加新端点
- 调度器扩展:自定义 Pod 调度逻辑
- Cloud Controller Manager:集成云提供商特定功能
- CSI(容器存储接口):集成存储系统
- CNI(容器网络接口):集成网络解决方案
- 设备插件:集成特殊硬件
下图展示了 Kubernetes 中的主要扩展点:
选择扩展方法
选择合适扩展方法时的考虑因素:
- 使用场景:您想要扩展的功能类型
- 复杂性:实现和维护的复杂性
- 性能影响:扩展对集群性能的影响
- 升级兼容性:与 Kubernetes 版本升级的兼容性
- 社区支持:扩展方法获得的社区支持程度
自定义资源
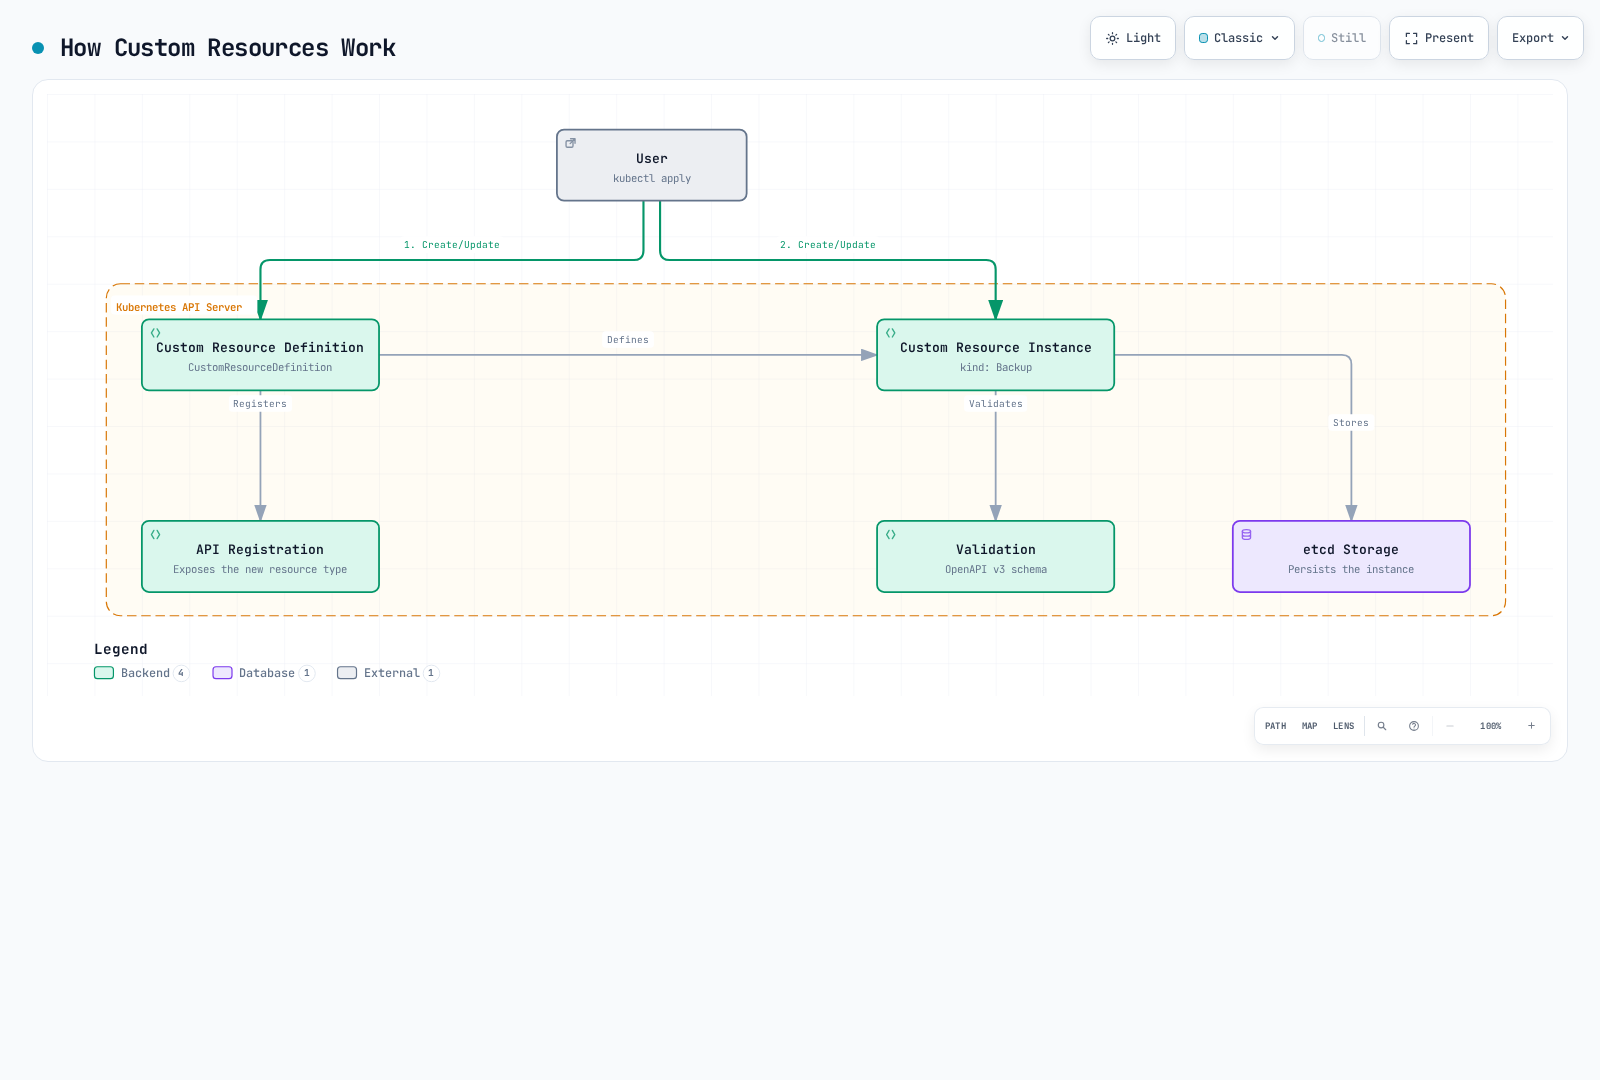
自定义资源是一种扩展 Kubernetes API 以定义新对象类型的方法。
下图展示了自定义资源的工作方式:
自定义资源定义(CRD)
CRD 是定义新资源类型的最简单方法:
apiVersion: apiextensions.k8s.io/v1
kind: CustomResourceDefinition
metadata:
  name: backups.example.com
spec:
  group: example.com
  names:
    kind: Backup
    listKind: BackupList
    plural: backups
    singular: backup
    shortNames:
    - bk
  scope: Namespaced
  versions:
  - name: v1
    served: true
    storage: true
    schema:
      openAPIV3Schema:
        type: object
        properties:
          spec:
            type: object
            properties:
              source:
                type: string
              destination:
                type: string
              schedule:
                type: string
            required:
            - source
            - destination
          status:
            type: object
            properties:
              phase:
                type: string
              lastBackupTime:
                type: string
                format: date-time
    subresources:
      status: {}
    additionalPrinterColumns:
    - name: Status
      type: string
      jsonPath: .status.phase
    - name: Age
      type: date
      jsonPath: .metadata.creationTimestamp
在上面的示例中,我们定义了一个名为 Backup 的新资源类型,并指定了该资源的架构和附加打印列。
创建自定义资源实例
在 CRD 的 Established 条件为 true 后,创建一个实例。CRD 存储并验证数据;没有控制器时,它不会执行备份。
apiVersion: example.com/v1
kind: Backup
metadata:
  name: daily-backup
spec:
  source: /data
  destination: s3://my-bucket/backups
  schedule: "0 0 * * *"
自定义资源验证
您可以在 CRD 中使用 OpenAPI v3 架构来验证自定义资源:
openAPIV3Schema:
  type: object
  properties:
    spec:
      type: object
      properties:
        replicas:
          type: integer
          minimum: 1
          maximum: 10
        image:
          type: string
          minLength: 1
      required:
      - replicas
- image在上面的示例中,replicas 字段必须是 1 到 10 之间的整数,image 字段必须非空;镜像可用性和签名检查需要单独的策略。
版本管理
CRD 支持多个版本,以便实现 API 演进:
versions:
- name: v1alpha1
  served: true
  storage: false
- name: v1beta1
  served: true
  storage: false
- name: v1
  served: true
  storage: true
在上面的示例中,提供 v1alpha1、v1beta1 和 v1 三个版本,但新的写入使用 v1。这是一个 versions 片段:请为每个版本包含结构化架构。现有对象不会自动重写;在移除旧的 storedVersions 条目之前,请迁移存储。
转换 Webhook
您可以使用转换 Webhook 来处理不同版本之间的转换:
# Merge this spec fragment into the complete CRD above.
spec:
  conversion:
    strategy: Webhook
    webhook:
      clientConfig:
        service:
          namespace: default
          name: example-conversion-webhook
          path: /convert
        caBundle: <base64-encoded-ca-cert>
      conversionReviewVersions:
      - v1
Operator 模式
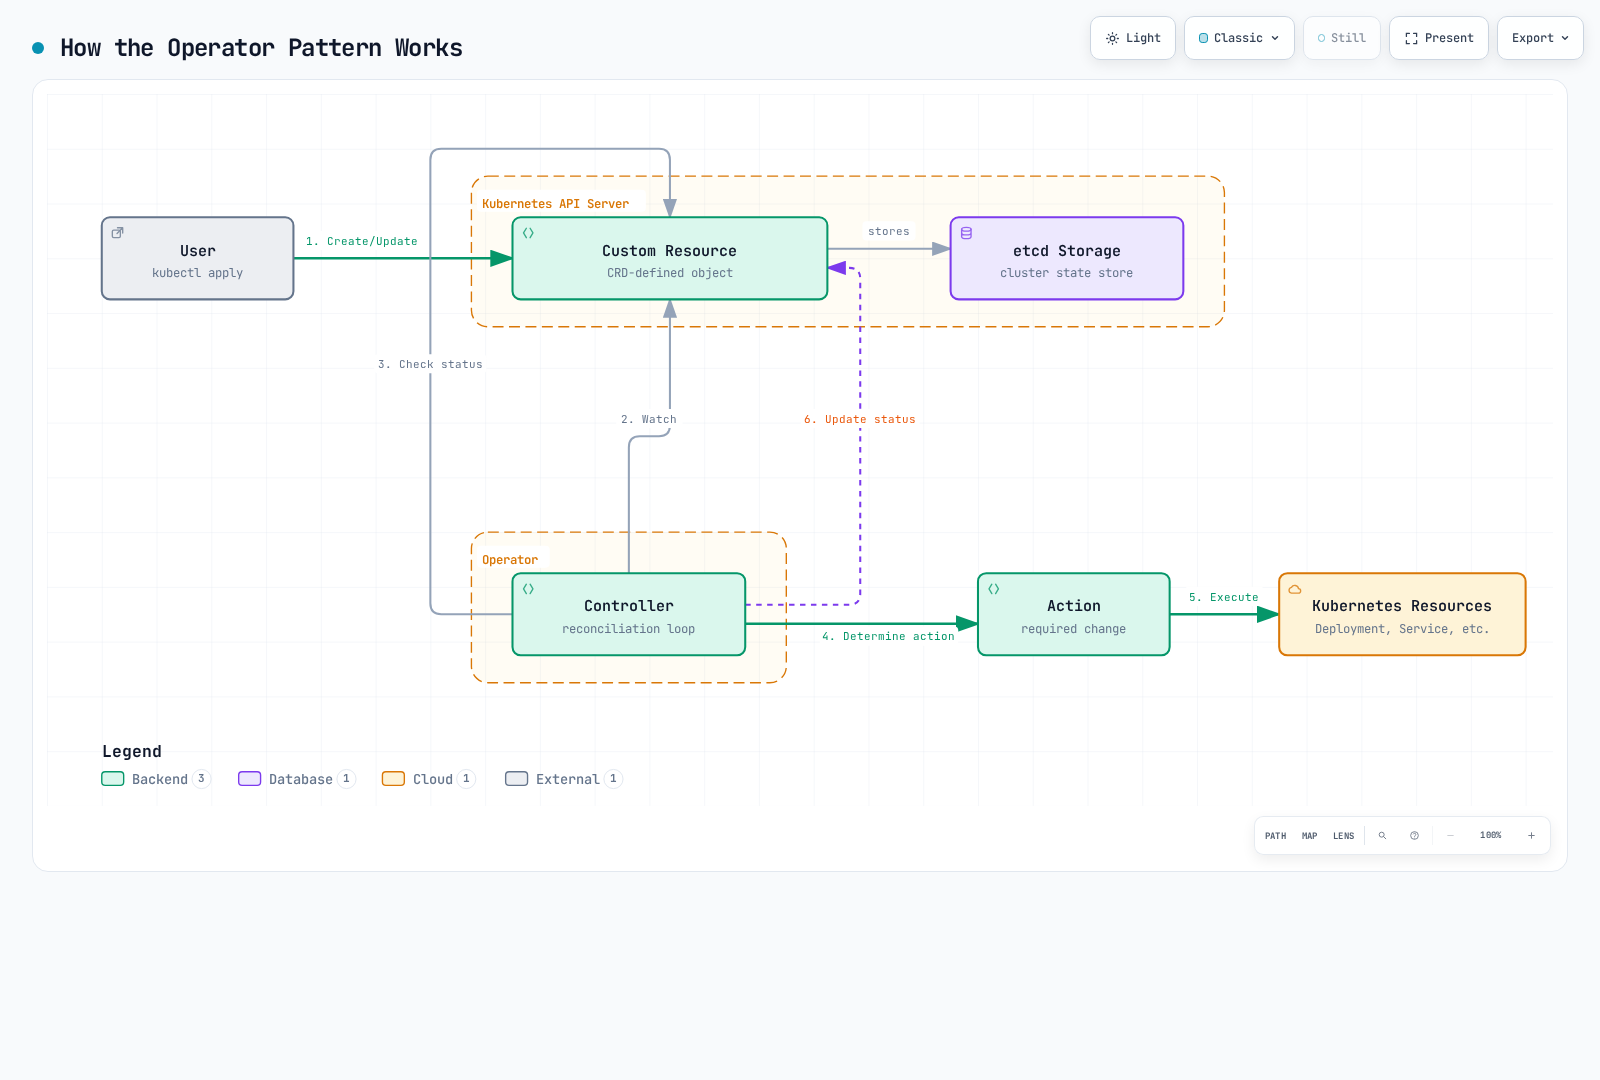
Operator 模式是一种通过结合自定义资源和控制器,将复杂应用程序的运维知识自动化的方法。
下图展示了 Operator 模式的工作方式:
Operator 概念
一个 Operator 由以下组件构成:
- 自定义资源定义(CRD):定义要管理的资源架构
- 控制器:监视自定义资源并将其协调为期望状态的逻辑
- Kubernetes API Client:与 Kubernetes API 交互的客户端
Operator 示例
数据库 Operator 示例:
# Custom Resource Definition
apiVersion: apiextensions.k8s.io/v1
kind: CustomResourceDefinition
metadata:
  name: databases.example.com
spec:
  group: example.com
  names:
    kind: Database
    listKind: DatabaseList
    plural: databases
    singular: database
    shortNames:
    - db
  scope: Namespaced
  versions:
  - name: v1
    served: true
    storage: true
    schema:
      openAPIV3Schema:
        type: object
        properties:
          spec:
            type: object
            properties:
              engine:
                type: string
                enum:
                - mysql
                - postgresql
              version:
                type: string
              storageSize:
                type: string
              replicas:
                type: integer
                minimum: 1
            required:
            - engine
            - version
            - storageSize
          status:
            type: object
            properties:
              phase:
                type: string
              endpoint:
                type: string
    subresources:
status: {}# Database Instance
apiVersion: example.com/v1
kind: Database
metadata:
name: my-db
spec:
engine: postgresql
version: "17"
storageSize: 10Gi
replicas: 3Operator 开发工具
用于开发 Operator 的工具:
- Operator SDK:使用 Go、Ansible 或 Helm 开发 Operator
- KUDO(Kubernetes Universal Declarative Operator):以声明方式开发 Operator
- Kubebuilder:基于 Go 的 Operator 开发框架
- Metacontroller:基于 Webhook 的 Operator 开发
Operator SDK 示例
使用 Operator SDK 创建 Operator:
: "${OPERATOR_IMAGE:?Set a registry image tag or digest you control}"
# Install a reviewed supported Operator SDK release and verify its checksum first.

# Create new operator project
operator-sdk init --domain example.com --repo github.com/example/database-operator

# Create API
operator-sdk create api --group database --version v1 --kind Database --resource --controller

# Implement controller (main.go, controllers/database_controller.go, etc.)

# Build and deploy operator
make docker-build docker-push IMG="$OPERATOR_IMAGE"
make deploy IMG="$OPERATOR_IMAGE"
常用 Operator
常用的开源 Operator:
- Prometheus Operator:管理 Prometheus 监控栈
- Elasticsearch Operator:管理 Elasticsearch 集群
- CoreOS etcd Operator(已归档):历史性的 etcd 自动化示例;不建议作为当前安装方案。
- PostgreSQL Operator:管理 PostgreSQL 数据库
- OpenTelemetry Operator:部署 Jaeger v2;之前的 Jaeger Operator 仅支持已淘汰的 Jaeger v1。
- Strimzi Kafka Operator:管理 Apache Kafka 集群
- Istio 集群内 Operator(在 1.24 中移除):历史示例;请使用受支持的 Helm/istioctl 安装工作流程。
准入控制器
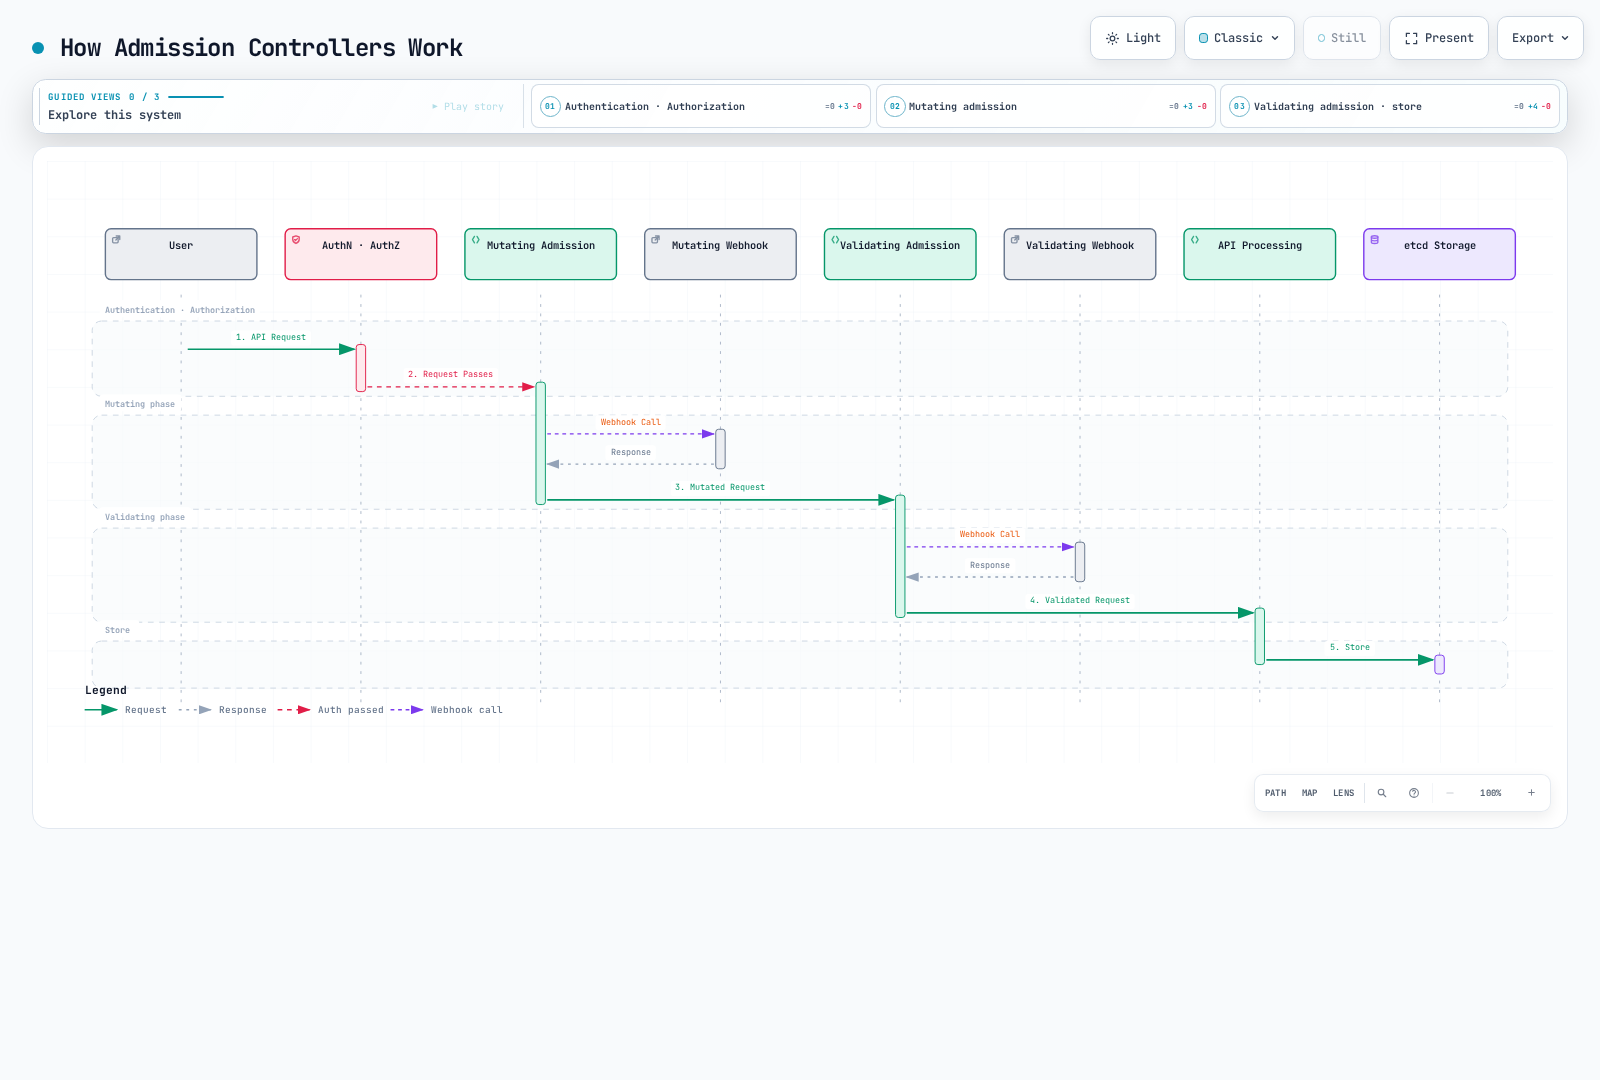
准入控制器是拦截对 Kubernetes API server 的请求并对其进行修改或验证的插件。
下图展示了准入控制器的工作方式:
准入控制器类型
Kubernetes 有两类准入控制器:
- 变更准入控制器:可以修改资源
- 验证准入控制器:只能验证资源
内置准入控制器
Kubernetes 有多个内置准入控制器:
- NamespaceLifecycle:防止在正在删除的命名空间中创建资源
- LimitRanger:为 Pod 和容器设置默认资源限制
- ServiceAccount:为 Pod ServiceAccount 设置默认值/进行验证,并注入投影令牌卷,除非禁用自动挂载;单独的控制器会创建默认账户。
- DefaultStorageClass:为 PVC 分配默认存储类
- ResourceQuota:限制每个命名空间的资源使用量
- PodSecurity:强制实施命名空间 Pod Security Standards;PodSecurityPolicy 已在 1.25 中移除。
- NodeRestriction:限制节点可修改的资源
Webhook 准入控制器
您可以使用 Webhook 准入控制器来实现自定义逻辑:
# Mutating Webhook Configuration
apiVersion: admissionregistration.k8s.io/v1
kind: MutatingWebhookConfiguration
metadata:
  name: pod-mutating-webhook
webhooks:
- name: pod-mutator.example.com
  clientConfig:
    service:
      namespace: default
      name: pod-mutating-webhook
      path: "/mutate"
    caBundle: <base64-encoded-ca-cert>
  rules:
  - apiGroups: [""]
    apiVersions: ["v1"]
    resources: ["pods"]
    operations: ["CREATE"]
    scope: "Namespaced"
  admissionReviewVersions: ["v1"]
  sideEffects: None
timeoutSeconds: 5# Validating Webhook Configuration
apiVersion: admissionregistration.k8s.io/v1
kind: ValidatingWebhookConfiguration
metadata:
name: pod-validating-webhook
webhooks:
- name: pod-validator.example.com
clientConfig:
service:
namespace: default
name: pod-validating-webhook
path: "/validate"
caBundle: <base64-encoded-ca-cert>
rules:
- apiGroups: [""]
apiVersions: ["v1"]
resources: ["pods"]
operations: ["CREATE", "UPDATE"]
scope: "Namespaced"
admissionReviewVersions: ["v1"]
sideEffects: None
timeoutSeconds: 5Webhook Server 实现
这些 Go 代码片段属于同一个文件,并实现 v1 AdmissionReview 处理程序。将 /mutate 和 /validate 连接到使用与 Service 匹配的证书和 CA bundle 的 HTTPS。它们不会执行外部副作用,对 dry-run 是安全的;请将 Webhook 配置的范围限定到预期的命名空间。标签检查是策略示例,并非完整的镜像引用或签名验证。
package main

import (
    "encoding/json"
    "net/http"
    "strings"
    admissionv1 "k8s.io/api/admission/v1"
    corev1 "k8s.io/api/core/v1"
    metav1 "k8s.io/apimachinery/pkg/apis/meta/v1"
)

func readPodReview(w http.ResponseWriter, r *http.Request) (*admissionv1.AdmissionRequest, *corev1.Pod, bool) {
    if r.Method != http.MethodPost || r.Body == nil {
        http.Error(w, "POST body required", http.StatusBadRequest)
        return nil, nil, false
    }
    var review admissionv1.AdmissionReview
    if err := json.NewDecoder(http.MaxBytesReader(w, r.Body, 2<<20)).Decode(&review); err != nil {
        http.Error(w, "Invalid AdmissionReview JSON", http.StatusBadRequest)
        return nil, nil, false
    }
    req := review.Request
    if review.APIVersion != "admission.k8s.io/v1" || review.Kind != "AdmissionReview" || req == nil || req.UID == "" {
        http.Error(w, "AdmissionReview v1 request and UID required", http.StatusBadRequest)
        return nil, nil, false
    }
    if req.Kind.Group != "" || req.Kind.Version != "v1" || req.Kind.Kind != "Pod" ||
        (req.Operation != admissionv1.Create && req.Operation != admissionv1.Update) {
        http.Error(w, "Only Pod CREATE/UPDATE is supported", http.StatusBadRequest)
        return nil, nil, false
    }
    var pod corev1.Pod
    if err := json.Unmarshal(req.Object.Raw, &pod); err != nil {
        http.Error(w, "Invalid Pod JSON", http.StatusBadRequest)
        return nil, nil, false
    }
    return req, &pod, true
}

func writeReview(w http.ResponseWriter, response admissionv1.AdmissionResponse) {
    review := admissionv1.AdmissionReview{
        TypeMeta: metav1.TypeMeta{APIVersion: "admission.k8s.io/v1", Kind: "AdmissionReview"},
        Response: &response,
    }
    data, err := json.Marshal(review)
    if err != nil {
        http.Error(w, "Response encoding failed", http.StatusInternalServerError)
        return
    }
    w.Header().Set("Content-Type", "application/json")
    _, _ = w.Write(data)
}

func writePatch(w http.ResponseWriter, req *admissionv1.AdmissionRequest, patches []map[string]interface{}) {
    response := admissionv1.AdmissionResponse{UID: req.UID, Allowed: true}
    if len(patches) > 0 {
        data, err := json.Marshal(patches)
        if err != nil {
            http.Error(w, "Patch encoding failed", http.StatusInternalServerError)
            return
        }
        patchType := admissionv1.PatchTypeJSONPatch
        response.PatchType, response.Patch = &patchType, data
    }
    writeReview(w, response)
}

func deny(w http.ResponseWriter, req *admissionv1.AdmissionRequest, message string) {
    writeReview(w, admissionv1.AdmissionResponse{
        UID: req.UID, Allowed: false,
        Result: &metav1.Status{Status: "Failure", Reason: metav1.StatusReasonForbidden, Code: 403, Message: message},
    })
}
func mutateHandler(w http.ResponseWriter, r *http.Request) {
    req, pod, ok := readPodReview(w, r)
    if !ok { return }
    if pod.Labels["injected-by"] == "mutating-webhook" {
        writePatch(w, req, nil)
        return
    }
    if pod.Labels == nil { pod.Labels = map[string]string{} }
    pod.Labels["injected-by"] = "mutating-webhook"
    // Add the whole map, preserving existing labels. Works when labels was absent.
    writePatch(w, req, []map[string]interface{}{{"op": "add", "path": "/metadata/labels", "value": pod.Labels}})
}func validateHandler(w http.ResponseWriter, r *http.Request) {
req, pod, ok := readPodReview(w, r)
if !ok { return }
images := []string{}
for _, c := range pod.Spec.Containers { images = append(images, c.Image) }
for _, c := range pod.Spec.InitContainers { images = append(images, c.Image) }
for _, c := range pod.Spec.EphemeralContainers { images = append(images, c.Image) }
for _, image := range images {
if strings.Contains(image, "@") { continue } // Digest references have no implicit latest tag.
last := image[strings.LastIndex(image, "/")+1:]
if !strings.Contains(last, ":") || strings.HasSuffix(last, ":latest") {
deny(w, req, "Use an explicit non-latest tag or digest for every container")
return
}
}
writeReview(w, admissionv1.AdmissionResponse{UID: req.UID, Allowed: true})
}常用准入控制器项目
- OPA Gatekeeper:使用 Open Policy Agent 强制实施策略
- Kyverno:基于 YAML 的策略引擎
- Istio:Service Mesh 边车注入
- cert-manager:TLS 证书管理
API Server 扩展
API Server 扩展是一种向 Kubernetes API server 添加新端点的方法。
扩展 API Server
扩展 API Server 是独立于 Kubernetes API server 运行并提供自定义 API 的服务器:
# APIService Definition
apiVersion: apiregistration.k8s.io/v1
kind: APIService
metadata:
  name: v1.example.com
spec:
  group: example.com
  version: v1
  groupPriorityMinimum: 1000
  versionPriority: 15
  service:
    name: example-api
    namespace: default
  caBundle: <base64-encoded-ca-cert>
扩展 API Server 实现
扩展 API Server 由以下组件构成:
- API Server:提供与 Kubernetes API server 类似的接口
- 资源处理程序:处理特定资源类型的请求
- 存储后端:存储资源数据
这是实现概述,不是一个独立程序。请从与您的 k8s.io 依赖项相匹配的官方 sample-apiserver 版本开始;配置安全服务、委托身份验证/授权、实际的 example.com/v1 类型、存储和关闭上下文。APIService group/version 必须与服务器匹配。
// Extension API Server Example
func main() {
    // Server configuration
    config := genericapiserver.NewRecommendedConfig(apiserver.Codecs)
    config.OpenAPIConfig = genericapiserver.DefaultOpenAPIConfig(
        sampleopenapi.GetOpenAPIDefinitions,
        openapi.NewDefinitionNamer(apiserver.Scheme),
    )
    config.EnableIndex = true
    config.EnableDiscovery = true

    // Create server
    server, err := config.Complete().New("sample-apiserver", genericapiserver.NewEmptyDelegate())
    if err != nil {
        log.Fatalf("Error creating server: %v", err)
    }

    // Set API group info
    apiGroupInfo := genericapiserver.NewDefaultAPIGroupInfo(
        samplev1.GroupName,
        apiserver.Scheme,
        metav1.ParameterCodec,
        apiserver.Codecs,
    )

    // Set storage
    apiGroupInfo.VersionedResourcesStorageMap["v1"] = map[string]rest.Storage{
        "widgets": NewWidgetStorage(),
    }

    // Install API group
    if err := server.InstallAPIGroup(&apiGroupInfo); err != nil {
        log.Fatalf("Error installing API group: %v", err)
    }

    // Run server
    if err := server.PrepareRun().Run(stopCh); err != nil {
        log.Fatalf("Error running server: %v", err)
    }
}
聚合层
聚合层使多个 API Server 表现为单个 API Server:
                                   +-----------------+
                                   |                 |
                                   |  kube-apiserver |
                                   |                 |
                                   +-------+---------+
                                           |
                                           v
                      +--------------------+--------------------+
                      |                                         |
                      |                                         |
          +-----------v-----------+               +------------v------------+
          |                       |               |                         |
          |  metrics-server       |               |  example-apiserver      |
          |                       |               |                         |
          +-----------------------+               +-------------------------+
调度器扩展
调度器扩展是一种自定义 Kubernetes 调度器行为的方法。
调度器框架
Kubernetes 1.15 引入的调度器框架允许通过插件扩展调度流水线的各个阶段:
- 队列排序:对调度队列中的 Pod 排序
- 预过滤:在过滤前检查 Pod 和集群状态
- 过滤:过滤掉无法运行 Pod 的节点
- 后过滤:在过滤后执行操作
- 预评分:在计算评分前执行操作
- 评分:为节点分配评分
- 评分标准化:标准化评分
- 预留:为 Pod 预留资源
- 许可:允许、拒绝或延迟 Pod 调度
- 预绑定:在绑定前执行操作
- 绑定:将 Pod 绑定到节点
- 后绑定:在绑定后执行操作
调度器配置
调度器配置示例:
apiVersion: kubescheduler.config.k8s.io/v1
kind: KubeSchedulerConfiguration
leaderElection:
  leaderElect: true
profiles:
- schedulerName: custom-scheduler
  pluginConfig:
  - name: NodeResourcesFit
    args:
      scoringStrategy:
        type: MostAllocated
        resources:
        - name: cpu
          weight: 1
        - name: memory
          weight: 1
自定义调度器
以下 Deployment 需要一个已构建的 custom-scheduler 镜像、一个名为 custom-scheduler-config 且包含前述 config.yaml 的 ConfigMap,以及一个具有经审核调度/Lease RBAC 的 ServiceAccount。请使用集群内身份验证;工作节点不能挂载托管控制平面的 scheduler.conf。schedulerName 必须与 Pod 匹配。
apiVersion: apps/v1
kind: Deployment
metadata:
  name: custom-scheduler
  namespace: kube-system
spec:
  replicas: 1
  selector:
    matchLabels:
      app: custom-scheduler
  template:
    metadata:
      labels:
        app: custom-scheduler
    spec:
      serviceAccountName: custom-scheduler
      nodeSelector:
        kubernetes.io/os: linux
      containers:
      - name: custom-scheduler
        image: example/custom-scheduler:REPLACE_WITH_TESTED_RELEASE
        command: [/custom-scheduler, --config=/etc/scheduler/config.yaml]
        volumeMounts:
        - name: config
          mountPath: /etc/scheduler
          readOnly: true
      volumes:
      - name: config
        configMap:
          name: custom-scheduler-config
为 Pod 指定自定义调度器:
apiVersion: v1
kind: Pod
metadata:
  name: custom-scheduled-pod
spec:
  schedulerName: custom-scheduler
  containers:
  - name: container
    image: nginx:1.30.4
Cloud Controller Manager
Cloud Controller Manager 提供 Kubernetes 与云提供商之间的接口。
Cloud Controller Manager 组件
Cloud Controller Manager 由以下控制器构成:
- Node Controller:通过云提供商 API 更新节点信息
- Route Controller:在云网络中设置路由
- Service Controller:创建、更新和删除云负载均衡器
AWS Cloud Controller Manager
外部 AWS CCM 用于 AWS 上自主管理的 Kubernetes。请选择与 Kubernetes 兼容的 cloud-provider-aws 版本,并遵循其现有集群流程以满足 ServiceAccount/RBAC、IAM、集群标签、节点命名和 --cloud-provider=external 迁移前提条件。其镜像仓库为 registry.k8s.io/provider-aws/cloud-controller-manager。任意的 cloud.conf 条目无法替代 VPC/子网标签。
您不能将此 DaemonSet 安装到 AWS 托管的 EKS 控制平面中,也不能挂载其 scheduler.conf。在 EKS 上,请使用服务托管的云集成及受支持的 AWS Load Balancer Controller 或 Auto Mode 功能,并确保每个资源只有一个控制器所有者。
CSI(容器存储接口)
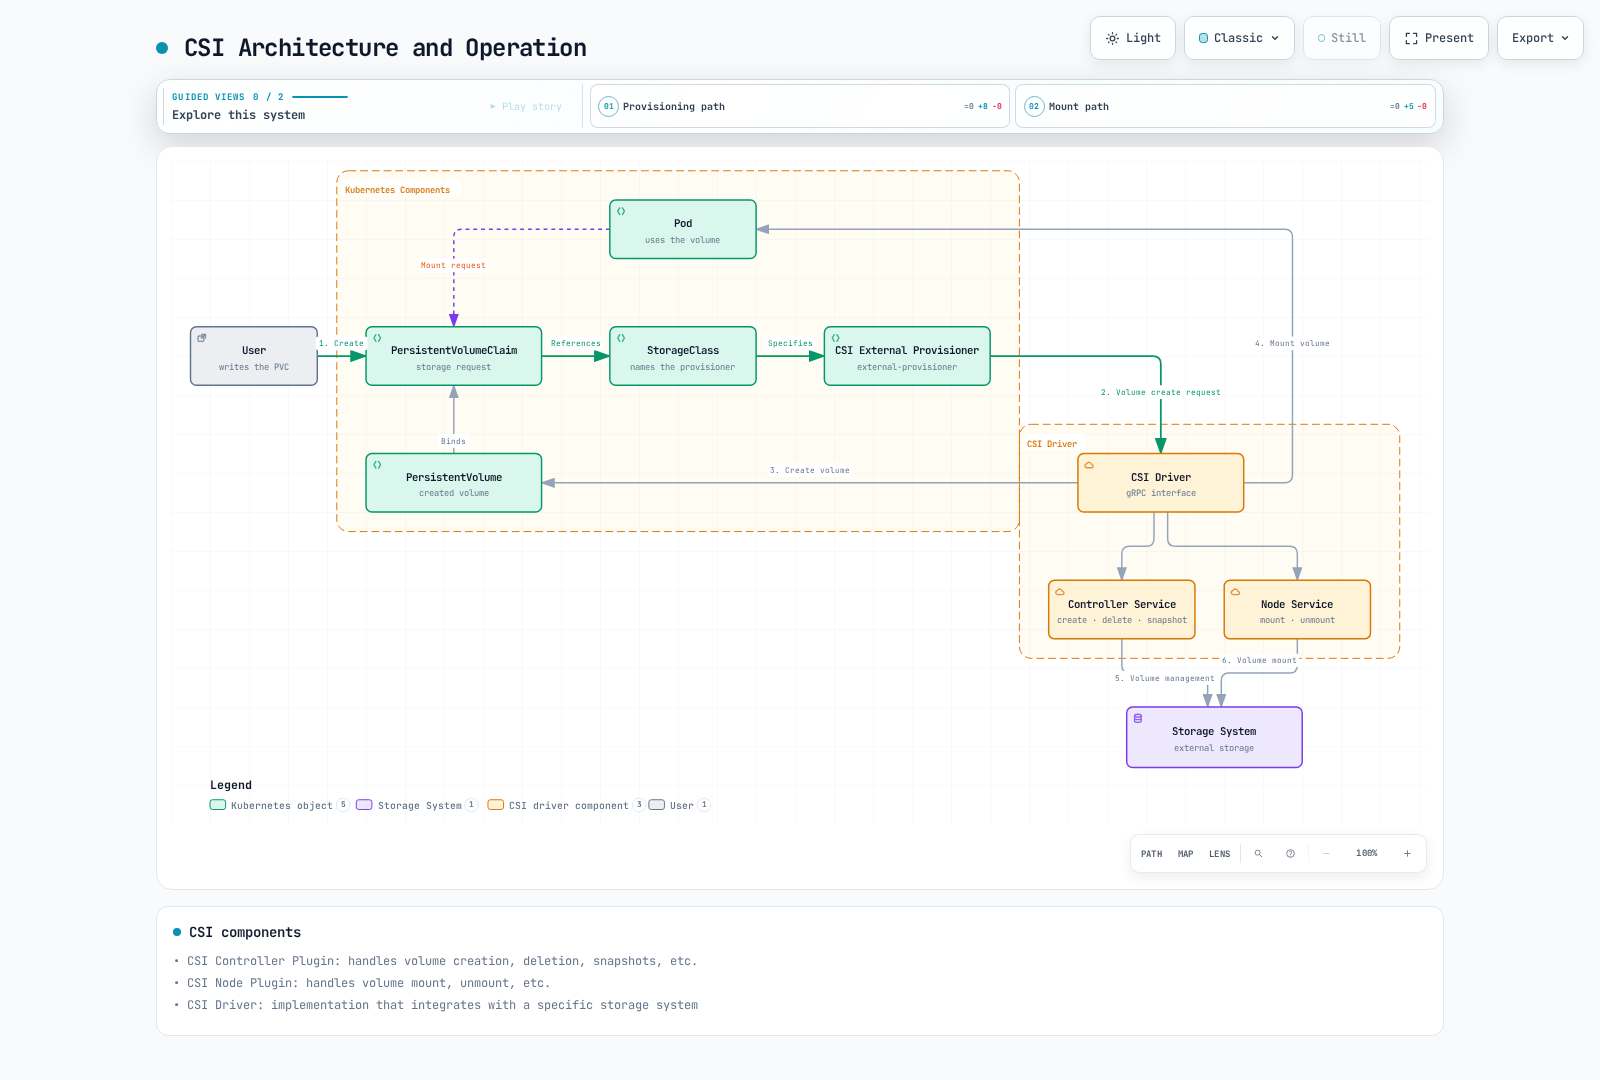
CSI 在 Kubernetes 与存储系统之间提供标准接口。
下图展示了 CSI 的架构和操作:
CSI 架构
CSI 由以下组件构成:
- CSI Controller Plugin:处理卷创建、删除、快照等操作
- CSI Node Plugin:处理卷挂载、卸载等操作
- CSI Driver:与特定存储系统集成的实现
+-------------------+
|                   |
|  Kubernetes       |
|  (External        |
|   Provisioner)    |
|                   |
+--------+----------+
         |
         | gRPC
         v
+--------+----------+
|                   |
|  CSI Driver       |
|                   |
+--------+----------+
         |
         | Storage Protocol
         v
+--------+----------+
|                   |
|  Storage System   |
|                   |
+-------------------+
CSI Driver 部署
以下是驱动程序编写者模板,而不是完整安装。请从供应商处提供驱动程序镜像/参数、兼容的 sidecar 版本、ServiceAccounts/RBAC 和 CSIDriver 注册。NodePlugin 在 Linux 上运行,需要文档中规定的主机路径和特权。
# CSI Controller Service
apiVersion: apps/v1
kind: Deployment
metadata:
  name: csi-controller
spec:
  replicas: 1
  selector:
    matchLabels:
      app: csi-controller
  template:
    metadata:
      labels:
        app: csi-controller
    spec:
      serviceAccountName: csi-controller
      nodeSelector:
        kubernetes.io/os: linux
      containers:
      - name: csi-provisioner
        image: registry.k8s.io/sig-storage/csi-provisioner:REPLACE_WITH_COMPATIBLE_RELEASE
        args:
        - "--csi-address=$(ADDRESS)"
        - "--v=5"
        env:
        - name: ADDRESS
          value: /var/lib/csi/sockets/pluginproxy/csi.sock
        volumeMounts:
        - name: socket-dir
          mountPath: /var/lib/csi/sockets/pluginproxy/
      - name: csi-attacher
        image: registry.k8s.io/sig-storage/csi-attacher:REPLACE_WITH_COMPATIBLE_RELEASE
        args:
        - "--csi-address=$(ADDRESS)"
        - "--v=5"
        env:
        - name: ADDRESS
          value: /var/lib/csi/sockets/pluginproxy/csi.sock
        volumeMounts:
        - name: socket-dir
          mountPath: /var/lib/csi/sockets/pluginproxy/
      - name: csi-driver
        image: example/csi-driver:v1.0.0
        args:
        - "--endpoint=$(CSI_ENDPOINT)"
        - "--nodeid=$(NODE_ID)"
        env:
        - name: CSI_ENDPOINT
          value: unix:///var/lib/csi/sockets/pluginproxy/csi.sock
        - name: NODE_ID
          valueFrom:
            fieldRef:
              fieldPath: spec.nodeName
        volumeMounts:
        - name: socket-dir
          mountPath: /var/lib/csi/sockets/pluginproxy/
      volumes:
      - name: socket-dir
        emptyDir: {}

---
# CSI Node Service
apiVersion: apps/v1
kind: DaemonSet
metadata:
  name: csi-node
spec:
  selector:
    matchLabels:
      app: csi-node
  template:
    metadata:
      labels:
        app: csi-node
    spec:
      serviceAccountName: csi-node
      nodeSelector:
        kubernetes.io/os: linux
      hostNetwork: true
      containers:
      - name: csi-node-driver-registrar
        image: registry.k8s.io/sig-storage/csi-node-driver-registrar:REPLACE_WITH_COMPATIBLE_RELEASE
        args:
        - "--csi-address=$(ADDRESS)"
        - "--kubelet-registration-path=$(DRIVER_REG_SOCK_PATH)"
        - "--v=5"
        env:
        - name: ADDRESS
          value: /csi/csi.sock
        - name: DRIVER_REG_SOCK_PATH
          value: /var/lib/kubelet/plugins/example.csi.k8s.io/csi.sock
        volumeMounts:
        - name: plugin-dir
          mountPath: /csi
        - name: registration-dir
          mountPath: /registration
      - name: csi-driver
        image: example/csi-driver:v1.0.0
        args:
        - "--endpoint=$(CSI_ENDPOINT)"
        - "--nodeid=$(NODE_ID)"
        env:
        - name: CSI_ENDPOINT
          value: unix:///csi/csi.sock
        - name: NODE_ID
          valueFrom:
            fieldRef:
              fieldPath: spec.nodeName
        securityContext:
          privileged: true
        volumeMounts:
        - name: plugin-dir
          mountPath: /csi
        - name: pods-mount-dir
          mountPath: /var/lib/kubelet/pods
          mountPropagation: "Bidirectional"
      volumes:
      - name: plugin-dir
        hostPath:
          path: /var/lib/kubelet/plugins/example.csi.k8s.io
          type: DirectoryOrCreate
      - name: registration-dir
        hostPath:
          path: /var/lib/kubelet/plugins_registry
          type: Directory
      - name: pods-mount-dir
        hostPath:
          path: /var/lib/kubelet/pods
          type: Directory
存储类和 PVC
使用 CSI Driver 的存储类和 PVC 示例:
# Storage Class
apiVersion: storage.k8s.io/v1
kind: StorageClass
metadata:
  name: example-csi
provisioner: example.csi.k8s.io
parameters:
  type: ssd
  csi.storage.k8s.io/fstype: ext4
reclaimPolicy: Delete
allowVolumeExpansion: true
volumeBindingMode: WaitForFirstConsumer

---
# PVC
apiVersion: v1
kind: PersistentVolumeClaim
metadata:
  name: example-pvc
spec:
  accessModes:
  - ReadWriteOnce
  resources:
    requests:
      storage: 10Gi
  storageClassName: example-csi
常用 CSI Driver
- AWS EBS CSI Driver:AWS EBS 卷管理
- AWS EFS CSI Driver:AWS EFS 文件系统管理
- GCE PD CSI Driver:Google Compute Engine 持久磁盘管理
- Azure Disk CSI Driver:Azure 磁盘管理
- Ceph RBD CSI Driver:Ceph RBD 卷管理
- NFS CSI Driver:NFS 卷管理
CNI(容器网络接口)
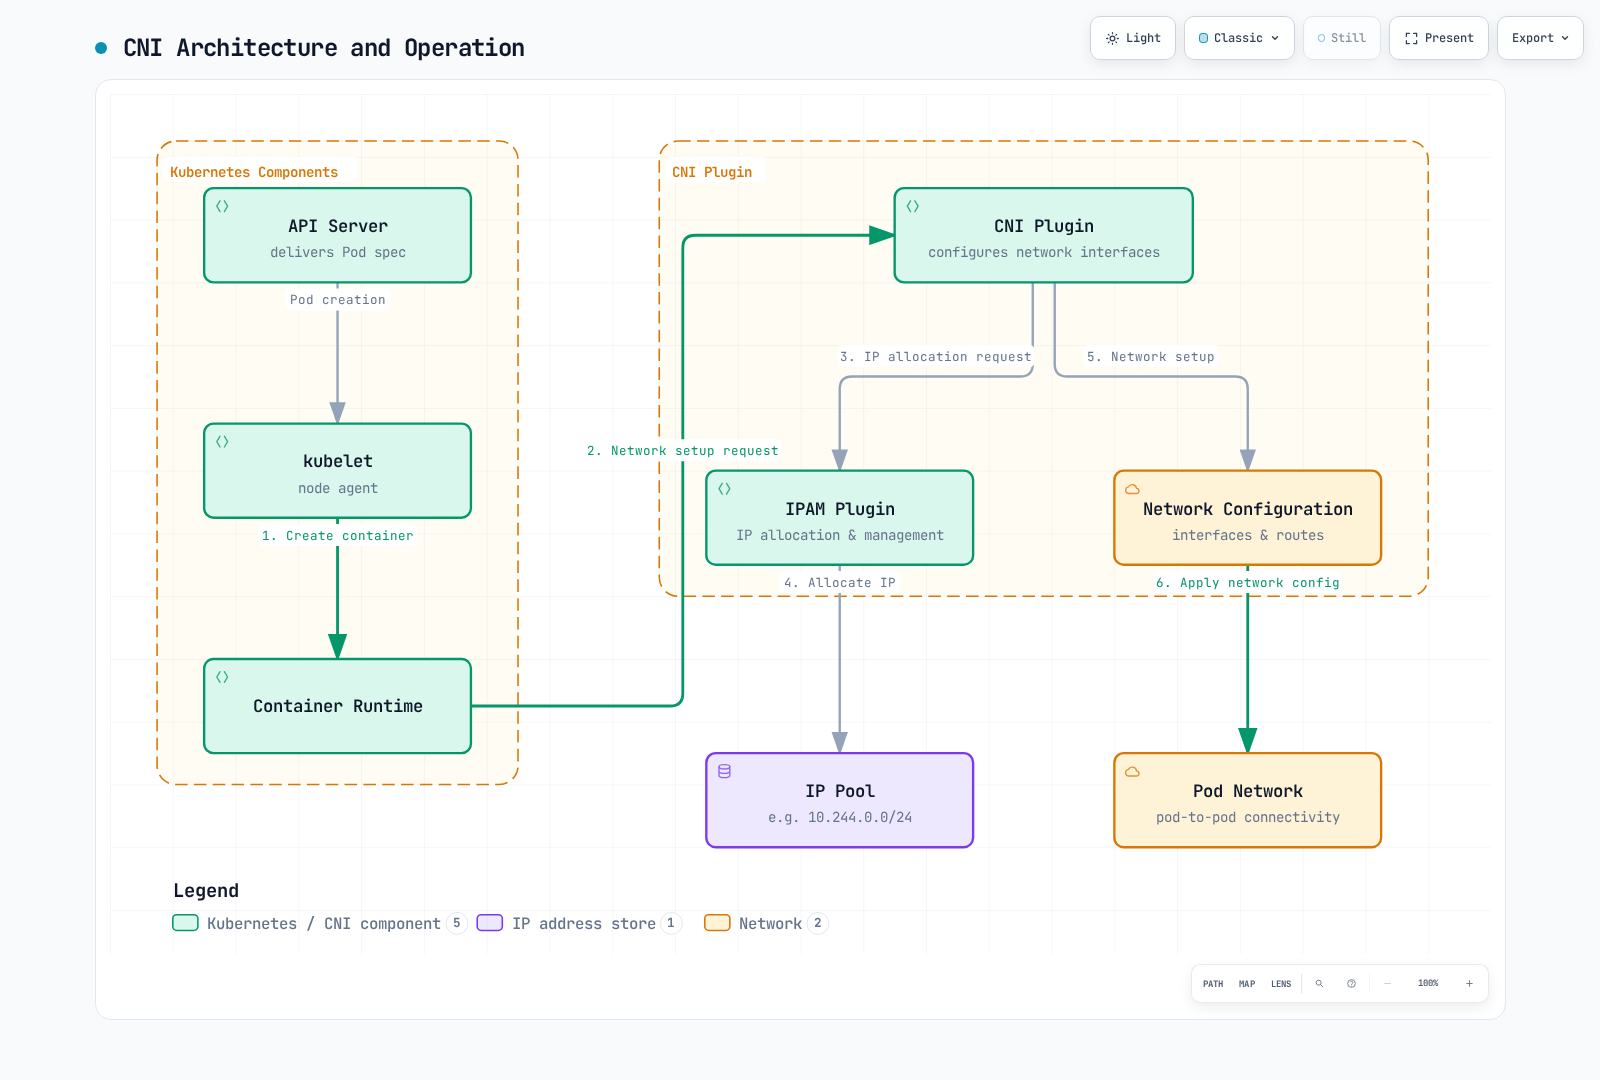
CNI 在 Kubernetes 与网络解决方案之间提供标准接口。
下图展示了 CNI 的架构和操作:
CNI 架构
CNI 由以下组件构成:
- CNI Plugin:配置容器网络接口
- IPAM Plugin:IP 地址分配和管理
- Meta Plugin:将多个插件组合在一起
+-------------------+
|                   |
|  Kubernetes       |
|  CRI runtime      |
|  (via kubelet)    |
+--------+----------+
         |
         | CNI Spec
         v
+--------+----------+
|                   |
|  CNI Plugin       |
|                   |
+--------+----------+
         |
         | Network Configuration
         v
+--------+----------+
|                   |
|  Network          |
|                   |
+-------------------+
CNI Plugin 配置
此单节点 bridge/host-local 示例说明了 CNI 契约;集群需要唯一的每节点子网和跨节点路由。CNI 由 CRI 运行时调用,而不是由现代 kubelet 直接调用。
{
  "cniVersion": "0.4.0",
  "name": "example-network",
  "type": "bridge",
  "bridge": "cni0",
  "isGateway": true,
  "ipMasq": true,
  "ipam": {
    "type": "host-local",
    "subnet": "10.244.0.0/24",
    "routes": [
      { "dst": "0.0.0.0/0" }
    ]
  }
}
常用 CNI 插件
- Calico:具有增强网络策略和安全功能的 CNI
- Flannel:提供简单的 Overlay 网络
- Cilium:基于 eBPF 的网络和安全解决方案
- Weave Net(已归档):历史性的多主机网络项目;请评估仍在维护的替代方案。
- AWS VPC CNI:与 AWS VPC 集成的 CNI
- Azure CNI:与 Azure 虚拟网络集成的 CNI
- Antrea:基于 Open vSwitch 的网络解决方案
CNI 插件安装
Calico CNI 插件安装示例:
# Use the official Calico installation guide for your distribution.
# Select a supported release and inspect the operator/custom-resources manifests.
# Do not install a second primary CNI over an existing cluster network.
kubectl get nodes -o wide
kubectl -n kube-system get daemonsets
设备插件
设备插件为 Kubernetes 与特殊硬件之间提供接口。
设备插件架构
设备插件由以下组件构成:
- 设备插件服务器:处理设备发现、分配、初始化等
- kubelet:与设备插件通信,将设备分配给 Pod
+-------------------+
|                   |
|  Kubernetes       |
|  (kubelet)        |
|                   |
+--------+----------+
         |
         | Device Plugin API
         v
+--------+----------+
|                   |
|  Device Plugin    |
|                   |
+--------+----------+
         |
         | Device Management
         v
+--------+----------+
|                   |
|  Hardware Device  |
|                   |
+-------------------+
NVIDIA GPU 设备插件
NVIDIA GPU 设备插件部署示例:
首先配置兼容的 NVIDIA 驱动程序、Container Toolkit 和容器运行时。固定经过测试的官方 NVIDIA device-plugin Helm chart 版本,并选择 Linux GPU 节点。当 GPU Operator 或 Auto Mode 已拥有该插件时,请避免重复安装。
GPU 请求 Pod
请求 GPU 的 Pod 示例:
apiVersion: v1
kind: Pod
metadata:
  name: gpu-pod
spec:
  restartPolicy: Never
  nodeSelector:
    kubernetes.io/os: linux
  containers:
  - name: cuda-container
    image: nvidia/cuda:REPLACE_WITH_DRIVER_COMPATIBLE_TAG
    command: ["nvidia-smi"]
    resources:
      limits:
        nvidia.com/gpu: 1
常用设备插件
- NVIDIA GPU Device Plugin:NVIDIA GPU 管理
- AMD GPU Device Plugin:AMD GPU 管理
- FPGA Device Plugin:FPGA 设备管理
- InfiniBand Device Plugin:InfiniBand 设备管理
- SR-IOV Network Device Plugin:SR-IOV 网络设备管理
Amazon EKS 中的扩展功能
EKS 的版本支持不同于上游。截至 2026-10-12,EKS 标准支持涵盖 1.34–1.37;还请检查每个 add-on/controller 的兼容性矩阵。
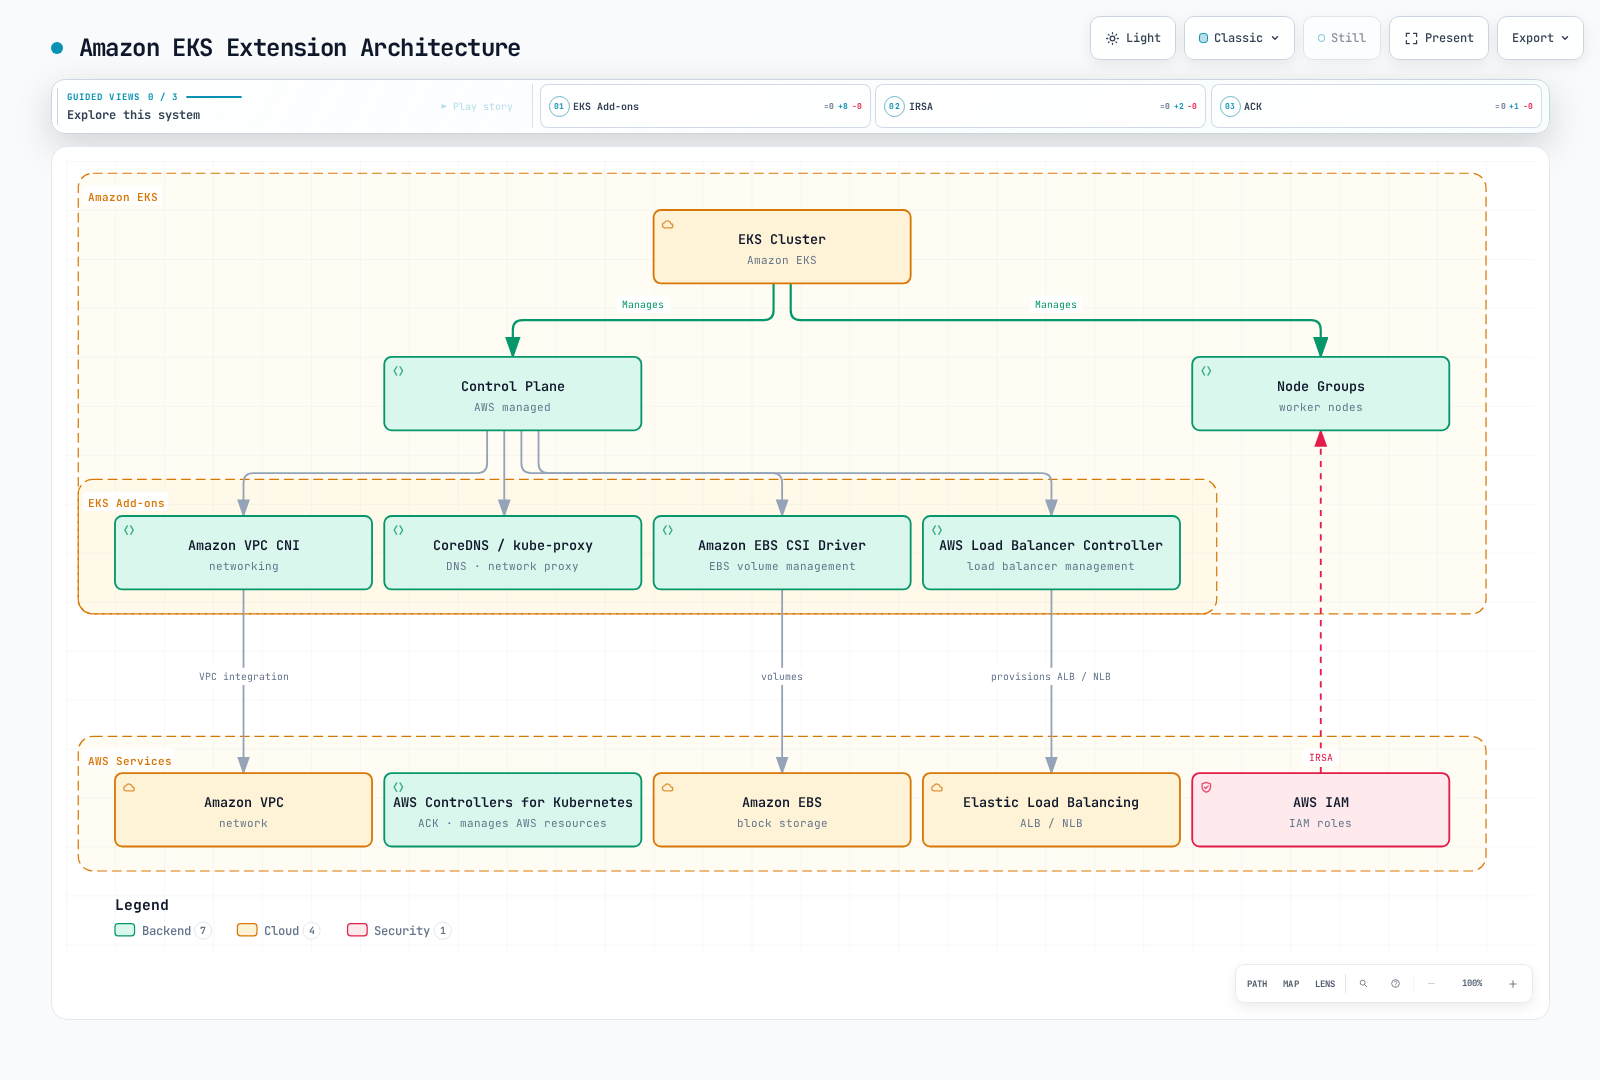
Amazon EKS 支持多种扩展功能,以扩展 Kubernetes 集群功能。
下图展示了 Amazon EKS 中的扩展功能架构:
EKS Add-ons
Amazon EKS 提供以下 add-on:
- Amazon VPC CNI:与 AWS VPC 集成的网络
- CoreDNS:集群内的 DNS 服务
- kube-proxy:网络代理
- Amazon EBS CSI Driver:EBS 卷管理
- AWS Load Balancer Controller:使用受支持的 Helm/manifests 单独安装;不要假设每个扩展都是 EKS 托管 add-on。
set -euo pipefail
: "${CLUSTER_NAME:?Set cluster name}"
KUBERNETES_VERSION=$(aws eks describe-cluster --name "$CLUSTER_NAME" --query cluster.version --output text)
aws eks list-addons --cluster-name "$CLUSTER_NAME"
aws eks describe-addon-versions --addon-name amazon-ebs-csi-driver --kubernetes-version "$KUBERNETES_VERSION"
# Choose a compatible version and prepare the controller's scoped IAM role first.
: "${ADDON_VERSION:?Set reviewed compatible add-on version}"
: "${EBS_ROLE_ARN:?Set EBS CSI IRSA role ARN}"
aws eks create-addon --cluster-name "$CLUSTER_NAME" --addon-name amazon-ebs-csi-driver \
  --addon-version "$ADDON_VERSION" --service-account-role-arn "$EBS_ROLE_ARN"
# For an existing installation, use update-addon instead of create-addon.
# To stop EKS management while retaining the workload (not uninstall it):
# aws eks delete-addon --cluster-name "$CLUSTER_NAME" --addon-name amazon-ebs-csi-driver --preserve
AWS Controllers for Kubernetes(ACK)
ACK 是一组 Operator,可从 Kubernetes 管理 AWS 资源:
set -euo pipefail
: "${ACK_VERSION:?Set a reviewed S3 controller chart version}"
: "${AWS_REGION:?Set target service region}"
# First prepare ack-s3-controller ServiceAccount with scoped IRSA/Pod Identity permissions.
helm upgrade --install ack-s3-controller oci://public.ecr.aws/aws-controllers-k8s/s3-chart \
  --version "$ACK_VERSION" --namespace ack-system --create-namespace \
  --set aws.region="$AWS_REGION" --set serviceAccount.create=false \
  --set serviceAccount.name=ack-s3-controller
# Creating a Bucket CR provisions a real AWS resource: review IAM, naming and retention first.
以下 Bucket 示例会在配置控制器和 IAM 权限后预置真实 AWS 资源。请将名称替换为全局唯一的值,并审查生命周期/保留设置。删除 Kubernetes 对象可能会删除 Bucket;请根据您的数据保留要求配置控制器删除策略。
apiVersion: s3.services.k8s.aws/v1alpha1
kind: Bucket
metadata:
  name: example-bucket
spec:
  name: replace-with-your-globally-unique-bucket-name
AWS Load Balancer Controller
AWS Load Balancer Controller 将 Kubernetes Service 和 Ingress 与 AWS 负载均衡器集成:
# ALB Ingress example
apiVersion: networking.k8s.io/v1
kind: Ingress
metadata:
  name: example-ingress
  annotations:
    alb.ingress.kubernetes.io/scheme: internet-facing
    alb.ingress.kubernetes.io/target-type: ip
spec:
  ingressClassName: alb
  rules:
  - host: example.com
    http:
      paths:
      - path: /
        pathType: Prefix
        backend:
          service:
            name: example-service
            port:
              number: 80
Service Accounts 的 IAM 角色(IRSA)
IRSA 通过将 AWS IAM 角色与 Kubernetes Service Accounts 关联,使 Pods 能够安全地访问 AWS 服务:
# Create OIDC provider
: "${S3_READ_POLICY_ARN:?Set a customer-managed policy restricted to your bucket/prefix}"
eksctl utils associate-iam-oidc-provider \
  --cluster my-cluster \
  --approve

# Create IAM role and service account
eksctl create iamserviceaccount \
  --cluster my-cluster \
  --namespace default \
  --name my-service-account \
  --attach-policy-arn "$S3_READ_POLICY_ARN" \
  --approve

# Pod using service account
cat <<EOF | kubectl apply -f -
apiVersion: v1
kind: Pod
metadata:
  name: s3-reader
spec:
  serviceAccountName: my-service-account
  restartPolicy: Never
  containers:
  - name: aws-cli
    image: public.ecr.aws/aws-cli/aws-cli:REPLACE_WITH_TESTED_RELEASE
    command: [aws]
    args: [sts, get-caller-identity]
EOF
最佳实践
让我们探讨实现 Kubernetes 扩展功能时需要考虑的最佳实践。
设计最佳实践
- 使用标准接口:尽可能使用 CSI、CNI 等标准接口
- 声明式 API 设计:设计声明式 API,而不是命令式 API
- 遵循 Kubernetes 设计原则:遵循控制器模式、水平触发等原则
- 版本管理:管理 API 版本并保持兼容性
- 最小权限原则:仅授予必要的最少权限
实现最佳实践
- 利用可复用库:利用 client-go、controller-runtime 等库
- 适当的错误处理:妥善处理和记录错误情况
- 指数退避:重试时使用指数退避
- 设置资源限制:设置内存和 CPU 限制
- 状态报告:准确报告资源状态
部署最佳实践
- 渐进式发布:逐步发布,而不是一次性更改所有内容
- 版本管理:避免对镜像使用 latest 标签
- 健康检查:配置适当的存活和就绪探针
- 日志和监控:配置全面的日志和监控
- 文档:记录 API 和用法
安全最佳实践
- 最小权限原则:仅授予必要的最少权限
- 使用 RBAC:配置适当的 RBAC 策略
- 网络策略:配置适当的网络策略
- 镜像扫描:扫描容器镜像中的漏洞
- Secret 管理:安全地管理 Secret
EKS 特定最佳实践
- 使用托管 Add-ons:尽可能使用 EKS 托管 add-on
- 使用 IRSA:使用 IRSA 进行每 Pod IAM 权限管理
- VPC CNI 配置:根据网络要求配置 VPC CNI
- 安全组:配置适当的安全组
- 成本优化:选择适当的实例类型和大小
结论
Kubernetes 提供多种扩展点,用于扩展和自定义其基础功能。自定义资源、Operator、准入控制器、API Server 扩展、调度器扩展、CSI、CNI 和设备插件让您能够使 Kubernetes 适应各种环境和要求。
Amazon EKS 支持这些扩展功能,并额外提供 EKS add-on、ACK、AWS Load Balancer Controller 和 IRSA 等 AWS 特定功能,以简化 Kubernetes 与 AWS 服务之间的集成。
实现 Kubernetes 扩展功能时,遵循使用标准接口、声明式 API 设计和最小权限原则等最佳实践非常重要。这样,您便能构建稳定且可扩展的 Kubernetes 环境。
测验
要测试您在本章所学的知识,请尝试 扩展 Kubernetes 测验。
验证参考资料
- https://kubernetes.io/releases/
- https://kubernetes.io/docs/reference/access-authn-authz/admission-controllers/
- https://kubernetes.io/docs/reference/access-authn-authz/extensible-admission-controllers/
- https://kubernetes.io/docs/tasks/extend-kubernetes/custom-resources/custom-resource-definitions/
- https://kubernetes.io/docs/tasks/extend-kubernetes/custom-resources/custom-resource-definition-versioning/
- https://kubernetes.io/docs/tasks/extend-kubernetes/configure-aggregation-layer/
- https://kubernetes.io/docs/concepts/scheduling-eviction/scheduling-framework/
- https://github.com/kubernetes/kubernetes/blob/v1.37.0/pkg/scheduler/apis/config/types.go
- https://github.com/kubernetes/cloud-provider-aws/blob/master/docs/prerequisites.md
- https://github.com/kubernetes/cloud-provider-aws/blob/master/examples/existing-cluster/base/aws-cloud-controller-manager-daemonset.yaml
- https://github.com/kubernetes-sigs/kubebuilder/blob/master/README.md
- https://github.com/operator-framework/operator-sdk/blob/master/README.md
- https://github.com/NVIDIA/k8s-device-plugin/blob/main/README.md
- https://github.com/jaegertracing/jaeger-operator/blob/main/README.md
- https://istio.io/latest/blog/2024/in-cluster-operator-deprecation-announcement/
- https://docs.aws.amazon.com/eks/latest/userguide/eks-add-ons.html
- https://docs.aws.amazon.com/eks/latest/userguide/lbc-helm.html
- https://docs.aws.amazon.com/eks/latest/userguide/kubernetes-versions-standard.html
- https://github.com/aws-controllers-k8s/community/blob/main/docs/content/docs/user-docs/install.md
- https://github.com/aws-controllers-k8s/s3-controller/blob/main/helm/values.yaml