トラフィック管理クイズ
対応バージョン: Istio 1.28.0 EKS バージョン: 1.34 (Kubernetes 1.28+) 最終更新: February 23, 2026
このクイズでは、Istio のトラフィック管理機能に関する理解を確認します。
選択式問題 (1-5)
問題 1: VirtualService の役割
VirtualService に関する記述として正しいものはどれですか?
A. Kubernetes Service を置き換えるリソースである B. ロードバランシングアルゴリズムのみを定義できる C. ルーティングルールを定義し、トラフィックを制御する D. Control Plane でのみ動作する
回答を表示
回答: C
VirtualService は、ルーティングルールを定義してトラフィックを制御する Istio のコア CRD です。
解説:
- A (X): VirtualService は Kubernetes Service を置き換えるものではなく、Service の上にルーティングルールを追加します
- B (X): ロードバランシングは DestinationRule が処理し、VirtualService はルーティングルールを定義します
- C (O): VirtualService は以下を定義します:
- HTTP/TCP ルーティングルール
- URL パスベースルーティング
- ヘッダーベースルーティング
- 重みベースのトラフィック分割
- Timeout と Retry の設定
- D (X): VirtualService は Data Plane の Envoy で動作します
例:
apiVersion: networking.istio.io/v1beta1
kind: VirtualService
metadata:
  name: reviews
spec:
  hosts:
  - reviews
  http:
  - match:
    - headers:
        end-user:
          exact: jason
    route:
    - destination:
        host: reviews
        subset: v2
  - route:
    - destination:
        host: reviews
        subset: v1
参照:
問題 2: DestinationRule の機能
DestinationRule が実行する機能ではないものはどれですか?
A. Subset の定義 B. ロードバランシングアルゴリズムの設定 C. HTTP パスベースルーティング D. Connection Pool の設定
回答を表示
回答: C
HTTP パスベースルーティングは VirtualService の役割です。
解説:
DestinationRule の主な機能:
- Subset の定義 (A - O)
apiVersion: networking.istio.io/v1beta1
kind: DestinationRule
metadata:
  name: reviews
spec:
  host: reviews
  subsets:
  - name: v1
    labels:
      version: v1
  - name: v2
    labels:
version: v2- ロードバランシング設定 (B - O)
spec:
  trafficPolicy:
    loadBalancer:
simple: ROUND_ROBIN # RANDOM, LEAST_REQUEST, etc.- Connection Pool 設定 (D - O)
spec:
  trafficPolicy:
    connectionPool:
      tcp:
        maxConnections: 100
      http:
http1MaxPendingRequests: 50- HTTP パスベースルーティング (C - X)
- これは VirtualService の役割です:
# Handled by VirtualService
apiVersion: networking.istio.io/v1beta1
kind: VirtualService
spec:
  http:
  - match:
    - uri:
        prefix: /api  # Path-based routing
    route:
    - destination:
        host: api-service
比較表:
| 機能 | VirtualService | DestinationRule |
|---|---|---|
| ルーティングルール | はい | いいえ |
| パスマッチング | はい | いいえ |
| Subset の定義 | いいえ | はい |
| ロードバランシング | いいえ | はい |
| Connection Pool | いいえ | はい |
参照:
問題 3: Canary Deployment のトラフィック分割
次の VirtualService 設定における v1 と v2 のトラフィック比率はどれですか?
apiVersion: networking.istio.io/v1beta1
kind: VirtualService
metadata:
  name: reviews
spec:
  hosts:
  - reviews
  http:
  - route:
    - destination:
        host: reviews
        subset: v1
      weight: 80
    - destination:
        host: reviews
        subset: v2
      weight: 20
A. v1: 50%, v2: 50% B. v1: 80%, v2: 20% C. v1: 20%, v2: 80% D. v1: 100%, v2: 0%
回答を表示
回答: B
weight の値が v1: 80、v2: 20 であるため、トラフィックは v1 に 80%、v2 に 20% 分配されます。
解説:
重みベースのトラフィック分割:
weightフィールドは相対比率を表します- 重みの合計: 80 + 20 = 100
- v1 の比率: 80/100 = 80%
- v2 の比率: 20/100 = 20%
Canary Deployment のステージ:
# Stage 1: 10% Canary
- weight: 90  # v1
- weight: 10  # v2

# Stage 2: 25% Canary
- weight: 75  # v1
- weight: 25  # v2

# Stage 3: 50% Canary
- weight: 50  # v1
- weight: 50  # v2

# Stage 4: 100% v2
- weight: 0   # v1
- weight: 100 # v2
Argo Rollouts による自動 Canary:
apiVersion: argoproj.io/v1alpha1
kind: Rollout
spec:
  strategy:
    canary:
      trafficRouting:
        istio:
          virtualService:
            name: reviews
      steps:
      - setWeight: 10
      - pause: {duration: 2m}
      - setWeight: 25
      - pause: {duration: 2m}
      - setWeight: 50
      - pause: {duration: 2m}
参照:
問題 4: Gateway の目的
Istio Gateway の主な役割ではないものはどれですか?
A. クラスター外部から内部へのトラフィックのエントリーポイント B. TLS 終端と証明書管理 C. サービス間の mTLS 暗号化 D. 外部トラフィックのロードバランシング
回答を表示
回答: C
サービス間の mTLS 暗号化は Sidecar Envoy と PeerAuthentication の役割です。
解説:
Gateway の主な役割:
- Ingress/Egress トラフィックのエントリーポイント (A - O)
apiVersion: networking.istio.io/v1beta1
kind: Gateway
metadata:
  name: bookinfo-gateway
spec:
  selector:
    istio: ingressgateway  # Select Ingress Gateway Pod
  servers:
  - port:
      number: 80
      name: http
      protocol: HTTP
    hosts:
- "*"- TLS 終端 (B - O)
spec:
  servers:
  - port:
      number: 443
      name: https
      protocol: HTTPS
    tls:
      mode: SIMPLE
      credentialName: bookinfo-secret  # TLS certificate
    hosts:
- bookinfo.example.com- 外部トラフィックのロードバランシング (D - O)
- Gateway は Kubernetes LoadBalancer Service と統合されます
- 外部トラフィックをクラスター内へ分配します
- サービス間 mTLS (C - X)
- これは Sidecar Envoy の役割です:
# Enable mTLS with PeerAuthentication
apiVersion: security.istio.io/v1beta1
kind: PeerAuthentication
metadata:
  name: default
spec:
  mtls:
    mode: STRICT
Gateway と Sidecar の役割:
| 機能 | Gateway | Sidecar Envoy |
|---|---|---|
| 外部 -> 内部トラフィック | はい | いいえ |
| TLS 終端 | はい | いいえ |
| サービス間 mTLS | いいえ | はい |
| 内部ルーティング | いいえ | はい |
参照:
問題 5: Timeout と Retry ポリシー
次の VirtualService 設定は何を意味しますか?
apiVersion: networking.istio.io/v1beta1
kind: VirtualService
metadata:
  name: reviews
spec:
  hosts:
  - reviews
  http:
  - route:
    - destination:
        host: reviews
    timeout: 10s
    retries:
      attempts: 3
      perTryTimeout: 2s
A. 元のリクエストの後に最大 3 回 Retry し、各配信は 2 秒に制限され、リクエスト全体は 10 秒に制限される B. 合計 2 秒以内に最大 3 回 Retry し、各試行は 10 秒に制限される C. 合計 10 秒以内に無制限に Retry し、各試行は 2 秒に制限される D. Retry せずに 10 秒後に失敗する
回答を表示
回答: A
この設定では、元のリクエストの後に最大 3 回追加で Retry でき、各配信は 2 秒、リクエスト全体は 10 秒 に制限されます。したがって、リクエストは最大 4 回 upstream に配信される可能性があります。
解説:
設定の解釈:
timeout: 10s           # Maximum time for entire request
retries:
  attempts: 3          # Up to 3 retries after the original request
  perTryTimeout: 2s    # Time limit for each delivery
実行シナリオ:
Scenario 1: First attempt succeeds
+- 1st attempt: 1.5s elapsed -> Success
+- Total time: 1.5s

Scenario 2: Success after 2 attempts
+- 1st attempt: 2s timeout -> Failure
+- 2nd attempt: 1.8s elapsed -> Success
+- Total time: 3.8s

Scenario 3: Original request plus all 3 retries fail
+- 1st attempt: 2s timeout -> Failure
+- 2nd attempt: 2s timeout -> Failure
+- 3rd attempt: 2s timeout -> Failure
+- 4th attempt: 2s timeout -> Failure
+- Total time: about 8s
Retry 条件設定:
retries:
  attempts: 3
  perTryTimeout: 2s
  retryOn: 5xx,connect-failure,refused-stream  # Retry conditions
ベストプラクティス:
# Read requests: limited retry
- match:
  - method:
      regex: "^(GET|HEAD)$"
  retries:
    attempts: 2
    perTryTimeout: 2s
    retryOn: connect-failure,refused-stream

# Write requests: disable mesh retry
- match:
  - method:
      regex: "^(POST|PATCH)$"
  retries:
    attempts: 0
注意事項:
- すべての Retry を考慮するには、backoff を含めて
timeoutをおおむね(1 + attempts) x perTryTimeoutより大きくする必要があります - Retry が多すぎるとカスケード障害を引き起こす可能性があります
attempts: 0は Retry を無効にし、attempts: 1は元のリクエスト後に 1 回の再試行を許可します- POST/PATCH では、サーバーがコミット済みでレスポンスだけを失う可能性があるため、デフォルトで mesh Retry を無効にします
- Workload mTLS またはネットワーク暗号化によって、リクエストの再送が安全になるわけではありません
参照:
記述式問題 (6-10)
問題 6: Argo Rollouts + Istio Canary Deployment
Argo Rollouts と Istio を併用して自動 Canary Deployment を実装するプロセスを説明してください。必要なリソース (Rollout、VirtualService、DestinationRule、AnalysisTemplate) と自動ロールバック条件を含めてください。
回答を表示
回答:
Argo Rollouts + Istio Canary Deployment の実装:
1. Service の作成 (基本 Kubernetes Service)
apiVersion: v1
kind: Service
metadata:
  name: reviews
spec:
  ports:
  - port: 9080
    name: http
  selector:
    app: reviews  # Select all Pods from Rollout
2. DestinationRule の定義 (Subset 定義)
apiVersion: networking.istio.io/v1beta1
kind: DestinationRule
metadata:
  name: reviews-destrule
spec:
  host: reviews
  subsets:
  - name: stable
    labels: {}  # Managed automatically by Rollout
  - name: canary
labels: {} # Managed automatically by Rollout重要: Rollout は自動的に rollouts-pod-template-hash ラベルを Pod に追加し、このラベルを使用して Subset を区別します。
3. VirtualService の定義 (トラフィック分割)
apiVersion: networking.istio.io/v1beta1
kind: VirtualService
metadata:
  name: reviews-vsvc
spec:
  hosts:
  - reviews
  http:
  - name: primary  # Route name referenced by Rollout (required)
    route:
    - destination:
        host: reviews
        subset: stable
      weight: 100  # Automatically modified by Rollout
    - destination:
        host: reviews
        subset: canary
weight: 0 # Automatically modified by Rollout重要なポイント:
http[].nameフィールドは必須です- Rollout はこの VirtualService の
weight値のみを自動更新します
4. AnalysisTemplate の定義 (自動ロールバック条件)
成功率分析:
apiVersion: argoproj.io/v1alpha1
kind: AnalysisTemplate
metadata:
  name: success-rate
spec:
  args:
  - name: service-name

  metrics:
  - name: success-rate
    interval: 30s
    count: 4  # 4 measurements (total 2 minutes)
    successCondition: result >= 0.95  # 95% or higher success rate
    failureLimit: 2  # Auto rollback after 2 failures
    provider:
      prometheus:
        address: http://prometheus.istio-system:9090
        query: |
          sum(rate(
            istio_requests_total{
              destination_service_name="{{args.service-name}}",
              response_code!~"5.*"
            }[2m]
          ))
          /
          sum(rate(
            istio_requests_total{
              destination_service_name="{{args.service-name}}"
            }[2m]
          ))
レイテンシー分析:
apiVersion: argoproj.io/v1alpha1
kind: AnalysisTemplate
metadata:
  name: latency
spec:
  args:
  - name: service-name

  metrics:
  - name: latency-p95
    interval: 30s
    count: 4
    successCondition: result <= 500  # P95 latency 500ms or less
    failureLimit: 2
    provider:
      prometheus:
        address: http://prometheus.istio-system:9090
        query: |
          histogram_quantile(0.95,
            sum(rate(
              istio_request_duration_milliseconds_bucket{
                destination_service_name="{{args.service-name}}"
              }[2m]
            )) by (le)
          )
5. Rollout リソースの定義 (Canary 戦略)
apiVersion: argoproj.io/v1alpha1
kind: Rollout
metadata:
  name: reviews
spec:
  replicas: 5
  revisionHistoryLimit: 2
  selector:
    matchLabels:
      app: reviews
  template:
    metadata:
      labels:
        app: reviews
    spec:
      containers:
      - name: reviews
        image: istio/examples-bookinfo-reviews-v2:1.17.0
        ports:
        - containerPort: 9080

  # Canary deployment strategy
  strategy:
    canary:
      # Traffic control via Istio VirtualService
      trafficRouting:
        istio:
          virtualService:
            name: reviews-vsvc
            routes:
            - primary
          destinationRule:
            name: reviews-destrule
            canarySubsetName: canary
            stableSubsetName: stable

      # Define Canary stages
      steps:
      - setWeight: 10    # 10% traffic to Canary
      - pause:
          duration: 2m

      - setWeight: 25    # 25% traffic to Canary
      - pause:
          duration: 2m

      - setWeight: 50    # 50% traffic to Canary
      - pause:
          duration: 2m

      - setWeight: 75    # 75% traffic to Canary
      - pause:
          duration: 2m

      # Automatic metric analysis
      analysis:
        templates:
        - templateName: success-rate
        - templateName: latency
        startingStep: 1
        args:
        - name: service-name
          value: reviews
6. Deployment の実行とモニタリング
# Install Argo Rollouts
kubectl create namespace argo-rollouts
kubectl apply -n argo-rollouts -f https://github.com/argoproj/argo-rollouts/releases/latest/download/install.yaml

# Deploy resources
kubectl apply -f service.yaml
kubectl apply -f destination-rule.yaml
kubectl apply -f virtual-service.yaml
kubectl apply -f analysis-templates.yaml
kubectl apply -f rollout.yaml

# Deploy new version
kubectl argo rollouts set image reviews \
  reviews=istio/examples-bookinfo-reviews-v3:1.17.0

# Monitor deployment status in real-time
kubectl argo rollouts get rollout reviews --watch

# Rollout dashboard
kubectl argo rollouts dashboard
自動ロールバックのシナリオ:
シナリオ 1: エラー率 > 5%
10% Canary -> Analysis starts
+- Measurement 1 (30s): 6% error rate -> Failure (1/2)
+- Measurement 2 (30s): 7% error rate -> Failure (2/2)
+- Auto rollback executed -> Stable 100%
シナリオ 2: レイテンシー > 500ms
25% Canary -> Analysis starts
+- Measurement 1 (30s): P95 600ms -> Failure (1/2)
+- Measurement 2 (30s): P95 550ms -> Failure (2/2)
+- Auto rollback executed -> Stable 100%
シナリオ 3: すべてのメトリクスが正常
10% Canary -> Analysis passed -> 25% Canary
25% Canary -> Analysis passed -> 50% Canary
50% Canary -> Analysis passed -> 75% Canary
75% Canary -> Analysis passed -> 100% Canary
主な利点:
- 完全自動化: 人による介入なしに Deployment が進行します
- 即時ロールバック: メトリクス障害の検出後、数秒以内にロールバックします
- 安全な Deployment: 各ステージで自動検証します
- 一貫したプロセス: 標準化された Deployment 戦略です
参照:
問題 7: Blue/Green Deployment と Canary Deployment
Blue/Green Deployment と Canary Deployment の違いを比較し、それぞれの長所と短所、およびユースケースを説明してください。
回答を表示
回答:
Blue/Green Deployment と Canary Deployment の比較:
1. Deployment 手法の違い
Blue/Green Deployment:
Blue (current version) --+
                         +--> [100% Traffic]
Green (new version) -----+

Stage 1: Blue 100% active
Stage 2: Deploy and test Green (0% traffic)
Stage 3: Switch traffic (Blue 0% -> Green 100%)
Stage 4: Remove Blue
Canary Deployment:
Stable (current version) --> 90% -> 75% -> 50% -> 0%
Canary (new version) -----> 10% -> 25% -> 50% -> 100%

Gradually increase traffic
2. 詳細比較表
| 項目 | Blue/Green | Canary |
|---|---|---|
| トラフィック切替 | 即時の 100% 切替 | 段階的な増加 (10% -> 100%) |
| ロールバック速度 | 即時 (1 回の切替) | 高速 (現在のステージからのみ) |
| リソース使用量 | 2 倍 (Blue + Green) | 1 倍 + 少量 (Stable + Canary) |
| リスクレベル | 中 (すべてのユーザーが同時) | 低 (少数のユーザーから開始) |
| テスト期間 | Deployment 前に十分なテスト | 本番環境で段階的に検証 |
| 複雑さ | 低 | 中 (メトリクス分析が必要) |
| ユーザーへの影響 | 全ユーザーが同時に影響を受ける | 少数のユーザーから段階的に影響を受ける |
3. Istio 実装例
Blue/Green Deployment (Argo Rollouts):
apiVersion: argoproj.io/v1alpha1
kind: Rollout
metadata:
  name: myapp
spec:
  replicas: 5
  strategy:
    blueGreen:
      activeService: myapp-active    # Blue (production)
      previewService: myapp-preview  # Green (test)
      autoPromotionEnabled: false    # Manual approval
      scaleDownDelaySeconds: 30      # Remove previous version 30s after Green -> Blue switch

      # Pre-promotion testing
      prePromotionAnalysis:
        templates:
        - templateName: smoke-tests

      # Post-promotion validation
      postPromotionAnalysis:
        templates:
        - templateName: performance-tests
Canary Deployment (Argo Rollouts):
apiVersion: argoproj.io/v1alpha1
kind: Rollout
metadata:
  name: myapp
spec:
  replicas: 5
  strategy:
    canary:
      trafficRouting:
        istio:
          virtualService:
            name: myapp-vsvc
      steps:
      - setWeight: 10
      - pause: {duration: 2m}
      - analysis:
          templates:
          - templateName: success-rate
      - setWeight: 25
      - pause: {duration: 2m}
      - analysis:
          templates:
          - templateName: success-rate
      - setWeight: 50
      - pause: {duration: 2m}
      - setWeight: 100
4. 長所と短所の比較
Blue/Green の長所:
- シンプルな構造 (Blue <-> Green の切替のみ)
- 即時ロールバックが可能 (切替を戻すだけ)
- Deployment 前に十分なテストが可能
- 予測可能な動作
Blue/Green の短所:
- 2 倍のリソースが必要
- すべてのユーザーが同時に影響を受ける
- データベースマイグレーションが複雑
- 段階的な検証がない
Canary の長所:
- 少数のユーザーから段階的に検証できる
- リソース効率がよい (1 倍 + 少量)
- 本番環境で実際の検証ができる
- 自動ロールバックが可能 (メトリクスベース)
Canary の短所:
- 設定が複雑 (メトリクス、分析)
- モニタリングが必要
- Deployment 時間が長い
- バージョン共存期間がある
5. ユースケース
Blue/Green が推奨されるシナリオ:
- 重要なリリース: 十分なテスト後に素早く切り替える場合
- データベース変更なし: スキーマ変更がない場合
- 即時ロールバックが必要: 問題発生時に迅速な復旧が必要な場合
- 十分なリソース: 2 倍のリソースを確保できる場合
- 予測可能な変更: 事前テストで十分に検証できる場合
例:
- Major feature releases
- Complete UI redesign
- API version upgrades
- Marketing campaign integration (switch at specific time)
Canary が推奨されるシナリオ:
- 実験的な機能: まず少数のユーザーでテストする場合
- リソース制約: 2 倍のリソースを利用できない場合
- 段階的な検証: 本番環境の実データで検証する場合
- 自動 Deployment: CI/CD で自動 Deployment する場合
- Microservices: Service の依存関係が複雑な場合
例:
- A/B testing
- Performance optimization
- Bug fixes
- Minor feature additions
- Daily deployment (Continuous Deployment)
6. ハイブリッドアプローチ
実際には、両方の戦略を組み合わせることができます:
# Stage 1: Gradual validation with Canary
10% -> 25% -> 50%

# Stage 2: Final switch with Blue/Green
50% -> 100% (instant switch)
参照:
問題 8: トラフィックミラーリング (Shadow Testing)
Traffic Mirroring を使用して新しいバージョンを安全にテストする方法を説明してください。ユースケース、設定方法、および注意事項を含めてください。
回答を表示
回答:
Traffic Mirroring の概念:
Traffic Mirroring は、本番トラフィックを複製して新しいバージョンへ送信し、レスポンスを無視する手法です。「shadow testing」とも呼ばれます。
1. 仕組み
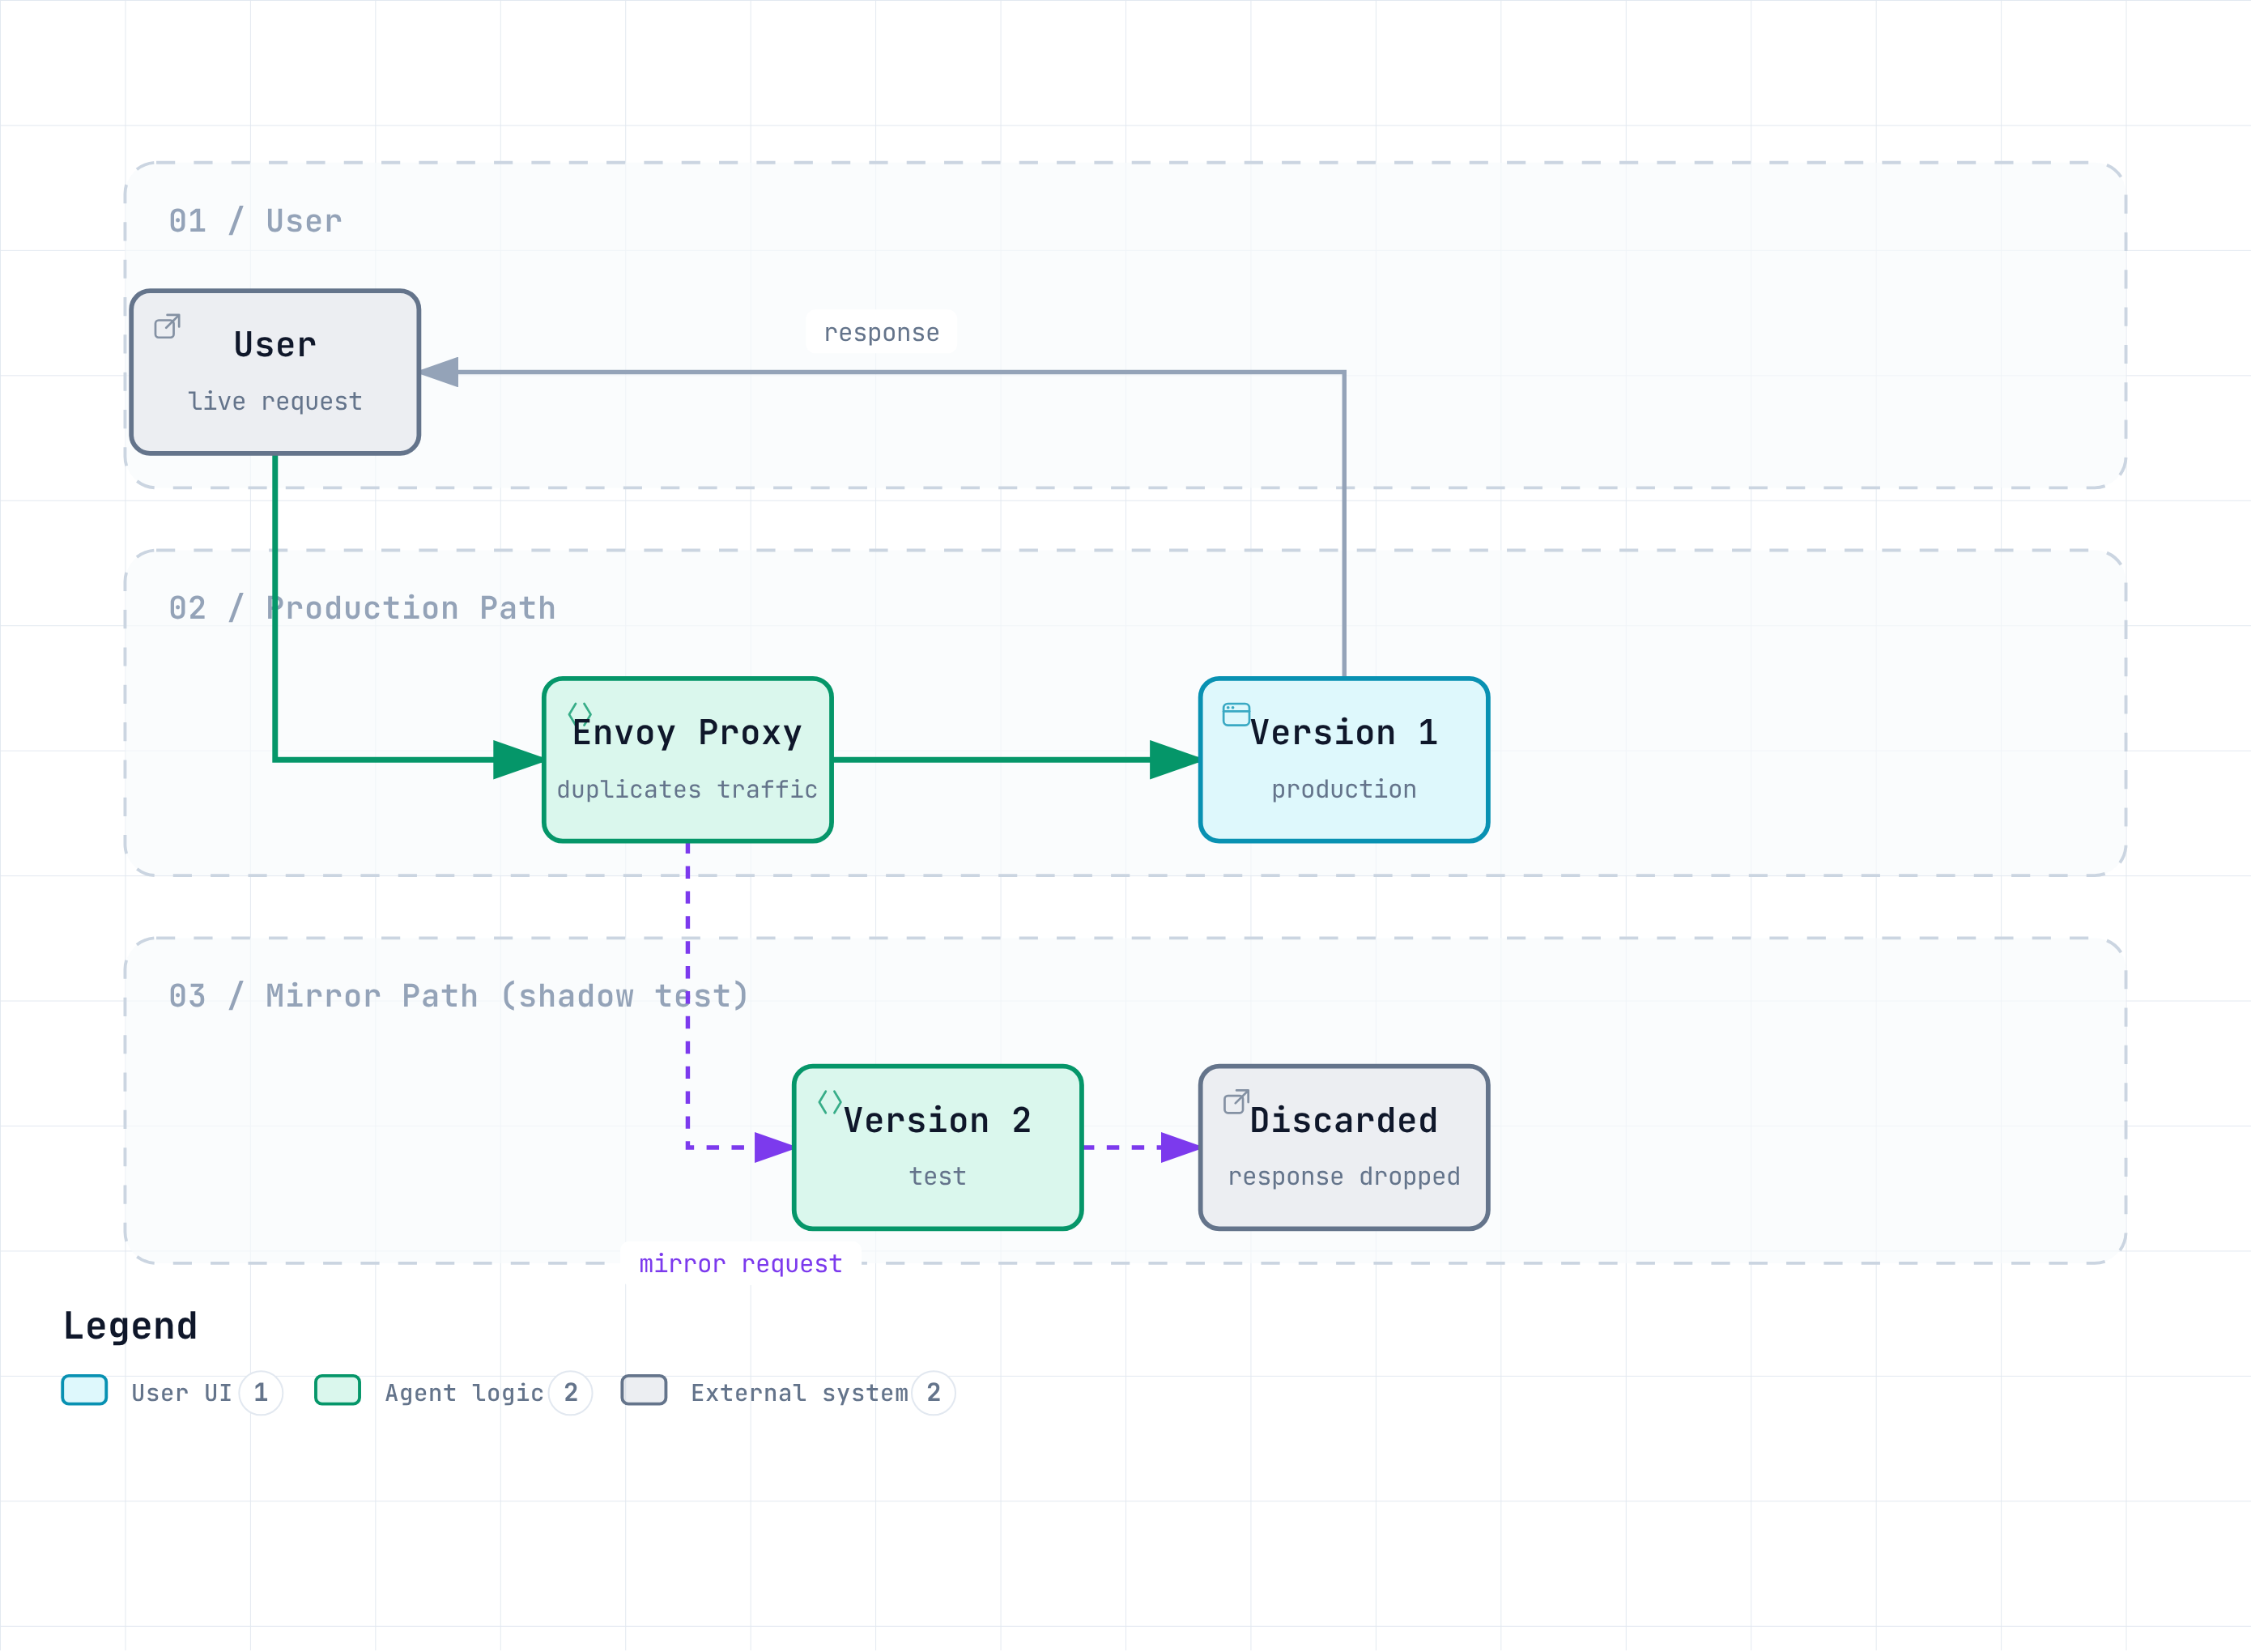
主な特性:
- ユーザーが受け取るのは v1 のレスポンスのみです
- v2 のレスポンスは Envoy により破棄されます
- v2 のエラーはユーザーに影響しません
2. 設定方法
基本ミラーリング (100%):
apiVersion: networking.istio.io/v1beta1
kind: VirtualService
metadata:
  name: reviews
spec:
  hosts:
  - reviews
  http:
  - route:
    - destination:
        host: reviews
        subset: v1
      weight: 100  # Primary traffic
    mirror:
      host: reviews
      subset: v2  # Mirror target
    mirrorPercentage:
      value: 100  # 100% mirroring
部分ミラーリング (50%):
spec:
  http:
  - route:
    - destination:
        host: reviews
        subset: v1
      weight: 100
    mirror:
      host: reviews
      subset: v2
    mirrorPercentage:
      value: 50  # Only 50% mirroring (reduce traffic load)
ミラーリング + Canary の組み合わせ:
spec:
  http:
  - route:
    # Primary traffic: 90% v1, 10% v2
    - destination:
        host: reviews
        subset: v1
      weight: 90
    - destination:
        host: reviews
        subset: v2
      weight: 10

    # Mirroring: Mirror all traffic to v3 (test)
    mirror:
      host: reviews
      subset: v3
    mirrorPercentage:
      value: 100
3. ユースケース
ケース 1: 新バージョンのパフォーマンステスト
Purpose: Verify if v2's performance is better than v1

1. Run v1 (production) + v2 (mirror) simultaneously
2. Monitor v2's latency, CPU, memory
3. If v2 is faster than v1 -> Proceed with Canary deployment
4. If v2 is slower than v1 -> Optimize and retest
ケース 2: データベースマイグレーションの検証
Purpose: Verify new database schema

1. v1 -> Existing DB
2. v2 -> New DB (mirroring)
3. Verify v2's query performance and error rate
4. If no issues -> Switch to v2
ケース 3: バグ修正の検証
Purpose: Verify that bug fix actually works

1. Run v1 (with bug) + v2 (fixed version, mirror)
2. Test v2 with production traffic
3. If v2's error rate decreases -> Deploy
ケース 4: キャッシュウォーミング
Purpose: Pre-populate new version's cache

1. Warm cache via mirroring before v2 deployment
2. Once v2's cache is sufficiently populated
3. No cold start when switching to v2
4. モニタリング設定
Prometheus Query によるミラートラフィックの監視:
# v2 (mirror) error rate
sum(rate(
  istio_requests_total{
    destination_version="v2",
    response_code=~"5.."
  }[5m]
))
/
sum(rate(
  istio_requests_total{
    destination_version="v2"
  }[5m]
))

# v1 vs v2 latency comparison
histogram_quantile(0.95,
  sum(rate(
    istio_request_duration_milliseconds_bucket[5m]
  )) by (destination_version, le)
)
Grafana Dashboard:
# Panel 1: Error rate comparison (v1 vs v2)
# Panel 2: Latency comparison (P50, P95, P99)
# Panel 3: CPU/Memory usage
# Panel 4: Request count (v1: actual, v2: mirror)
5. 注意事項
警告 - 負荷の増加:
Mirroring increases service load.

Example:
- v1: 1000 RPS
- v2: 1000 RPS (mirror)
- Total load: 2000 RPS

Solution: Set mirrorPercentage to 50% or less
警告 - 副作用に注意:
# Don't mirror write operations!

# Bad example
POST /api/orders  # Both v1 and v2 create orders -> Duplicates!

# Good example
GET /api/orders   # Mirror only read-only operations
警告 - コスト:
Mirroring increases resources and costs.

- 2x computing resources
- 2x network traffic
- 2x database queries

Solution: Mirror only for short periods (1-2 days)
警告 - レスポンスを検証できない:
Mirror traffic responses are discarded, so
you cannot validate response content.

Can validate:
- Error rate
- Latency
- Resource usage

Cannot validate:
- Response data accuracy
- Business logic verification
6. ベストプラクティス
# Good examples
1. Mirror only read-only APIs
2. mirrorPercentage: 50% (reduce load)
3. Short-term testing (1-2 days)
4. Automatic validation based on metrics

# Bad examples
1. Mirroring write operations (duplicate data)
2. mirrorPercentage: 100% (overload)
3. Long-term mirroring (cost increase)
4. Manual validation (slow)
参照:
問題 9: Locality Load Balancing (Zone Aware Routing)
Istio の Locality Load Balancing を使用して、AWS EKS のクロス AZ コストを削減する方法を説明してください。設定例と推定コスト削減額を含めてください。
回答を表示
回答:
Locality Load Balancing の概念:
Locality Load Balancing は、ネットワークレイテンシーとクロス AZ コストを削減するために、同じ Availability Zone (AZ) 内の Service へ優先的にルーティングする機能です。
1. AWS EKS におけるクロス AZ コスト
コスト構造:
Same AZ traffic: Free
Cross-AZ traffic: $0.01-0.02 per GB
Cross-Region traffic: $0.02-0.09 per GB
計算例:
Service A (us-east-1a) -> Service B (us-east-1b)
- Monthly traffic: 1TB = 1000GB
- Cross-AZ cost: 1000GB x $0.01 = $10/month

If 80% traffic is routed to same AZ:
- Same AZ: 800GB x $0 = $0
- Cross-AZ: 200GB x $0.01 = $2/month
- Savings: $8/month (80%)
2. EKS Pod トポロジーラベル
EKS ノードにはトポロジーラベルが自動的に設定されます:
# EKS node labels (automatic)
topology.kubernetes.io/region: us-east-1
topology.kubernetes.io/zone: us-east-1a

# Pods inherit node labels
3. Locality Load Balancing の設定
基本設定 (同一 AZ 優先):
apiVersion: networking.istio.io/v1beta1
kind: DestinationRule
metadata:
  name: reviews
spec:
  host: reviews
  trafficPolicy:
    loadBalancer:
      localityLbSetting:
        enabled: true
        # 100% routing to same AZ if Pods exist there
        # Automatic failover to other AZ if not
高度な設定 (重み付き分散):
apiVersion: networking.istio.io/v1beta1
kind: DestinationRule
metadata:
  name: reviews
spec:
  host: reviews
  trafficPolicy:
    loadBalancer:
      localityLbSetting:
        enabled: true
        distribute:
        # Traffic originating from us-east-1a
        - from: us-east-1/us-east-1a/*
          to:
            "us-east-1/us-east-1a/*": 80  # Same AZ 80%
            "us-east-1/us-east-1b/*": 20  # Other AZ 20% (for failover)

        # Traffic originating from us-east-1b
        - from: us-east-1/us-east-1b/*
          to:
            "us-east-1/us-east-1b/*": 80  # Same AZ 80%
            "us-east-1/us-east-1a/*": 20  # Other AZ 20% (for failover)
フェイルオーバーポリシー:
spec:
  trafficPolicy:
    loadBalancer:
      localityLbSetting:
        enabled: true
        failover:
        # On us-east-1a failure, route to us-east-1b
        - from: us-east-1/us-east-1a
          to: us-east-1/us-east-1b

        # On us-east-1 complete failure, route to us-west-2
        - from: us-east-1
          to: us-west-2
4. Outlier Detection との組み合わせ
apiVersion: networking.istio.io/v1beta1
kind: DestinationRule
metadata:
  name: reviews
spec:
  host: reviews
  trafficPolicy:
    # Locality Load Balancing
    loadBalancer:
      localityLbSetting:
        enabled: true

    # Outlier Detection (exclude unhealthy instances)
    outlierDetection:
      consecutiveErrors: 5
      interval: 30s
      baseEjectionTime: 30s
      maxEjectionPercent: 50
動作:
1. Prioritize Pods in same AZ (us-east-1a)
2. Exclude that Pod after 5 consecutive failures
3. Automatic switch to healthy Pod in other AZ (us-east-1b)
4. Retry excluded Pod after 30 seconds
5. コスト削減の計算
シナリオ: 大規模 Microservices アーキテクチャ
Assumptions:
- Number of services: 20
- Monthly traffic between each service: 500GB
- Total monthly traffic: 20 x 20 x 500GB = 200TB
- Cross-AZ ratio (without Locality LB): 70%
- Cross-AZ ratio (with Locality LB): 20%
Locality LB なし:
Cross-AZ traffic: 200TB x 70% = 140TB
Cost: 140,000GB x $0.01 = $1,400/month
Locality LB あり:
Cross-AZ traffic: 200TB x 20% = 40TB
Cost: 40,000GB x $0.01 = $400/month

Savings: $1,400 - $400 = $1,000/month (71% savings)
Annual savings: $1,000 x 12 = $12,000/year
6. パフォーマンス改善
レイテンシー改善:
Same AZ communication: ~1ms
Cross-AZ communication: ~2-3ms

With Locality LB:
- 30-50% reduction in average latency
- 40-60% reduction in P99 latency
実測例:
# us-east-1a -> us-east-1a (same AZ)
$ kubectl exec -it pod-a -- curl -w "%{time_total}\n" http://service-b
0.001s

# us-east-1a -> us-east-1b (cross-AZ)
$ kubectl exec -it pod-a -- curl -w "%{time_total}\n" http://service-b
0.003s
7. モニタリング
Prometheus Query:
# Traffic distribution by Locality
sum(rate(
  istio_requests_total[5m]
)) by (
  source_workload_namespace,
  destination_workload_namespace,
  source_canonical_service,
  destination_canonical_service
)

# Cross-AZ traffic ratio
sum(rate(istio_requests_total{
  source_cluster="us-east-1a",
  destination_cluster!="us-east-1a"
}[5m]))
/
sum(rate(istio_requests_total[5m]))
Grafana Dashboard:
Panel 1: Request count by Locality (us-east-1a, us-east-1b, us-east-1c)
Panel 2: Cross-AZ traffic ratio (target: <20%)
Panel 3: Latency (same AZ vs cross-AZ)
Panel 4: Estimated cost (cross-AZ traffic x $0.01/GB)
8. 注意事項
警告 - 不均衡な負荷:
If all traffic concentrates on one AZ, overload can occur

Solutions:
- Deploy sufficient replicas in each AZ
- Configure HPA (Horizontal Pod Autoscaler)
- Ensure minimum replicas with PodDisruptionBudget
警告 - AZ 障害:
If entire AZ fails, traffic moves to other AZs

Failover policy configuration required:
- from: us-east-1/us-east-1a
  to: us-east-1/us-east-1b
警告 - コールドスタート:
On failover, Pods in other AZ may be in cold start state

Solutions:
- Maintain at least 1 replica in each AZ
- Verify ready state with Readiness Probe
9. ベストプラクティス
# Recommended configuration
apiVersion: networking.istio.io/v1beta1
kind: DestinationRule
metadata:
  name: production-service
spec:
  host: production-service
  trafficPolicy:
    loadBalancer:
      localityLbSetting:
        enabled: true
        distribute:
        - from: us-east-1/us-east-1a/*
          to:
            "us-east-1/us-east-1a/*": 80  # Cost savings
            "us-east-1/us-east-1b/*": 15  # Failover
            "us-east-1/us-east-1c/*": 5   # Additional backup

    outlierDetection:
      consecutiveErrors: 5
      interval: 30s
      baseEjectionTime: 30s

    connectionPool:
      tcp:
        maxConnections: 100
      http:
        http1MaxPendingRequests: 50
参照:
問題 10: Gateway TLS 設定
Istio Gateway で TLS 終端を設定し、HTTPS リダイレクトを構成する方法を説明してください。ACM (AWS Certificate Manager) 証明書を使用する場合と、自己署名証明書を使用する場合の両方を含めてください。
回答を表示
回答:
Istio Gateway TLS 設定:
1. 自己署名証明書の使用 (Kubernetes Secret)
ステップ 1: TLS 証明書の生成
# Generate self-signed certificate (for testing)
openssl req -x509 -nodes -days 365 -newkey rsa:2048 \
  -keyout bookinfo.key \
  -out bookinfo.crt \
  -subj "/CN=bookinfo.example.com"

# Or use Let's Encrypt certificate
certbot certonly --standalone -d bookinfo.example.com
ステップ 2: Kubernetes Secret の作成
# Create Secret for Istio to use
kubectl create -n istio-system secret tls bookinfo-secret \
  --key=bookinfo.key \
  --cert=bookinfo.crt

# Verify Secret
kubectl get secret bookinfo-secret -n istio-system
ステップ 3: Gateway の設定 (HTTPS + HTTP -> HTTPS リダイレクト)
apiVersion: networking.istio.io/v1beta1
kind: Gateway
metadata:
  name: bookinfo-gateway
  namespace: default
spec:
  selector:
    istio: ingressgateway
  servers:
  # HTTPS (port 443)
  - port:
      number: 443
      name: https
      protocol: HTTPS
    tls:
      mode: SIMPLE  # One-way TLS (server certificate only)
      credentialName: bookinfo-secret  # Kubernetes Secret name
    hosts:
    - bookinfo.example.com

  # HTTP (port 80) - Redirect to HTTPS
  - port:
      number: 80
      name: http
      protocol: HTTP
    hosts:
    - bookinfo.example.com
    tls:
      httpsRedirect: true  # HTTP -> HTTPS redirect
ステップ 4: VirtualService の接続
apiVersion: networking.istio.io/v1beta1
kind: VirtualService
metadata:
  name: bookinfo-vs
  namespace: default
spec:
  hosts:
  - bookinfo.example.com
  gateways:
  - bookinfo-gateway
  http:
  - match:
    - uri:
        prefix: /productpage
    route:
    - destination:
        host: productpage
        port:
          number: 9080
    timeout: 10s
    retries:
      attempts: 3
      perTryTimeout: 2s
ステップ 5: テスト
# HTTPS access
curl -v https://bookinfo.example.com/productpage

# HTTP access -> HTTPS redirect verification
curl -v http://bookinfo.example.com/productpage
# Output:
# HTTP/1.1 301 Moved Permanently
# location: https://bookinfo.example.com/productpage
2. AWS ACM 証明書の使用 (NLB Annotation)
AWS EKS では、ACM 証明書を使用して NLB で TLS 終端を行う方法が推奨されます。
ステップ 1: ACM 証明書の発行
# Issue ACM certificate via AWS Console or CLI
aws acm request-certificate \
  --domain-name bookinfo.example.com \
  --validation-method DNS \
  --region us-east-1

# Get ARN
aws acm list-certificates --region us-east-1
# Output: arn:aws:acm:us-east-1:123456789012:certificate/abc123
ステップ 2: Istio Ingress Gateway Service の変更
apiVersion: v1
kind: Service
metadata:
  name: istio-ingressgateway
  namespace: istio-system
  annotations:
    # Use NLB
    service.beta.kubernetes.io/aws-load-balancer-type: "nlb"

    # TLS termination (ACM certificate)
    service.beta.kubernetes.io/aws-load-balancer-ssl-cert: "arn:aws:acm:us-east-1:123456789012:certificate/abc123"
    service.beta.kubernetes.io/aws-load-balancer-ssl-ports: "443"

    # HTTP -> HTTPS redirect (NLB level)
    service.beta.kubernetes.io/aws-load-balancer-ssl-negotiation-policy: "ELBSecurityPolicy-TLS-1-2-2017-01"

    # Cross-AZ load balancing
    service.beta.kubernetes.io/aws-load-balancer-cross-zone-load-balancing-enabled: "true"

spec:
  type: LoadBalancer
  selector:
    istio: ingressgateway
    app: istio-ingressgateway
  ports:
  # HTTP (80) - NLB redirects to HTTPS(443)
  - name: http
    port: 80
    targetPort: 8080
    protocol: TCP

  # HTTPS (443) - NLB terminates TLS and forwards to 8443
  - name: https
    port: 443
    targetPort: 8443
    protocol: TCP
ステップ 3: Gateway の設定 (TLS Passthrough)
apiVersion: networking.istio.io/v1beta1
kind: Gateway
metadata:
  name: bookinfo-gateway
spec:
  selector:
    istio: ingressgateway
  servers:
  # Receive as HTTP since NLB terminated TLS
  - port:
      number: 8443
      name: http
      protocol: HTTP  # NLB already terminated TLS
    hosts:
    - bookinfo.example.com
3. 相互 TLS (mTLS) - クライアント認証
クライアントにも証明書の提示を要求する場合:
apiVersion: networking.istio.io/v1beta1
kind: Gateway
metadata:
  name: secure-gateway
spec:
  selector:
    istio: ingressgateway
  servers:
  - port:
      number: 443
      name: https-mutual
      protocol: HTTPS
    tls:
      mode: MUTUAL  # Two-way TLS
      credentialName: server-cert-secret  # Server certificate
      caCertificates: /etc/istio/client-ca/ca-chain.crt  # Client CA
    hosts:
    - secure.example.com
クライアント証明書で接続:
curl --cert client.crt --key client.key \
  https://secure.example.com/api
4. ワイルドカード証明書
複数のサブドメインに単一の証明書を使用します:
# Generate wildcard certificate
openssl req -x509 -nodes -days 365 -newkey rsa:2048 \
  -keyout wildcard.key \
  -out wildcard.crt \
  -subj "/CN=*.example.com"

# Create Secret
kubectl create -n istio-system secret tls wildcard-secret \
  --key=wildcard.key \
--cert=wildcard.crtapiVersion: networking.istio.io/v1beta1
kind: Gateway
metadata:
name: wildcard-gateway
spec:
selector:
istio: ingressgateway
servers:
- port:
number: 443
name: https
protocol: HTTPS
tls:
mode: SIMPLE
credentialName: wildcard-secret
hosts:
- "*.example.com" # Allow all subdomainsVirtualService によるサブドメイン別ルーティング:
apiVersion: networking.istio.io/v1beta1
kind: VirtualService
metadata:
  name: multi-subdomain
spec:
  hosts:
  - api.example.com
  - web.example.com
  - admin.example.com
  gateways:
  - wildcard-gateway
  http:
  - match:
    - uri:
        prefix: /api
      authority:
        exact: api.example.com
    route:
    - destination:
        host: api-service

  - match:
    - authority:
        exact: web.example.com
    route:
    - destination:
        host: web-service

  - match:
    - authority:
        exact: admin.example.com
    route:
    - destination:
        host: admin-service
5. TLS バージョンと Cipher Suite の設定
apiVersion: networking.istio.io/v1beta1
kind: Gateway
metadata:
  name: secure-gateway
spec:
  selector:
    istio: ingressgateway
  servers:
  - port:
      number: 443
      name: https
      protocol: HTTPS
    tls:
      mode: SIMPLE
      credentialName: bookinfo-secret
      minProtocolVersion: TLSV1_2  # Allow only TLS 1.2 and above
      maxProtocolVersion: TLSV1_3
      cipherSuites:
      - ECDHE-ECDSA-AES256-GCM-SHA384
      - ECDHE-RSA-AES256-GCM-SHA384
      - ECDHE-ECDSA-AES128-GCM-SHA256
    hosts:
    - bookinfo.example.com
6. 証明書の自動更新 (cert-manager)
# Install cert-manager
kubectl apply -f https://github.com/cert-manager/cert-manager/releases/download/v1.13.0/cert-manager.yaml

# Create Let's Encrypt Issuer
kubectl apply -f - <<EOF
apiVersion: cert-manager.io/v1
kind: ClusterIssuer
metadata:
  name: letsencrypt-prod
spec:
  acme:
    server: https://acme-v02.api.letsencrypt.org/directory
    email: admin@example.com
    privateKeySecretRef:
      name: letsencrypt-prod
    solvers:
    - http01:
        ingress:
          class: istio
EOF

# Create Certificate resource (auto-renewal)
kubectl apply -f - <<EOF
apiVersion: cert-manager.io/v1
kind: Certificate
metadata:
  name: bookinfo-cert
  namespace: istio-system
spec:
  secretName: bookinfo-secret
  issuerRef:
    name: letsencrypt-prod
    kind: ClusterIssuer
  dnsNames:
  - bookinfo.example.com
EOF
7. ベストプラクティス
# Recommended configuration
apiVersion: networking.istio.io/v1beta1
kind: Gateway
metadata:
  name: production-gateway
spec:
  selector:
    istio: ingressgateway
  servers:
  # HTTPS (recommended)
  - port:
      number: 443
      name: https
      protocol: HTTPS
    tls:
      mode: SIMPLE
      credentialName: prod-tls-secret
      minProtocolVersion: TLSV1_2  # Security hardening
    hosts:
    - "*.example.com"

  # HTTP -> HTTPS redirect
  - port:
      number: 80
      name: http
      protocol: HTTP
    hosts:
    - "*.example.com"
    tls:
      httpsRedirect: true
注意:
- TLS 1.2 以降を使用する
- 強力な Cipher Suites を設定する
- 証明書を自動更新する (cert-manager)
- HTTP -> HTTPS リダイレクトを有効にする
- 本番環境で自己署名証明書を使用しない
- TLS 1.0/1.1 を使用しない
参照:
スコア計算
- 選択式問題 1-5: 各 10 点 (合計 50 点)
- 記述式問題 6-10: 各 10 点 (合計 50 点)
- 合計: 100 点
評価基準:
- 90-100 点: 優秀 (Istio トラフィック管理エキスパート)
- 80-89 点: 良好 (本番運用の準備完了)
- 70-79 点: 平均 (追加学習を推奨)
- 60-69 点: 平均未満 (基本概念の復習が必要)
- 0-59 点: 再学習が必要