Harbor
最后更新:2026 年 10 月 16 日
概述
Harbor 是开源、云原生的容器镜像仓库,提供企业级镜像存储、签名和扫描功能。作为 CNCF 毕业项目,Harbor 已证明其成熟度、安全性和业界采用情况。
主要功能
| 功能 | 说明 |
|---|---|
| 多租户 | 基于项目隔离,并支持 RBAC |
| 漏洞扫描 | 内置 Trivy 扫描器 |
| 镜像签名 | 支持 Cosign 和 Notation |
| 复制 | 仓库之间的推送/拉取复制 |
| 垃圾回收 | 自动清理未使用的层 |
| 代理缓存 | 缓存远程仓库(如 Docker Hub) |
| 审计日志 | 完整的操作历史 |
| OIDC/LDAP | 企业身份集成 |
| 配额管理 | 按项目设置存储限制 |
| 机器人账户 | 用于自动化的服务账户 |
架构
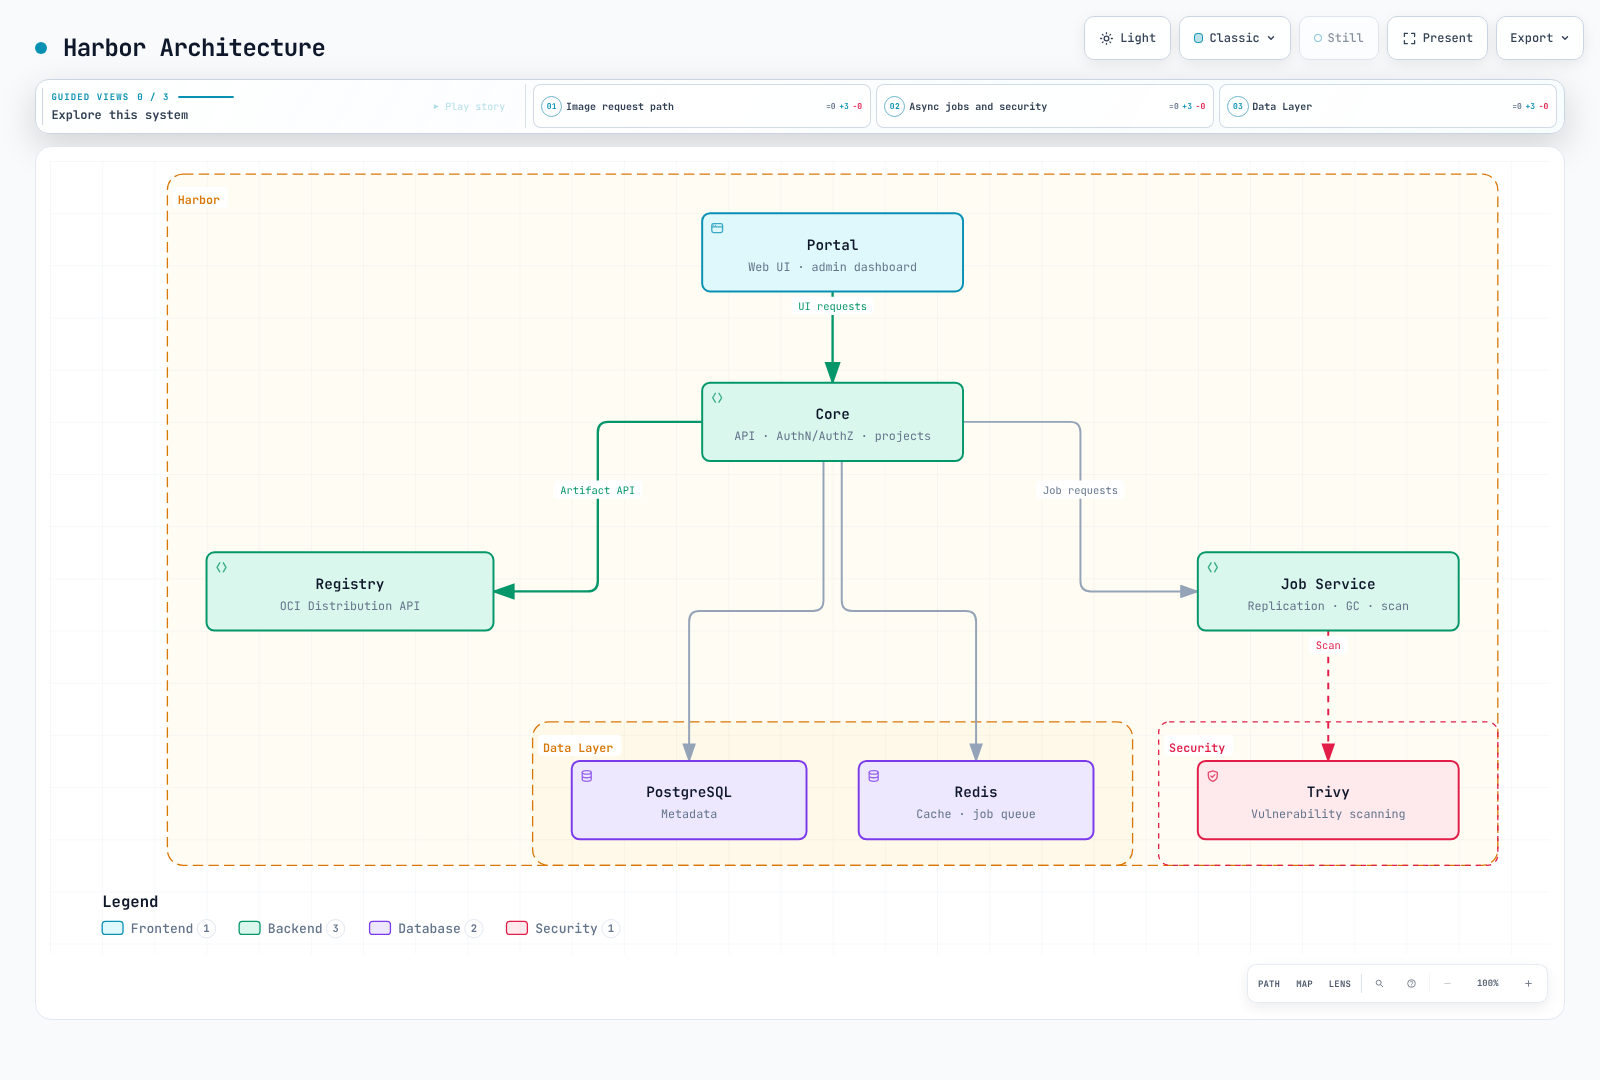
组件职责
| 组件 | 用途 |
|---|---|
| Core | API 服务器、身份验证、授权和项目管理 |
| Registry | Docker Distribution v2 API 实现及镜像存储 |
| Job Service | 执行异步任务(复制、扫描、GC) |
| Trivy | 漏洞扫描引擎 |
| Portal | 管理 Web UI |
| PostgreSQL | 元数据、用户数据和审计日志 |
| Redis | 作业队列、会话缓存和 Registry 缓存 |
Helm 安装
截至 2026-10-16,已审核的基线版本为 Harbor 2.15.4 / Helm chart 1.19.2。应用版本与 chart 版本不同:最新 chart 1.19.2 仍默认使用 appVersion 2.15.2,因此默认 Helm 安装不包含 2.15.3 的安全修复(例如 GHSA-2phj-cp9f-qq6w)。本示例假设外部 HA PostgreSQL、Redis 和共享存储已经就绪;values 文件不会创建这些服务。
前置条件
- 准备受支持的 Kubernetes/Helm 版本、DNS、受维护的 Ingress 控制器及其
IngressClass。为该控制器配置上传限制、超时和 TLS。 - 在
harbor命名空间中创建harbor-tls证书/密钥 Secret。证书必须匹配主机名;客户端和节点必须信任其 CA。 - 两个 Registry 副本若放在不同节点上,必须使用共享 RWX PVC 或对象存储。在多个节点间共享一个 EBS
gp3RWO PVC 并不是高可用配置。 - 准备 PostgreSQL 数据库
registry、数据库用户以及harbor-databaseSecret 中的password键。sslmode: require只要求加密;需要证书与主机名验证时,还要验证 CA 信任并使用verify-full。 - Redis 必须支持 Harbor 使用的多个逻辑数据库。不要使用仅限 DB 0 的 Redis Cluster 模式。将
REDIS_PASSWORD放入harbor-redisSecret,并验证 TLS 连接。私有 CA 应通过 chart 的caBundleSecretName提供。
helm repo add harbor https://helm.goharbor.io
helm repo update
helm show chart harbor/harbor --version 1.19.2
kubectl create namespace harbor
kubectl get ingressclass
kubectl get storageclass
初始凭据
# Initial installation only: preserve this encryption key during upgrades.
umask 077
HARBOR_SETUP_DIR=$(mktemp -d)
python3 - "$HARBOR_SETUP_DIR" <<'PYTHON'
import getpass
import pathlib
import secrets
import sys
root = pathlib.Path(sys.argv[1])
(root / "admin-password").write_text(getpass.getpass("Initial Harbor admin password: "))
(root / "secretKey").write_text(secrets.token_hex(8))  # exactly 16 characters
PYTHON
kubectl create secret generic harbor-admin -n harbor \
  --from-file=HARBOR_ADMIN_PASSWORD="$HARBOR_SETUP_DIR/admin-password"
kubectl create secret generic harbor-encryption-key -n harbor \
  --from-file=secretKey="$HARBOR_SETUP_DIR/secretKey"
rm -rf -- "$HARBOR_SETUP_DIR"
生产环境 values.yaml
保存为 harbor-values.yaml,并替换所有示例主机名和 StorageClass。根据测得的负载和可用节点添加资源请求/限制并配置 Pod 分散。只有安装 Prometheus Operator CRD 后,才启用 serviceMonitor.enabled。
expose:
  type: ingress
  tls:
    enabled: true
    certSource: secret
    secret:
      secretName: harbor-tls
  ingress:
    hosts:
      core: harbor.example.com
    className: your-ingress-class
    annotations: {}
externalURL: https://harbor.example.com
existingSecretAdminPassword: harbor-admin
existingSecretSecretKey: harbor-encryption-key
internalTLS:
  enabled: true
  certSource: auto
persistence:
  enabled: true
  resourcePolicy: keep
  persistentVolumeClaim:
    registry:
      storageClass: your-rwx-storage-class
      accessMode: ReadWriteMany
      size: 100Gi
    trivy:
      storageClass: your-storage-class
      size: 10Gi
core:
  replicas: 2
portal:
  replicas: 2
registry:
  replicas: 2
jobservice:
  replicas: 2
  jobLoggers: [database]
database:
  type: external
  external:
    host: harbor-db.internal
    port: "5432"
    username: harbor
    coreDatabase: registry
    existingSecret: harbor-database
    sslmode: require
redis:
  type: external
  external:
    addr: harbor-redis.internal:6379
    existingSecret: harbor-redis
    tlsOptions:
      enable: true
trivy:
  enabled: true
  skipUpdate: false
  skipJavaDBUpdate: false
  offlineScan: false
metrics:
  enabled: true
  serviceMonitor:
    enabled: false
使用自定义值安装
helm template harbor harbor/harbor --version 1.19.2   --namespace harbor --values harbor-values.yaml > harbor-rendered.yaml
helm install harbor harbor/harbor --version 1.19.2   --namespace harbor --values harbor-values.yaml --wait --timeout 15m
kubectl get pods,svc,ingress,pvc -n harbor
docker login harbor.example.com --username admin
升级 Harbor
升级前,请在发行说明中检查受支持的升级路径。在同一个一致的恢复时间点备份元数据、Registry 数据、配置和加密密钥,并测试恢复流程。比较新旧 chart 值,在预发布环境中测试渲染结果和迁移。helm upgrade 时固定目标 chart 版本;单独执行 Helm 回滚可能无法撤销数据库迁移。
Harbor 2.9 已移除 Notary v1。Cosign 和 Notation 是外部签名工具;其签名作为 OCI artifact 保存在 Registry 中。
项目与 RBAC
API 示例假设存在一个可通过 HTTPS 访问的测试 Harbor 实例,并已准备 curl 和 jq。将 HARBOR_USER 设置为具有所需权限的用户。curl --user "$HARBOR_USER" 会提示输入密码。自动化时,应通过密钥管理器提供范围受限的机器人凭据,且不要记录这些凭据。
export HARBOR_USER=admin项目类型
| 类型 | 说明 | 使用场景 |
|---|---|---|
| 公开 | 任何人都可以拉取镜像 | 开源项目、共享基础镜像 |
| 私有 | 只有成员可以访问 | 应用镜像、内部工具 |
创建项目
# Create project via API
curl --fail-with-body -X POST "https://harbor.example.com/api/v2.0/projects" \
  -H "Content-Type: application/json" \
  --user "$HARBOR_USER" \
  -d '{
    "project_name": "myapp",
    "metadata": {
      "public": "false",
      "prevent_vul": "true",
      "auto_scan": "true",
      "severity": "high"
    },
    "storage_limit": 107374182400
  }'
RBAC 角色
| 角色 | 权限 |
|---|---|
| Project Admin | 完全控制:管理成员、策略和镜像 |
| Maintainer | 推送/拉取镜像、扫描、删除标签 |
| Developer | 推送/拉取镜像;不包括成员管理 |
| Guest | 仅拉取镜像 |
| Limited Guest | 拉取/读取 artifact;不能查看项目成员或日志列表 |
添加成员
# Add user to project
curl --fail-with-body -X POST "https://harbor.example.com/api/v2.0/projects/myapp/members" \
  -H "Content-Type: application/json" \
  --user "$HARBOR_USER" \
  -d '{
    "role_id": 2,
    "member_user": {
      "username": "developer1"
    }
  }'

# Role IDs: 1=Admin, 2=Developer, 3=Guest, 4=Maintainer, 5=Limited Guest
机器人账户
机器人账户是供 CI/CD 自动化使用的服务账户:
# Create robot account
curl --fail-with-body -X POST "https://harbor.example.com/api/v2.0/robots" \
  -H "Content-Type: application/json" \
  --user "$HARBOR_USER" \
  -d '{
    "name": "ci-robot",
    "description": "Robot account for CI/CD pipelines",
    "duration": 90,
    "level": "project",
    "permissions": [
      {
        "kind": "project",
        "namespace": "myapp",
        "access": [
          {"resource": "repository", "action": "push"},
          {"resource": "repository", "action": "pull"}
        ]
      }
    ]
  }'

# Response includes robot name and secret
# {
#   "name": "robot$myapp+ci-robot",
#   "secret": "xxxxxxxxxxxxxxxxxxxx",
#   ...
# }
在 CI/CD 中使用机器人账户:
# Docker login with robot account
read -r -p 'Robot name returned by Harbor: ' ROBOT_NAME
read -r -s -p 'Robot secret: ' ROBOT_SECRET
printf '\n'
printf '%s' "$ROBOT_SECRET" | docker login harbor.example.com \
  --username "$ROBOT_NAME" --password-stdin
unset ROBOT_SECRET

# Push image
docker push harbor.example.com/myapp/app:v1.0.0
镜像复制
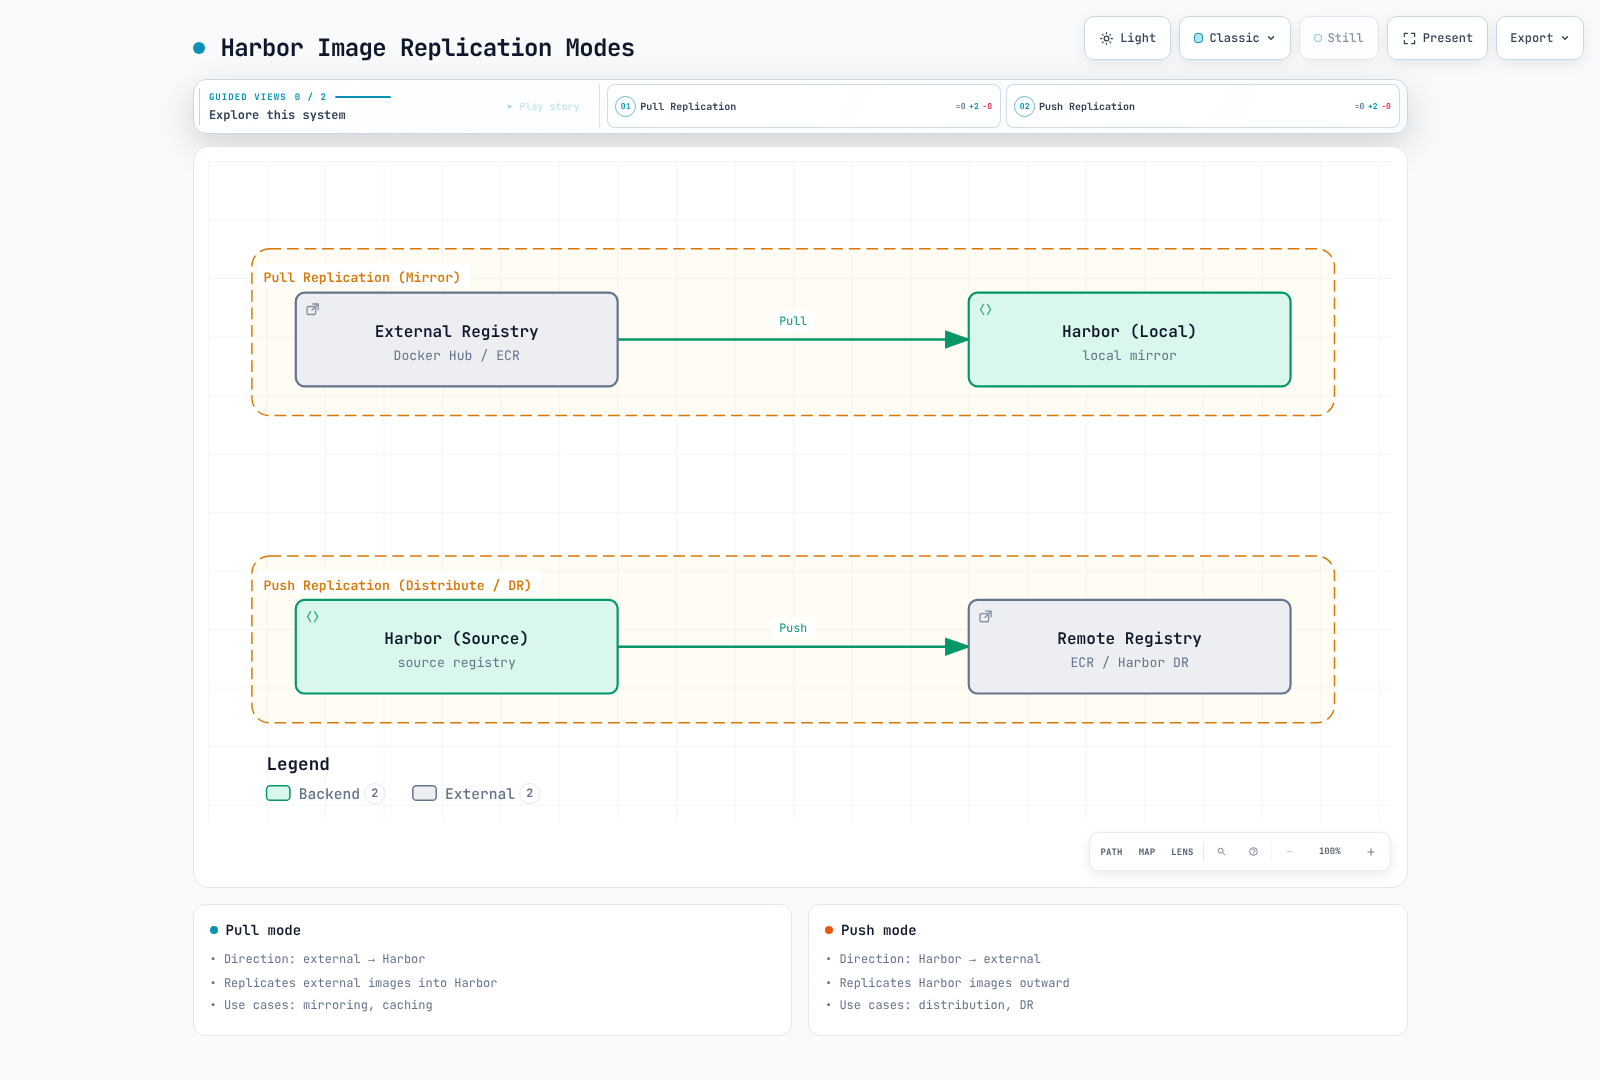
Harbor 支持仓库之间的双向复制。
下文的端点 ID 1 和 3 仅为示例:请从创建响应的 Location 或端点列表中取得实际 ID。定时 cron 表达式包含秒在内的六个字段(0 0 0 * * *);请检查 Job Service 时区。拉取复制需要连接上游,因此不能导入到完全断网的环境中。事件复制会响应本地 Harbor 的推送/重新打标签/删除事件,不会响应远程 Registry 中的任意更改。
复制模式
| 模式 | 说明 | 使用场景 |
|---|---|---|
| 推送 | Harbor 推送到远端 | 分发到边缘位置 |
| 拉取 | Harbor 从远端拉取 | 镜像 Docker Hub、从 ECR 同步 |
设置复制端点
# Create registry endpoint (e.g., Docker Hub)
curl --fail-with-body -X POST "https://harbor.example.com/api/v2.0/registries" \
  -H "Content-Type: application/json" \
  --user "$HARBOR_USER" \
  -d '{
    "name": "docker-hub",
    "type": "docker-hub",
    "url": "https://hub.docker.com",
    "credential": {
      "type": "basic",
      "access_key": "dockerhub-username",
      "access_secret": "<dockerhub-PAT>"
    }
  }'

# Create registry endpoint (ECR)
curl --fail-with-body -X POST "https://harbor.example.com/api/v2.0/registries" \
  -H "Content-Type: application/json" \
  --user "$HARBOR_USER" \
  -d '{
    "name": "aws-ecr",
    "type": "aws-ecr",
    "url": "https://123456789012.dkr.ecr.us-east-1.amazonaws.com",
    "credential": {
      "type": "basic",
      "access_key": "AKIAIOSFODNN7EXAMPLE",
      "access_secret": "wJalrXUtnFEMI/K7MDENG/bPxRfiCYEXAMPLEKEY"
    }
  }'

# Create registry endpoint (another Harbor)
curl --fail-with-body -X POST "https://harbor.example.com/api/v2.0/registries" \
  -H "Content-Type: application/json" \
  --user "$HARBOR_USER" \
  -d '{
    "name": "harbor-dr",
    "type": "harbor",
    "url": "https://harbor-dr.example.com",
    "credential": {
      "type": "basic",
      "access_key": "<replication-user>",
      "access_secret": "<replication-secret>"
    }
  }'
创建复制规则
# Pull replication from Docker Hub (mirror official images)
curl --fail-with-body -X POST "https://harbor.example.com/api/v2.0/replication/policies" \
  -H "Content-Type: application/json" \
  --user "$HARBOR_USER" \
  -d '{
    "name": "mirror-dockerhub-nginx",
    "src_registry": {"id": 1},
    "dest_namespace": "dockerhub-mirror",
    "filters": [
      {"type": "name", "value": "library/nginx"},
      {"type": "tag", "value": "1.*"}
    ],
    "trigger": {
      "type": "scheduled",
      "trigger_settings": {
        "cron": "0 0 0 * * *"
      }
    },
    "enabled": true,
    "replicate_deletion": false,
    "override": true,
    "speed": -1
  }'

# Push replication to DR site
curl --fail-with-body -X POST "https://harbor.example.com/api/v2.0/replication/policies" \
  -H "Content-Type: application/json" \
  --user "$HARBOR_USER" \
  -d '{
    "name": "replicate-to-dr",
    "dest_registry": {"id": 3},
    "filters": [
      {"type": "name", "value": "production/**"},
      {"type": "tag", "value": "v*"}
    ],
    "trigger": {
      "type": "event_based"
    },
    "enabled": true,
    "replicate_deletion": false,
    "override": true,
    "speed": 102400
  }'
复制过滤器
| 过滤器类型 | 说明 | 示例 |
|---|---|---|
name | 仓库名称模式 | library/**、myapp/* |
tag | 标签模式 | v*、latest |
label | Harbor 标签 | production、approved |
resource | 资源类型 | image、chart |
漏洞扫描
Trivy 集成
Harbor 默认使用 Trivy 作为漏洞扫描器。Trivy 可以扫描:
- 操作系统软件包漏洞(Alpine、Debian、Ubuntu、RHEL 等)
- 应用依赖项(npm、pip、gem、maven、go modules)
推送时扫描配置
# Enable automatic scanning for a project
curl --fail-with-body -X PUT "https://harbor.example.com/api/v2.0/projects/myapp" \
  -H "Content-Type: application/json" \
  --user "$HARBOR_USER" \
  -d '{
    "metadata": {
      "auto_scan": "true"
    }
  }'
手动扫描
# Use the digest of an existing artifact from the Harbor UI/API.
: "${HARBOR_DIGEST:?Set the complete sha256 digest}"
curl --fail-with-body --user "$HARBOR_USER" -X POST \
  "https://harbor.example.com/api/v2.0/projects/myapp/repositories/app/artifacts/${HARBOR_DIGEST}/scan"
curl --fail-with-body --user "$HARBOR_USER" \
  "https://harbor.example.com/api/v2.0/projects/myapp/repositories/app/artifacts/${HARBOR_DIGEST}?with_scan_overview=true"
扫描为异步操作。请检查扫描是否完成以及数据库是否新鲜;报告为空/不完整不代表扫描结果干净。与单组件 app 示例不同,嵌套仓库名(如 team/app)需要对 Harbor API URL 进行双重编码。
CVE 允许列表
只对已批准的 CVE 设置例外,并记录负责人、理由和到期时间。下面的 PUT 会替换项目允许列表,因此必须先合并现有条目。该设置会禁用系统列表复用,并要求提供已批准的标识符和未来的到期时间。
# Review the existing project allowlist before replacing it.
: "${APPROVED_CVE:?Set an approved CVE identifier}"
: "${ALLOWLIST_EXPIRES_AT:?Set a future Unix timestamp in seconds}"
jq -n --arg cve "$APPROVED_CVE" --argjson expires "$ALLOWLIST_EXPIRES_AT" \
  '{metadata:{reuse_sys_cve_allowlist:"false"},
    cve_allowlist:{items:[{cve_id:$cve}],expires_at:$expires}}' > cve-allowlist.json
curl --fail-with-body --user "$HARBOR_USER" -X PUT \
  -H 'Content-Type: application/json' \
  --data-binary @cve-allowlist.json \
  'https://harbor.example.com/api/v2.0/projects/myapp'
防止部署有漏洞的镜像
配置 Harbor 阻止拉取存在漏洞的镜像:
# Set vulnerability prevention policy
curl --fail-with-body -X PUT "https://harbor.example.com/api/v2.0/projects/myapp" \
  -H "Content-Type: application/json" \
  --user "$HARBOR_USER" \
  -d '{
    "metadata": {
      "prevent_vul": "true",
      "severity": "high"
    }
  }'

# Severity options: none, low, medium, high, critical
此策略会限制 Registry 拉取操作;不会检查或停止已经运行或使用缓存镜像的容器。仅启用自动扫描并不会阻止镜像拉取。
镜像签名
签名用于验证 artifact 完整性和签名者是否可信。它不会修补漏洞,也不会检查运行中的 Pod。请依据官方指南安装 Cosign/Notation,并验证其签名格式与 Harbor 及策略引擎兼容。
Cosign 集成
# HARBOR_IMAGE must include an existing image digest, not a mutable tag.
: "${HARBOR_IMAGE:?Set harbor.example.com/myapp/app@sha256:<actual-digest>}"
cosign version
cosign generate-key-pair
cosign sign --key cosign.key "$HARBOR_IMAGE"
cosign verify --key cosign.pub "$HARBOR_IMAGE"
无密钥签名使用 OIDC 身份和透明日志;验证时必须限制可信的签发者和身份。基于密钥的示例中,应保护私钥及其密码。完全断网的环境无法直接使用依赖公共 Sigstore 服务的工作流。
Notation(Notary v2)集成
本例使用仅供测试的自签名证书。验证之前,请先为 generate-test 创建的信任存储导入信任策略。生产策略应使用组织的 CA/密钥管理,并明确限制签名者身份。
notation version
notation login harbor.example.com
notation cert generate-test --default harbor-demo
notation sign "$HARBOR_IMAGE"
cat > trustpolicy.json <<'JSON'
{
  "version": "1.0",
  "trustPolicies": [{
    "name": "harbor-demo",
    "registryScopes": ["harbor.example.com/myapp/app"],
    "signatureVerification": {"level": "strict"},
    "trustStores": ["ca:harbor-demo"],
    "trustedIdentities": ["*"]
  }]
}
JSON
notation policy import trustpolicy.json
notation verify "$HARBOR_IMAGE"
在 Harbor 中配置 Cosign
在项目 Configuration 中选择 Cosign 或 Notation 策略。两者都启用时需要两种签名类型。chart 没有用于公钥验证的 core.cosignKeyFile 选项。要区分 Registry 的签名 accessory 检查与使用组织可信密钥和身份进行验证。
Kubernetes 策略强制执行
如需在部署时强制执行策略,请按镜像安全中的说明配置 Kyverno 等准入策略。提供有效密钥或可信 OIDC 签发者/身份、精确镜像范围及私有 Registry 凭据;并覆盖 init/ephemeral 容器。在 Audit 模式中先验证,再切换到 Enforce;测试错误密钥、未签名镜像和标签重新指向等失败情况。
隔离网络场景
Docker Compose 离线安装程序与 Kubernetes Helm 部署是两条不同的安装路径。离线安装程序会打包 Harbor 镜像,但不会打包所有 Docker/Compose 软件包、Kubernetes chart、CNI、应用镜像或 Trivy 数据库。
离线安装程序
HARBOR_VERSION=2.15.4
curl --fail --location --remote-name \
  "https://github.com/goharbor/harbor/releases/download/v${HARBOR_VERSION}/harbor-offline-installer-v${HARBOR_VERSION}.tgz"
# Verify the release checksum/signature before transporting the bundle.
sha256sum "harbor-offline-installer-v${HARBOR_VERSION}.tgz" > harbor-bundle.sha256
# Transfer both files through the approved offline transport.
在断网主机上运行以下命令。本地生成的 SHA-256 用于验证传输完整性,不能替代对发布者发行签名的验证。
sha256sum -c harbor-bundle.sha256
tar xzf harbor-offline-installer-v2.15.4.tgz
cd harbor
cp harbor.yml.tmpl harbor.yml
# Set hostname, HTTPS certificate/key, strong admin/DB passwords and data_volume.
# For Trivy: preload DBs, set skip_update, skip_java_db_update and offline_scan.
# Install Docker Engine/Compose and other prerequisites from offline packages first.
./install.sh --with-trivy
为隔离网络中的 Kubernetes 预加载镜像
使用与目标支持的 Kubernetes 确切版本匹配的 kubeadm 二进制文件,列出控制平面镜像。CNI、CSI、Ingress、监控镜像以及 chart/CRD 需要另外添加。对于非 kubeadm 管理的集群,请使用该发行版自己的镜像清单。
: "${K8S_VERSION:?Set the exact supported Kubernetes patch version}"
kubeadm config images list --kubernetes-version "$K8S_VERSION" > kubeadm-images.txt
自动化镜像同步脚本
使用 TSV 文件显式映射源端和目标端镜像引用。只按 basename 重新打标签可能导致跨仓库/命名空间冲突。以下 Bash/Skopeo 示例通过 OCI archive 传输所有平台。签名/SBOM referrer 需要依据工具支持情况单独传输和验证。
# images.tsv: two columns separated by a TAB; replace the internal hostname.
docker.io/library/nginx:1.30.6	harbor.airgap.local/k8s-system/dockerhub/library/nginx:1.30.6
在有连接的环境中:
#!/usr/bin/env bash
set -euo pipefail
mkdir -p image-bundle
: > image-bundle/import.tsv
index=0
while IFS=$'\t' read -r source target || [[ -n "$source" ]]; do
  [[ -z "$source" || "$source" == \#* ]] && continue
  [[ -n "$target" ]] || { echo 'Missing target image' >&2; exit 1; }
  index=$((index + 1))
  file="image-${index}.tar"
  skopeo copy --all "docker://${source}" "oci-archive:image-bundle/${file}"
  printf '%s\t%s\n' "$file" "$target" >> image-bundle/import.tsv
done < images.tsv
(cd image-bundle && sha256sum image-*.tar import.tsv > SHA256SUMS)
传输 image-bundle 后,在断网环境中:
#!/usr/bin/env bash
set -euo pipefail
cd image-bundle
sha256sum -c SHA256SUMS
# Pre-create the target Harbor projects and trust its TLS CA.
skopeo login harbor.airgap.local
while IFS=$'\t' read -r file target; do
  skopeo copy --all "oci-archive:${file}" "docker://${target}"
done < import.tsv
将映射后的内部镜像 URI 应用到 Pod/Helm/kubeadm 配置,并验证 digest、平台和拉取结果。--all 请求获取所有平台清单;表示形式转换可能改变 digest,因此要比较源端和目标端结果。
隔离环境中的 Trivy 数据库更新
# Use a Trivy version compatible with the deployed Harbor scanner adapter.
trivy image --cache-dir ./trivy-cache --download-db-only
trivy image --cache-dir ./trivy-cache --download-java-db-only
tar -C trivy-cache -czf trivy-db-bundle.tgz db java-db
将压缩包解压到每个 Trivy 副本的持久缓存根目录 /home/scanner/.cache/trivy,并为 db/trivy.db、db/metadata.json、java-db/trivy-java.db 及其元数据设置正确的所有权。请先停止扫描器,或改用新的 PVC/init job;不要覆盖正在打开的数据库。上面的 tar -C 形式可以避免误将 home 目录路径嵌套在缓存目录内。
trivy:
  skipUpdate: true
  skipJavaDBUpdate: true
  offlineScan: true
仅设置 offlineScan 既不会禁用所有数据库更新,也不会创建缺失的数据库。应建立数据库导入/新鲜度维护计划,并在更新后重新扫描。Compose harbor.yml 中对应的键为 skip_update、skip_java_db_update 和 offline_scan。
Containerd 信任配置
在离线清单中使用明确的内部 Harbor 镜像引用。将任意外部 Registry 重定向到 /v2/<project>,并不会自动重写仓库路径或凭据。在每个节点上安装 CA,并根据运行时版本采用相应配置。
# containerd 2.x: /etc/containerd/config.toml
[plugins."io.containerd.cri.v1.images".registry]
  config_path = "/etc/containerd/certs.d"
# containerd 1.x uses plugins."io.containerd.grpc.v1.cri".registry instead.# /etc/containerd/certs.d/harbor.airgap.local/hosts.toml
server = "https://harbor.airgap.local"
[host."https://harbor.airgap.local"]
capabilities = ["pull", "resolve"]
ca = "/etc/containerd/certs.d/harbor.airgap.local/ca.crt"更改 config_path 后,应按照节点维护流程重启 containerd,再验证一次实际 CRI 拉取。通过 imagePullSecrets 提供限定命名空间且只有拉取权限的凭据。
Harbor + Kubernetes 集成
创建 imagePullSecrets
# Create pull credentials in the same namespace as the consuming Pod.
umask 077
HARBOR_AUTH_DIR=$(mktemp -d)
python3 - "$HARBOR_AUTH_DIR/config.json" <<'PYTHON'
import base64
import getpass
import json
import pathlib
import sys
name = input("Pull robot name returned by Harbor: ")
password = getpass.getpass("Pull robot secret: ")
auth = base64.b64encode(f"{name}:{password}".encode()).decode()
pathlib.Path(sys.argv[1]).write_text(json.dumps({
    "auths": {"harbor.example.com": {"auth": auth}}
}))
PYTHON
kubectl create secret generic harbor-secret -n default \
  --type=kubernetes.io/dockerconfigjson \
  --from-file=.dockerconfigjson="$HARBOR_AUTH_DIR/config.json" \
  --dry-run=client -o yaml \
  | kubectl apply --server-side --field-manager=harbor-pull-secret -f -
rm -rf -- "$HARBOR_AUTH_DIR"
kubectl get secret harbor-secret -n default -o jsonpath='{.type}'
ServiceAccount 配置
apiVersion: v1
kind: ServiceAccount
metadata:
  name: app-sa
  namespace: default
imagePullSecrets:
- name: harbor-secret
---
apiVersion: apps/v1
kind: Deployment
metadata:
  name: myapp
spec:
  replicas: 3
  selector:
    matchLabels:
      app: myapp
  template:
    metadata:
      labels:
        app: myapp
    spec:
      serviceAccountName: app-sa
      containers:
      - name: app
        image: harbor.example.com/myapp/app:v1.0.0
代理缓存配置
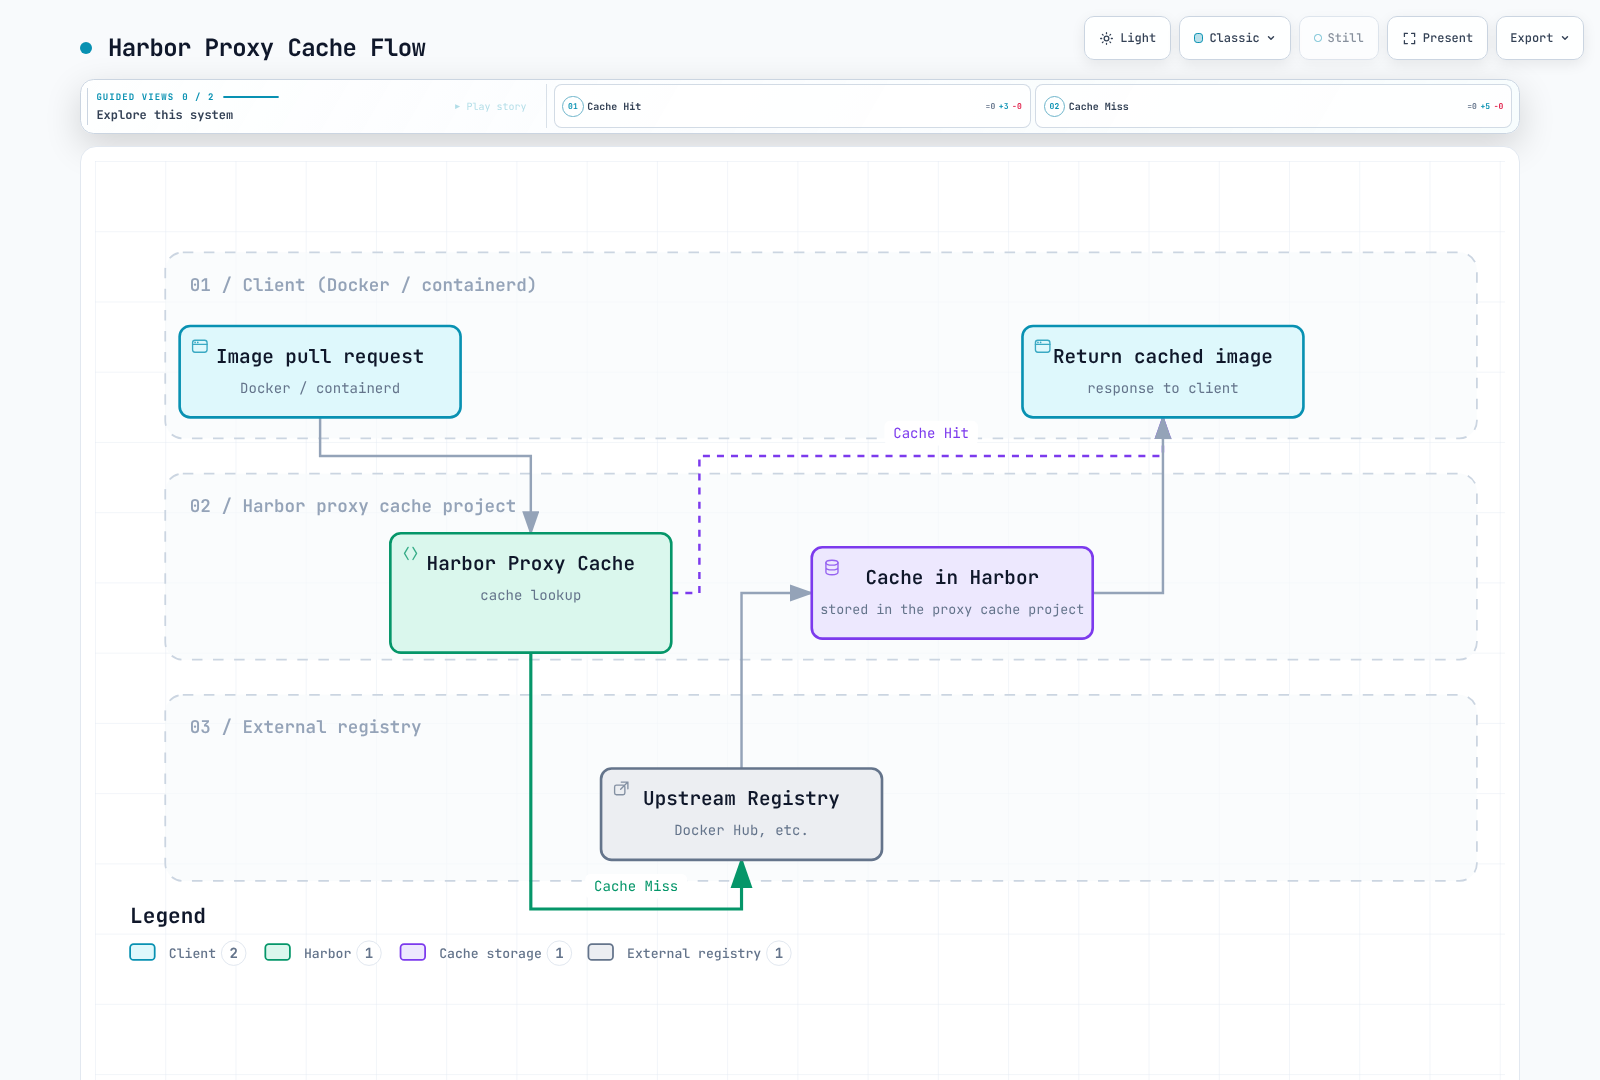
将 Harbor 配置为外部 Registry 的代理缓存:
# Create proxy cache project via API
curl --fail-with-body -X POST "https://harbor.example.com/api/v2.0/projects" \
  -H "Content-Type: application/json" \
  --user "$HARBOR_USER" \
  -d '{
    "project_name": "dockerhub-proxy",
    "registry_id": 1,
    "metadata": {
      "public": "true"
    }
  }'
拉取明确的代理路径,例如 harbor.example.com/dockerhub-proxy/library/nginx:1.30.6。缓存未命中时需要访问上游。缓存内容的新鲜度、上游删除行为和身份验证均取决于代理项目配置;这不保证离线场景所需内容齐全。
垃圾回收
GC 会回收未被引用的 blob。delete_untagged 还会删除未标记 artifact,而这些 artifact 仍可能按 digest 部署。请先保护正在部署/用于回滚的镜像。下面的示例只执行 dry run,不会删除数据。
curl --fail-with-body --user "$HARBOR_USER" -X POST \
  'https://harbor.example.com/api/v2.0/system/gc/schedule' \
  -H 'Content-Type: application/json' \
  -d '{"schedule":{"type":"Manual"},
       "parameters":{"delete_untagged":false,"dry_run":true}}'
curl --fail-with-body --user "$HARBOR_USER"   'https://harbor.example.com/api/v2.0/system/gc'
在 UI 中配置实际运行/计划任务前,请先检查结果。Harbor 支持 GC 期间进行推送/拉取,但 I/O 负载和近期上传保护窗口可能会延迟空间回收。
标签保留策略
在项目的 Policy → Tag Retention 视图中定义要保留的内容。将最近 10 次推送与最近 30 天组合,会保留两者的并集(OR),artifact 数量可能超过 10 个。使用 Dry Run 检查将排除的标签/artifact、签名关联以及已部署/用于回滚的 digest。
创建策略的端点是 /api/v2.0/retentions,不是项目级 /tag-retention 端点。不要猜测项目 ID 来创建策略;应检查并 dry-run UI 中已配置的策略。
curl --fail-with-body --user "$HARBOR_USER" \
  'https://harbor.example.com/api/v2.0/projects/myapp' \
  | jq '{project_id, retention_id: .metadata.retention_id}'
# Use the actual non-empty policy ID returned above.
: "${RETENTION_ID:?Set an existing retention policy ID}"
curl --fail-with-body --user "$HARBOR_USER"   "https://harbor.example.com/api/v2.0/retentions/${RETENTION_ID}"
curl --fail-with-body --user "$HARBOR_USER" -X POST \
  "https://harbor.example.com/api/v2.0/retentions/${RETENTION_ID}/executions" \
  -H 'Content-Type: application/json' -d '{"dry_run":true}'
最佳实践
高可用性
至少将两个 portal/core/jobservice/registry 副本分散部署,并验证 PostgreSQL、Redis 和共享存储本身的故障转移能力。使用 S3 时,设置 persistence.imageChartStorage.type: s3、bucket/region,以及明确的 Registry Pod IAM 身份或 existingSecret。不要在 values 中嵌入长期密钥。IRSA/Pod Identity 需要 Registry 镜像中的 SDK 兼容支持、正确的 ServiceAccount 和范围受限的 S3 权限;仅省略静态密钥并不会自动配置 IAM 角色。
安全加固
使用外部/内部 TLS、OIDC/LDAP、设有过期时间且范围受限的机器人账户、审计日志和补丁管理。根据渲染后的 Pod 标签/容器端口以及所需的 DNS、Core/Registry/Job Service、PostgreSQL/Redis、扫描器 DB 和复制流量来构建 NetworkPolicy。只允许 443 端口的全局策略可能会破坏内部流量和 DNS。密码/MFA 要求应通过身份提供商管理,不要假定 Harbor UI 提供未记载的控制项。
备份策略
协调写入、复制和 GC,在同一个一致的恢复时间点捕获 PostgreSQL、Registry blob、配置、TLS 证书和加密密钥。Helm values 不会备份数据库/镜像;仅使用 S3 版本控制或 aws s3 sync 无法保证一致快照。Secret YAML 只是 Base64 编码,应保存在有访问控制的加密备份中。测试项目/机器人身份验证、按 digest 拉取、签名、策略和扫描结果的恢复。
监控
使用 chart 的 metrics.enabled;若存在 Operator CRD,则可启用 metrics.serviceMonitor.enabled。不要猜测 http-metrics 端口,而应检查生成的 ServiceMonitor/Service 端口。让 Prometheus ServiceMonitor 与命名空间选择器相匹配。监控存储/数据库容量、复制/扫描/GC 失败、队列延迟、Trivy DB 新鲜度,以及证书/机器人账户到期情况。
总结
Harbor 提供功能全面的企业级容器 Registry,主要优势包括:
- 安全性:内置漏洞扫描、镜像签名和 RBAC
- 灵活性:自行托管,可全面控制数据和基础设施
- 隔离网络支持:面向断网环境设计
- 多租户:按项目隔离并提供细粒度访问控制
- 集成能力:通过受支持的 Registry 适配器和 artifact 格式进行复制
何时选择 Harbor
| 场景 | 建议 |
|---|---|
| 隔离网络环境 | Harbor 或其他受支持的自托管 Registry |
| 严格的数据主权要求 | Harbor |
| 多云部署 | Harbor |
| 采用 EKS 的 AWS 原生部署 | 优先考虑 ECR;需要高级功能时使用 Harbor |
| 小团队且运维资源有限 | Docker Hub 或 ECR |
| 有合规要求的企业 | Harbor 或 ECR |
关键要点
- 谨慎规划存储:生产环境使用 S3 兼容存储
- 配置复制:从第一天起设置灾难恢复复制
- 启用扫描:推送时自动扫描,并配置严重级别阈值
- 使用机器人账户:绝不要在 CI/CD 中使用个人凭据
- 实施保留策略:配置垃圾回收和保留策略
- 监控并告警:使用 Prometheus 指标和告警
- 定期备份:数据库备份对灾难恢复至关重要